Project : Room Divider

Project Plans For Room Divider: Available now

Hi Everyone,

I have just completed the woodworking project plans for the Room Divider and are avaiable in my shop. These plans are extremely details and the Room Divider boasts the following:

If you are looking for a Room Divider to separate two living spaces that has style and functionality then this room divider complete woodworking plans are for you. 

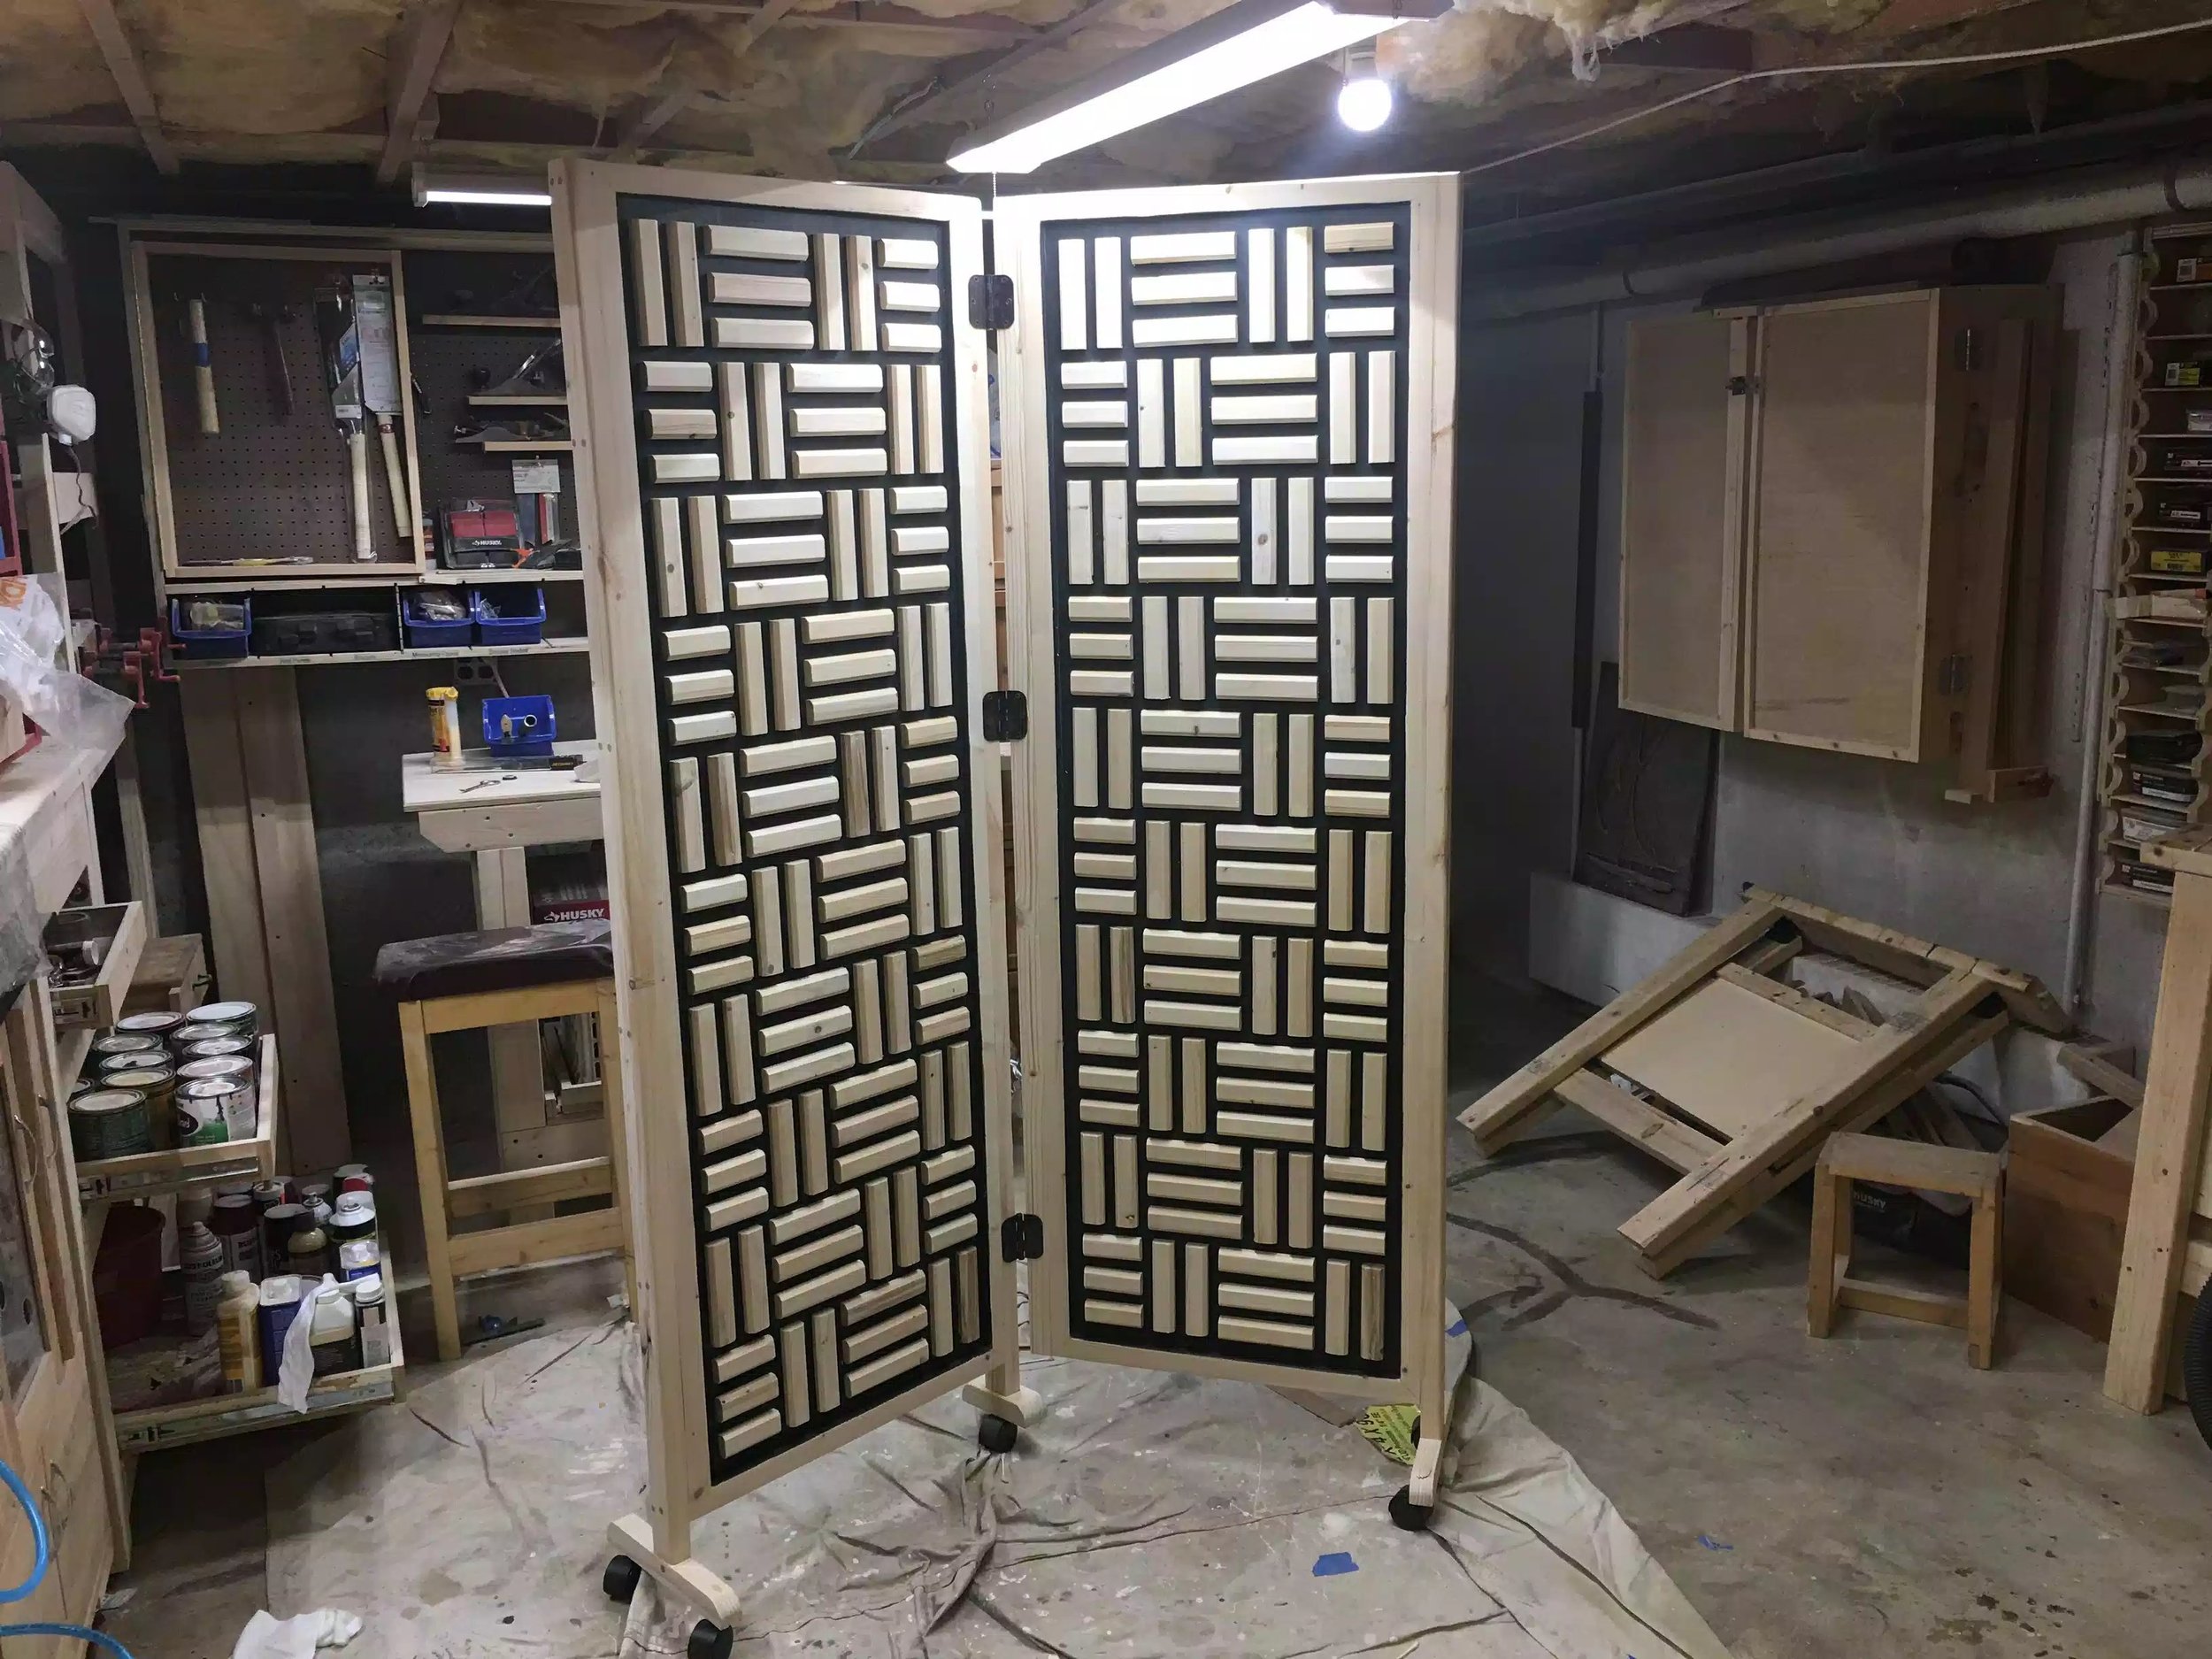
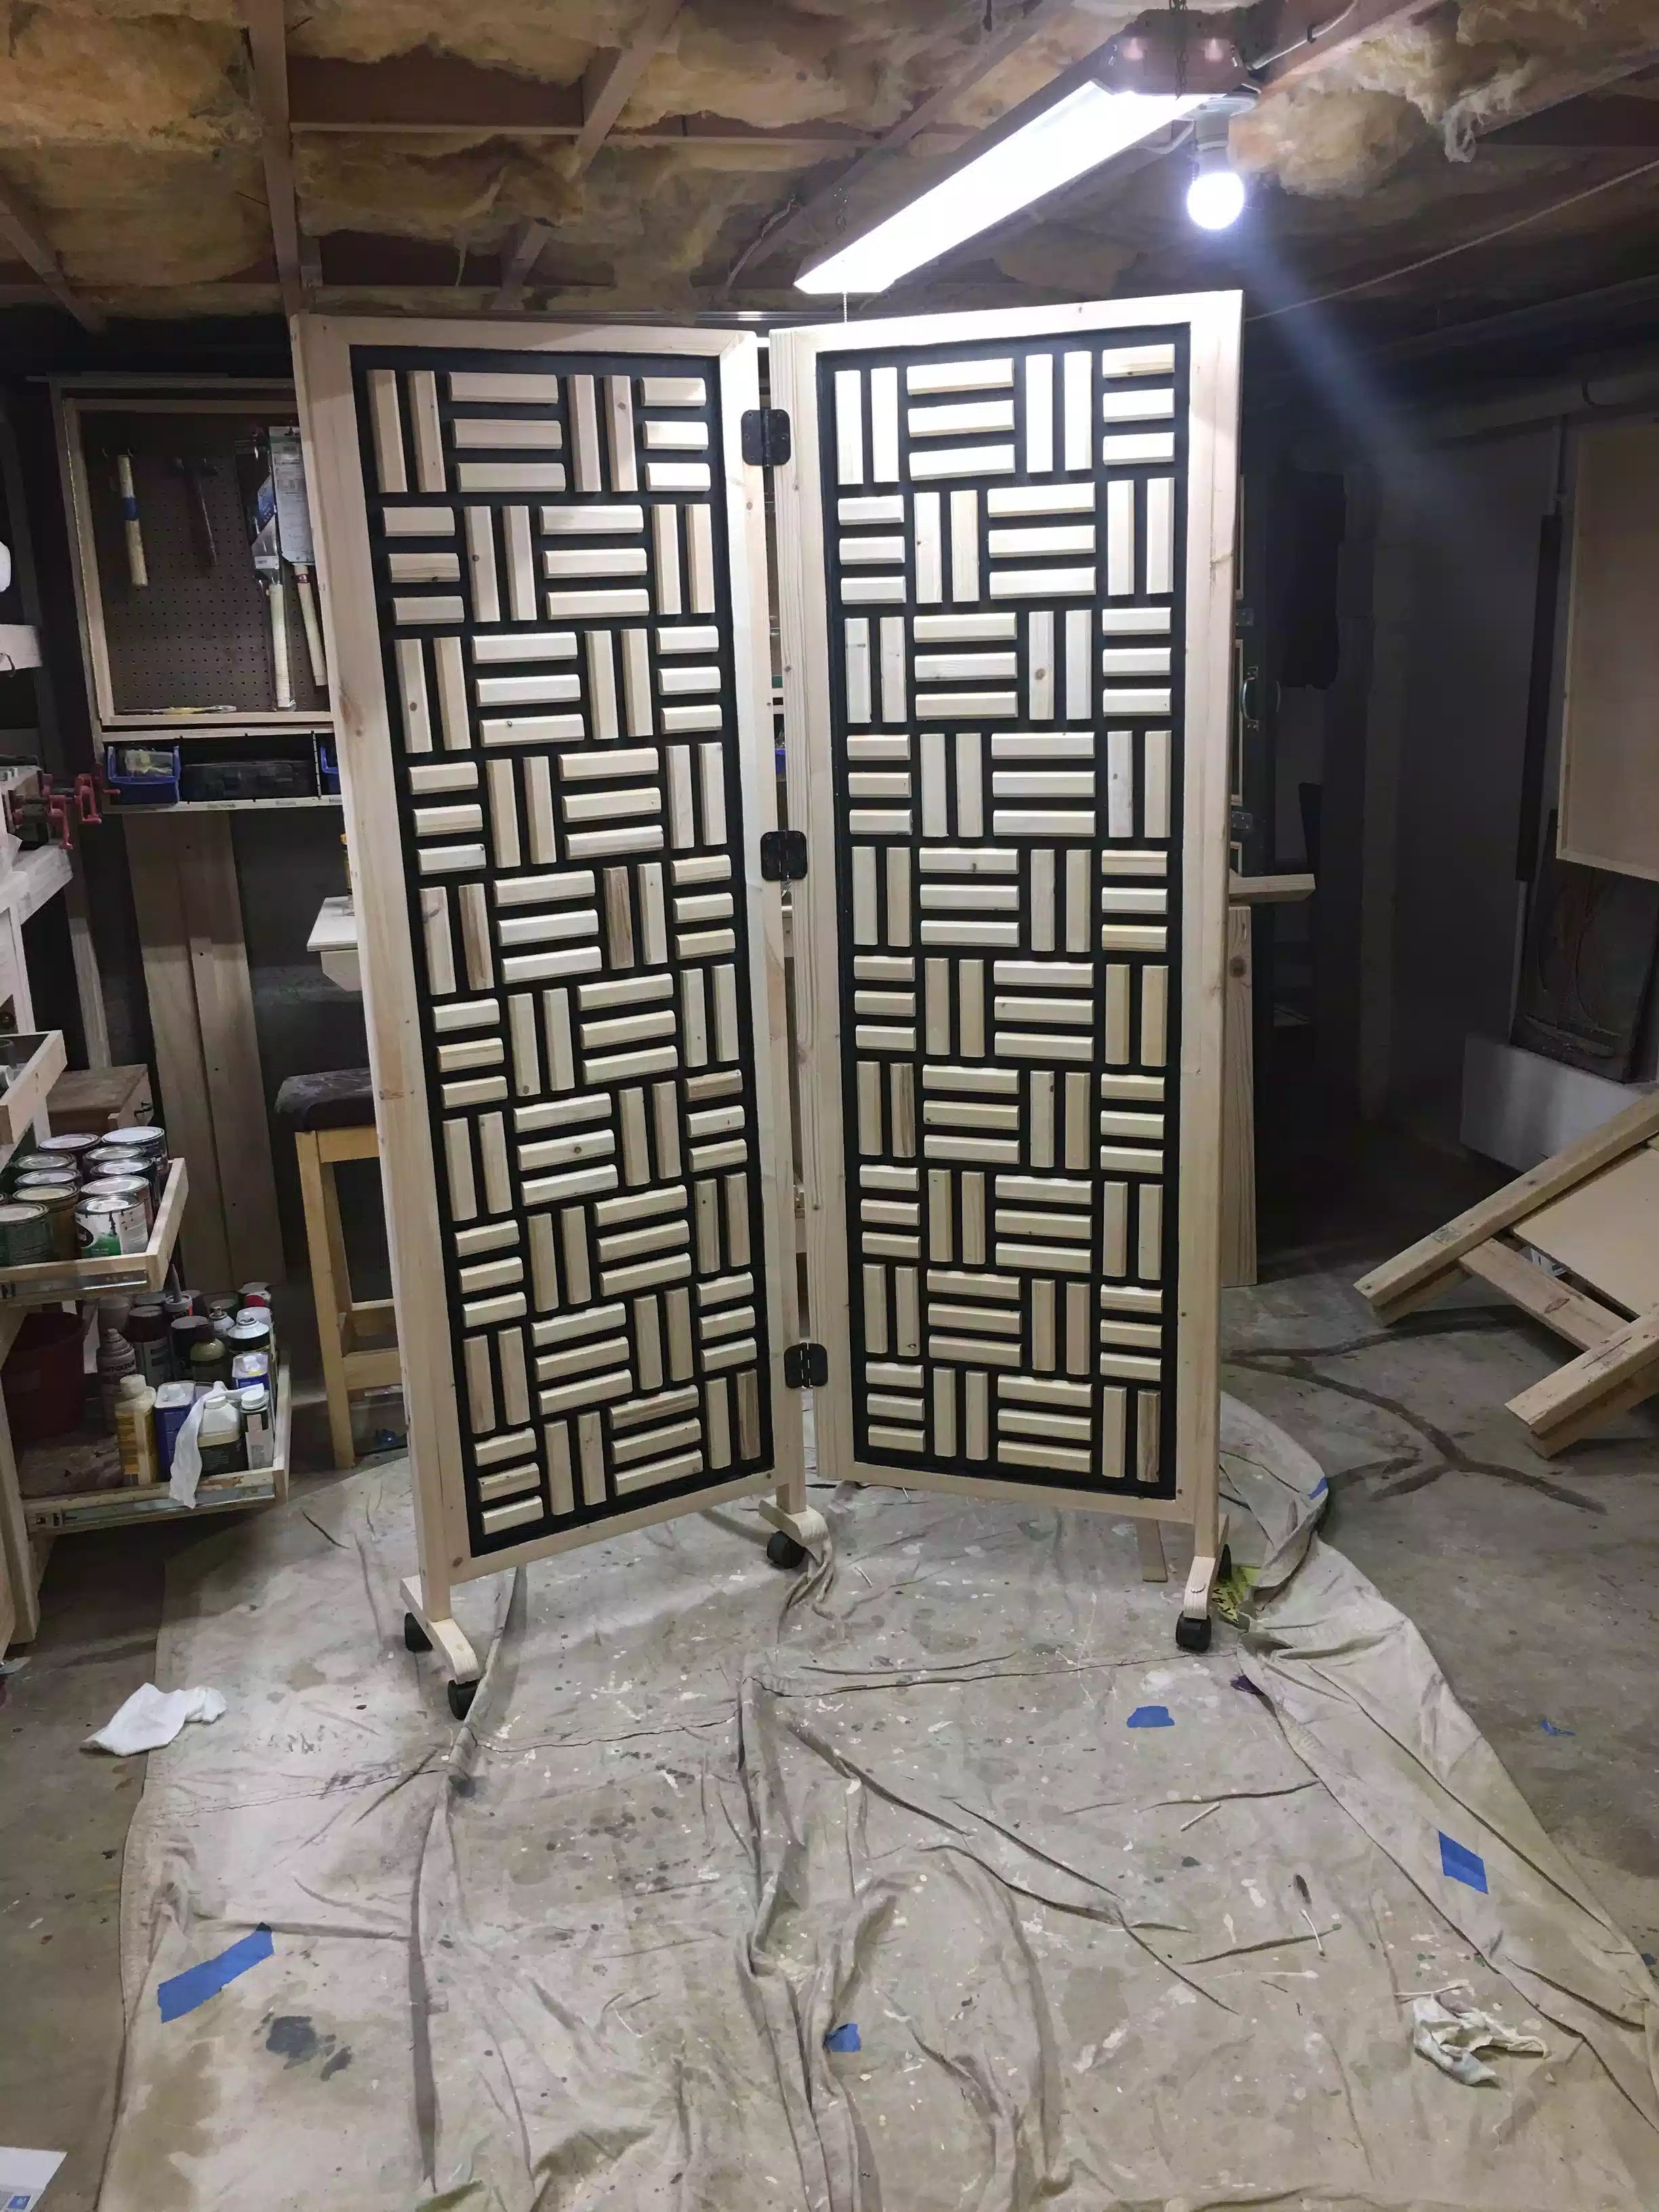
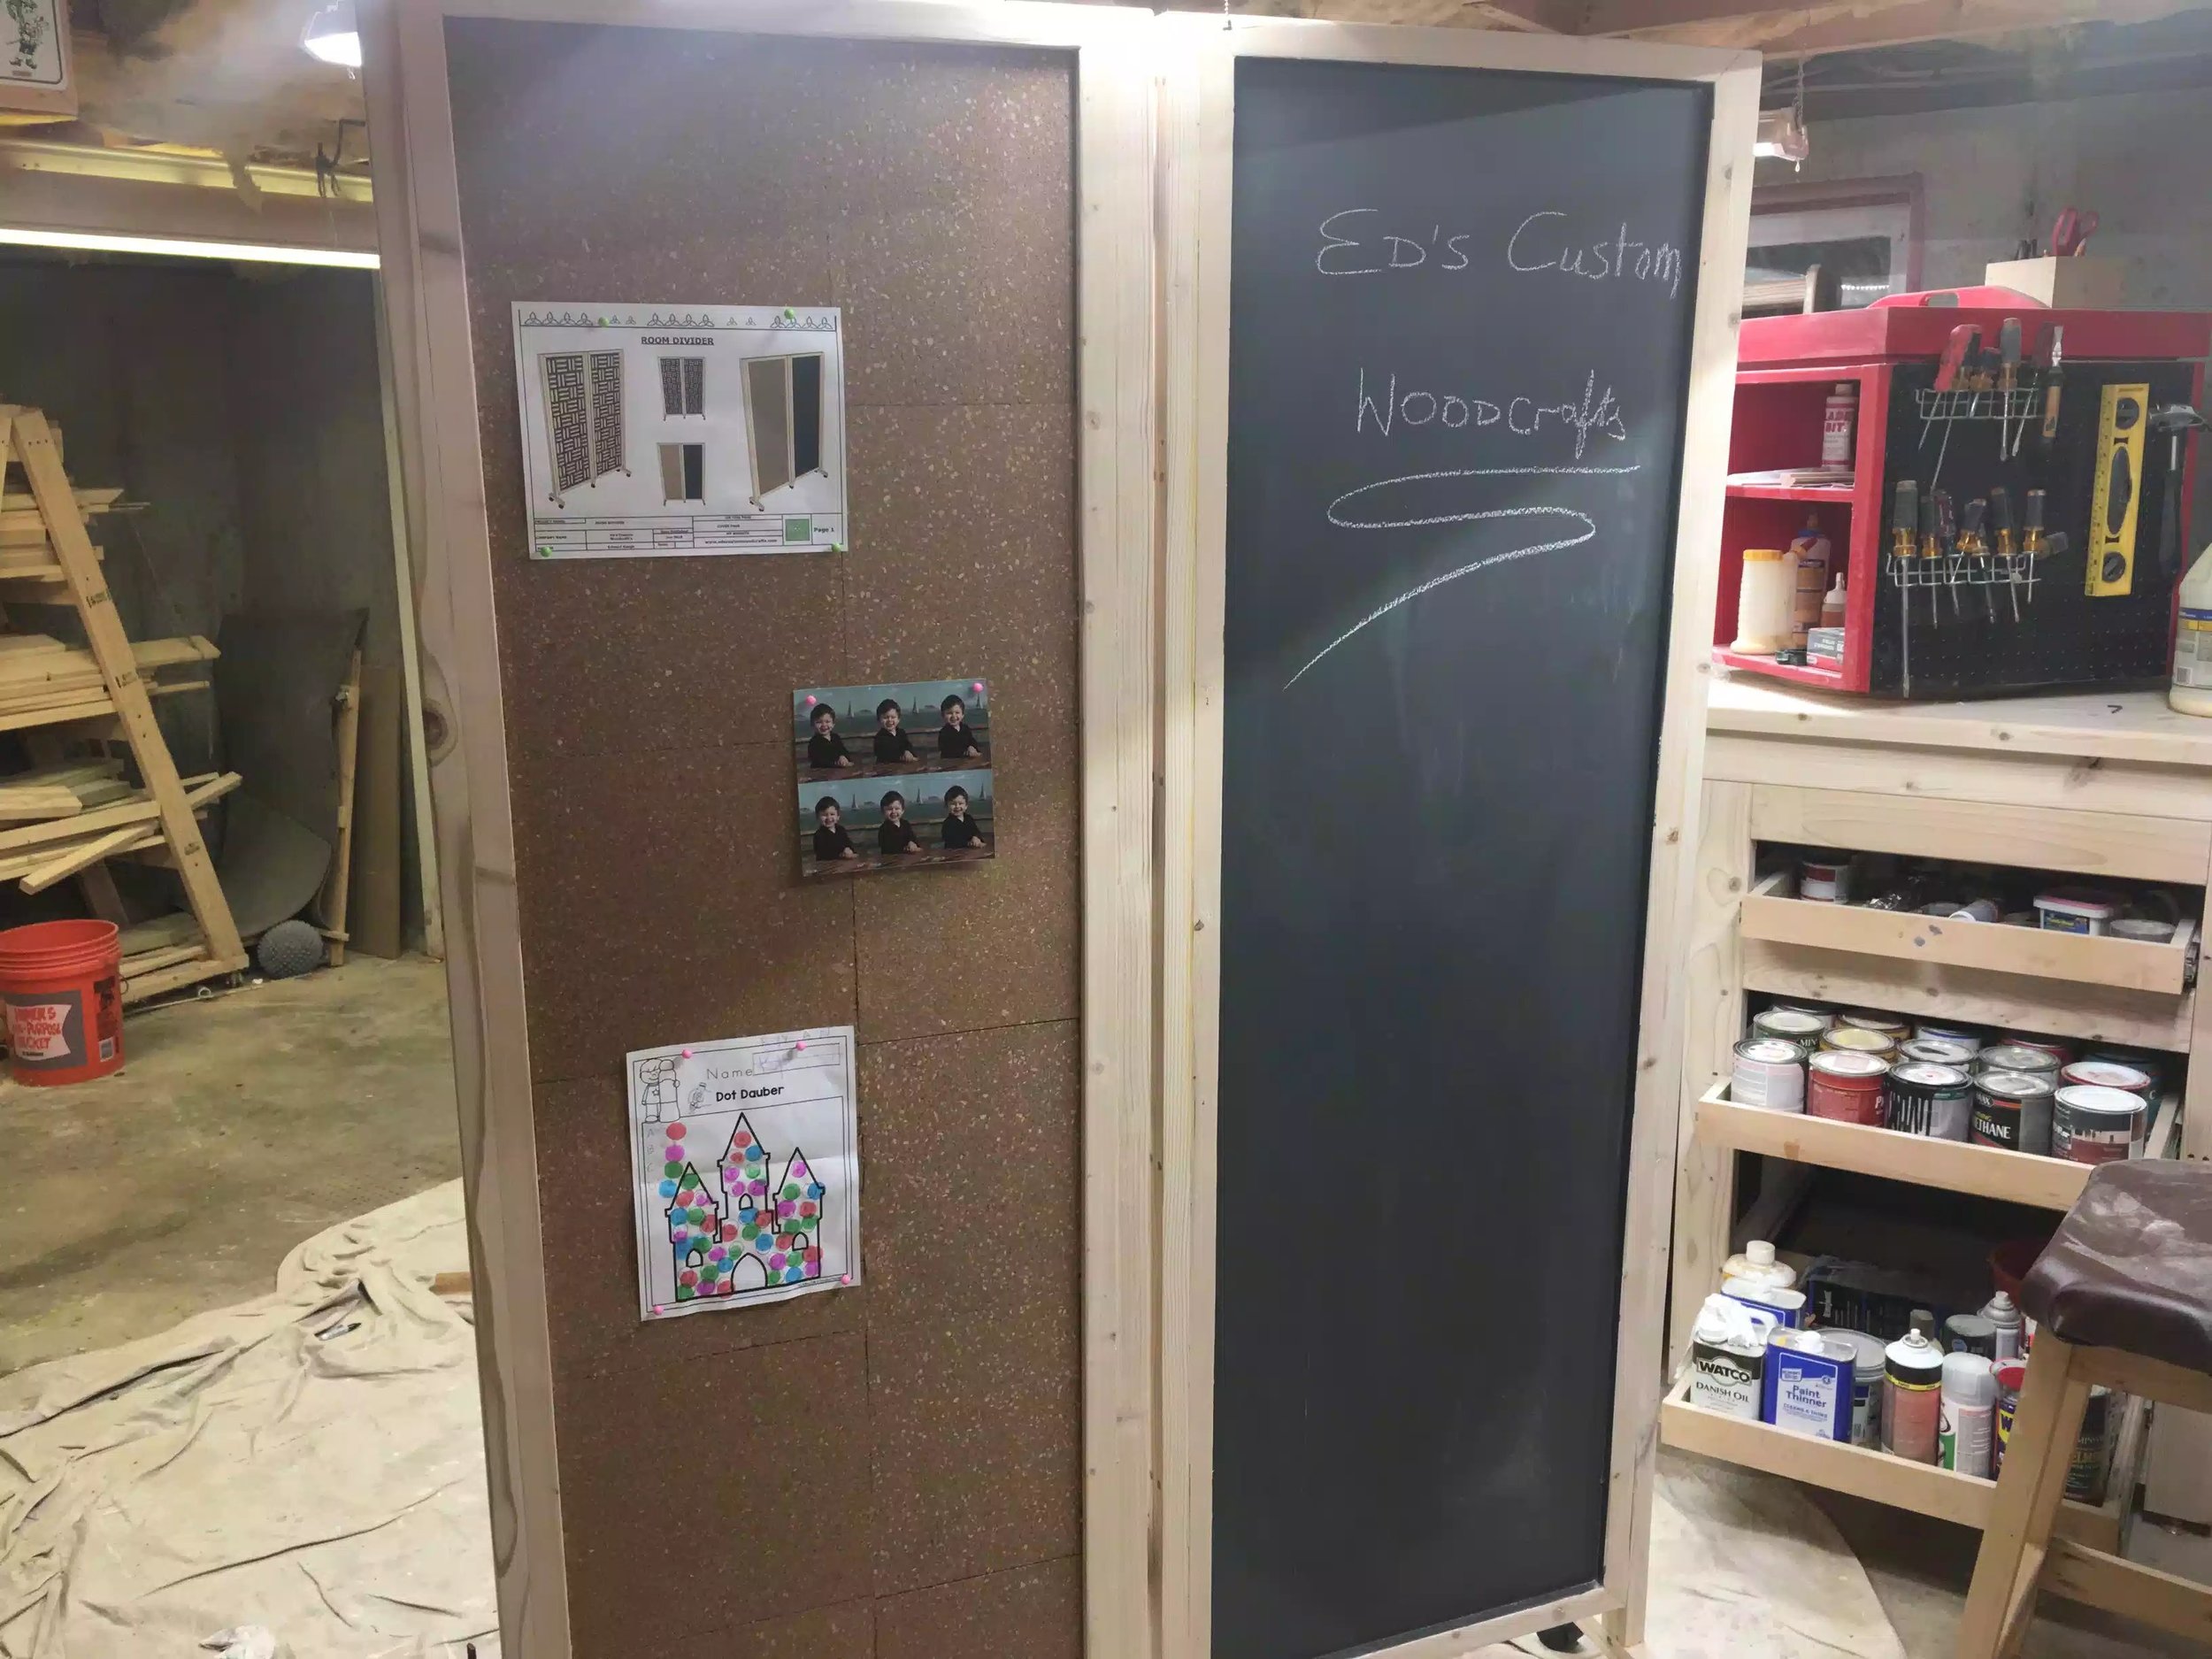
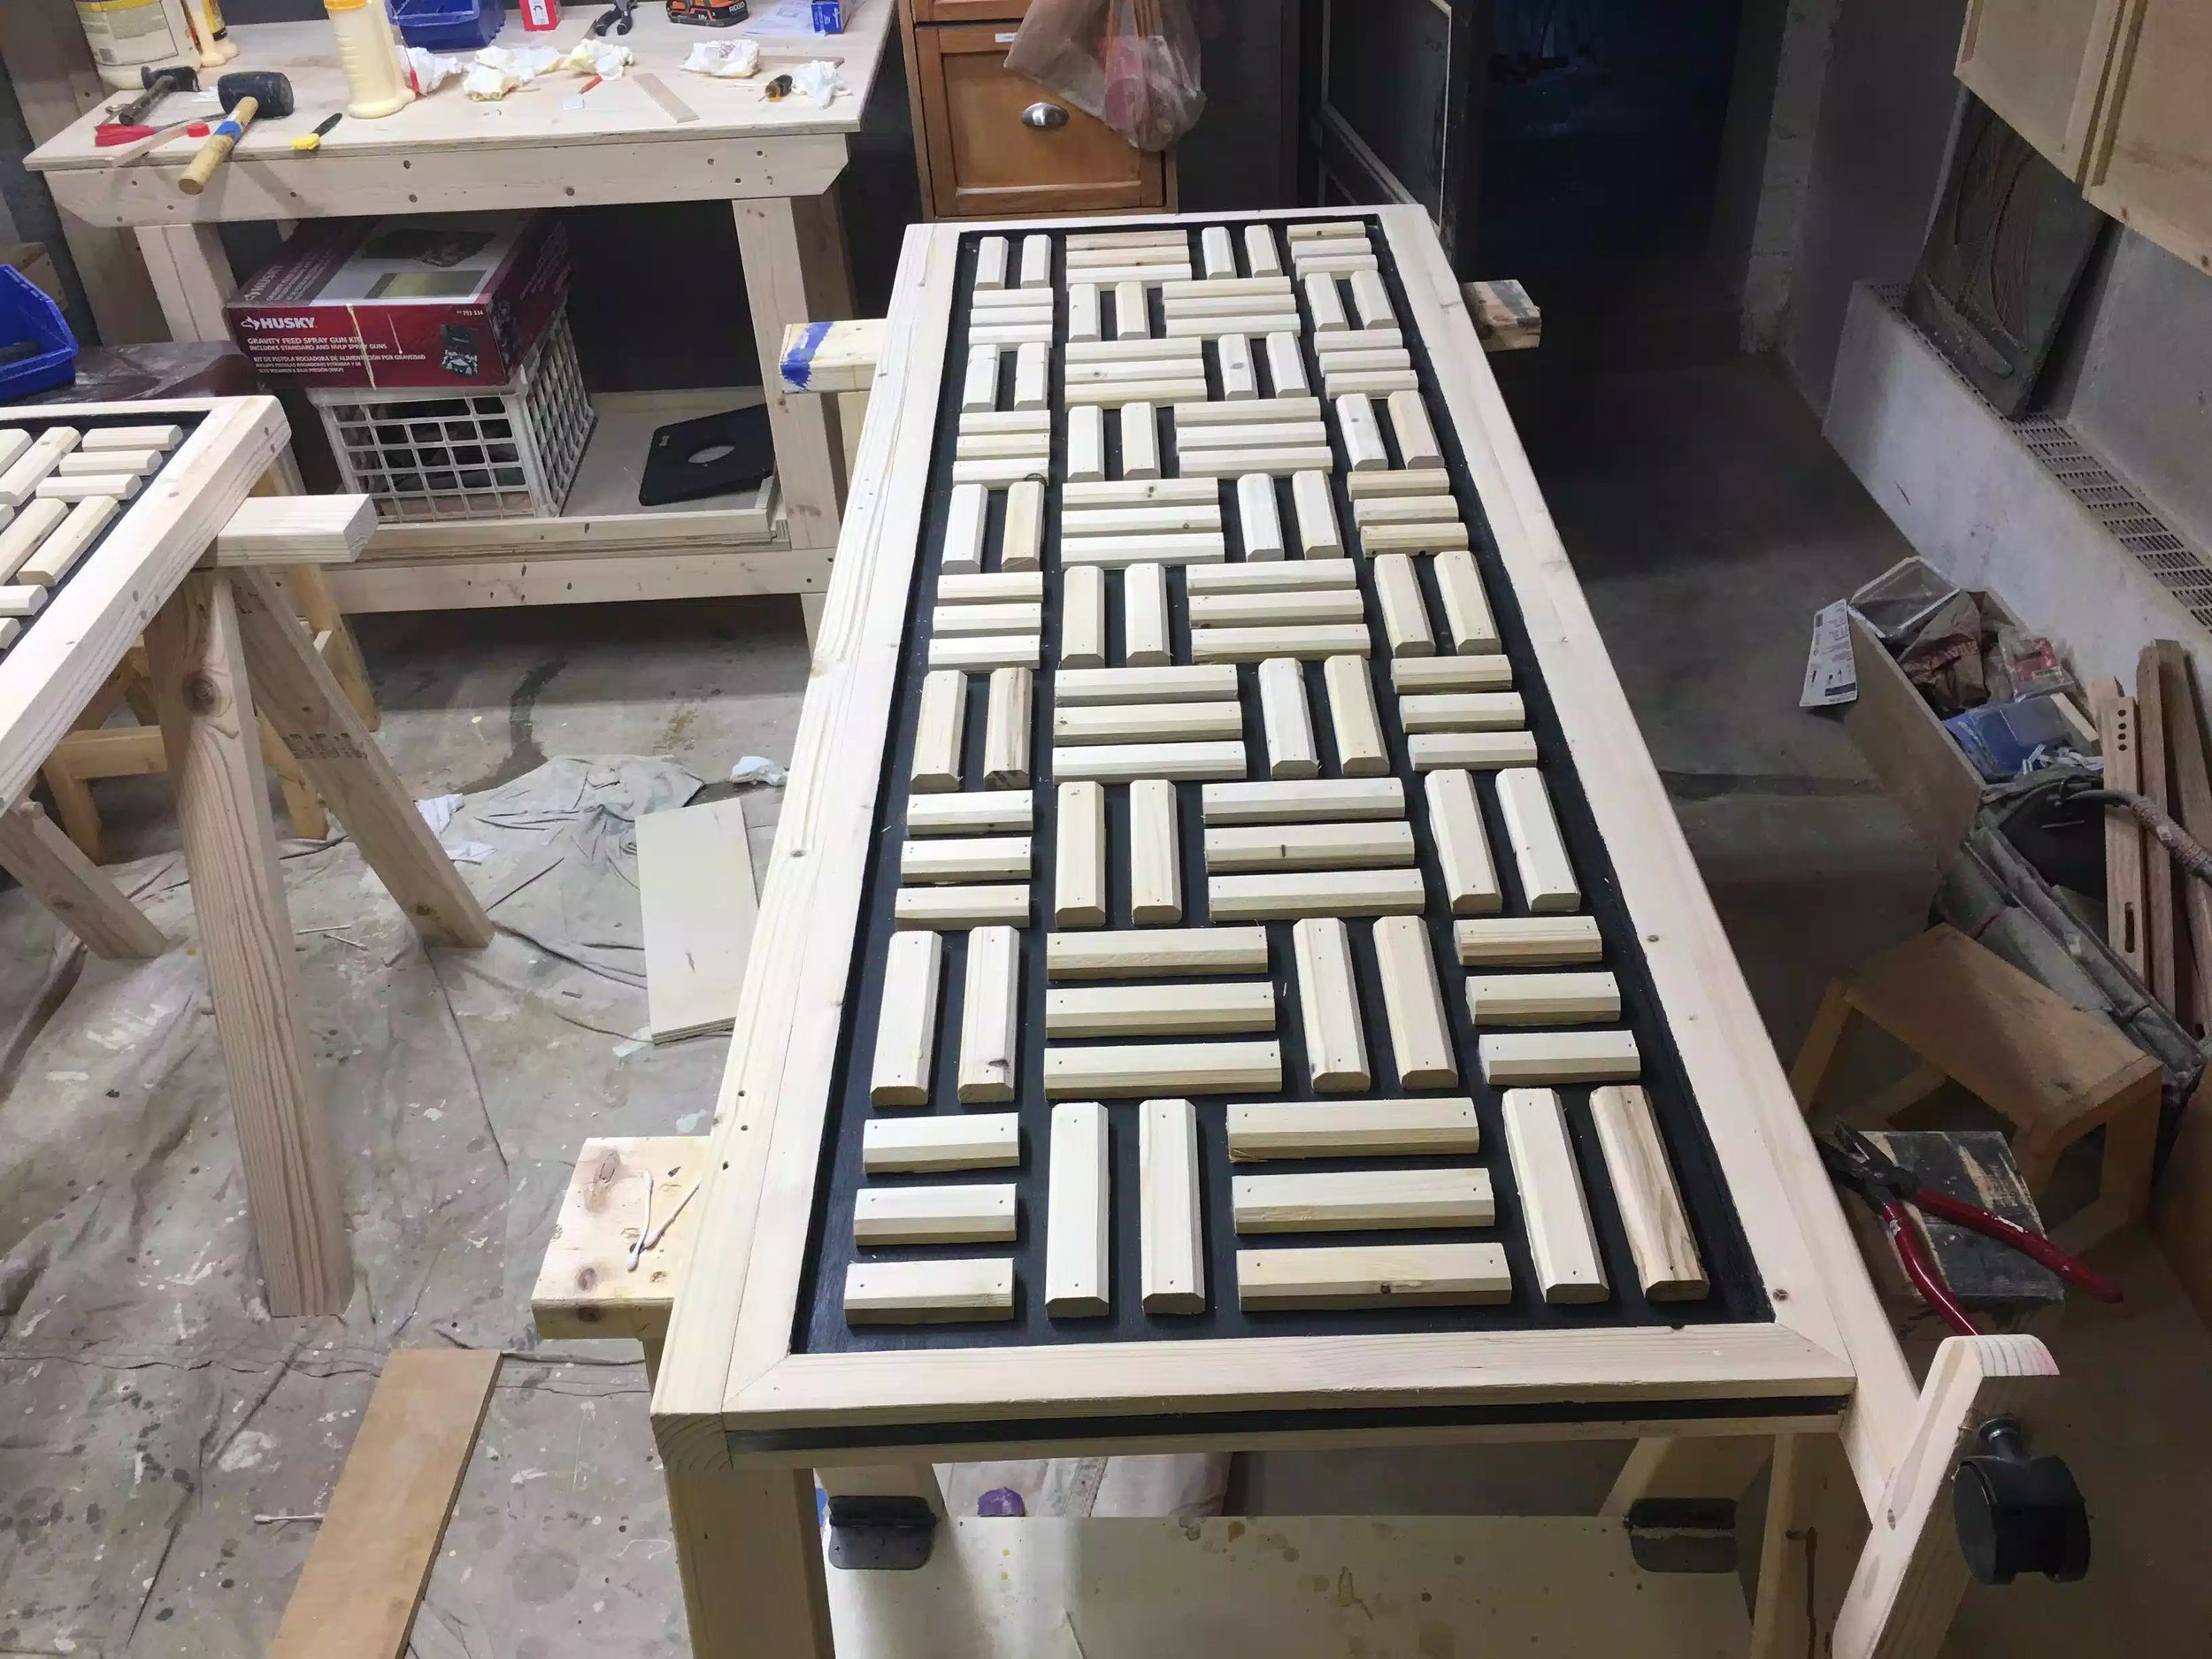
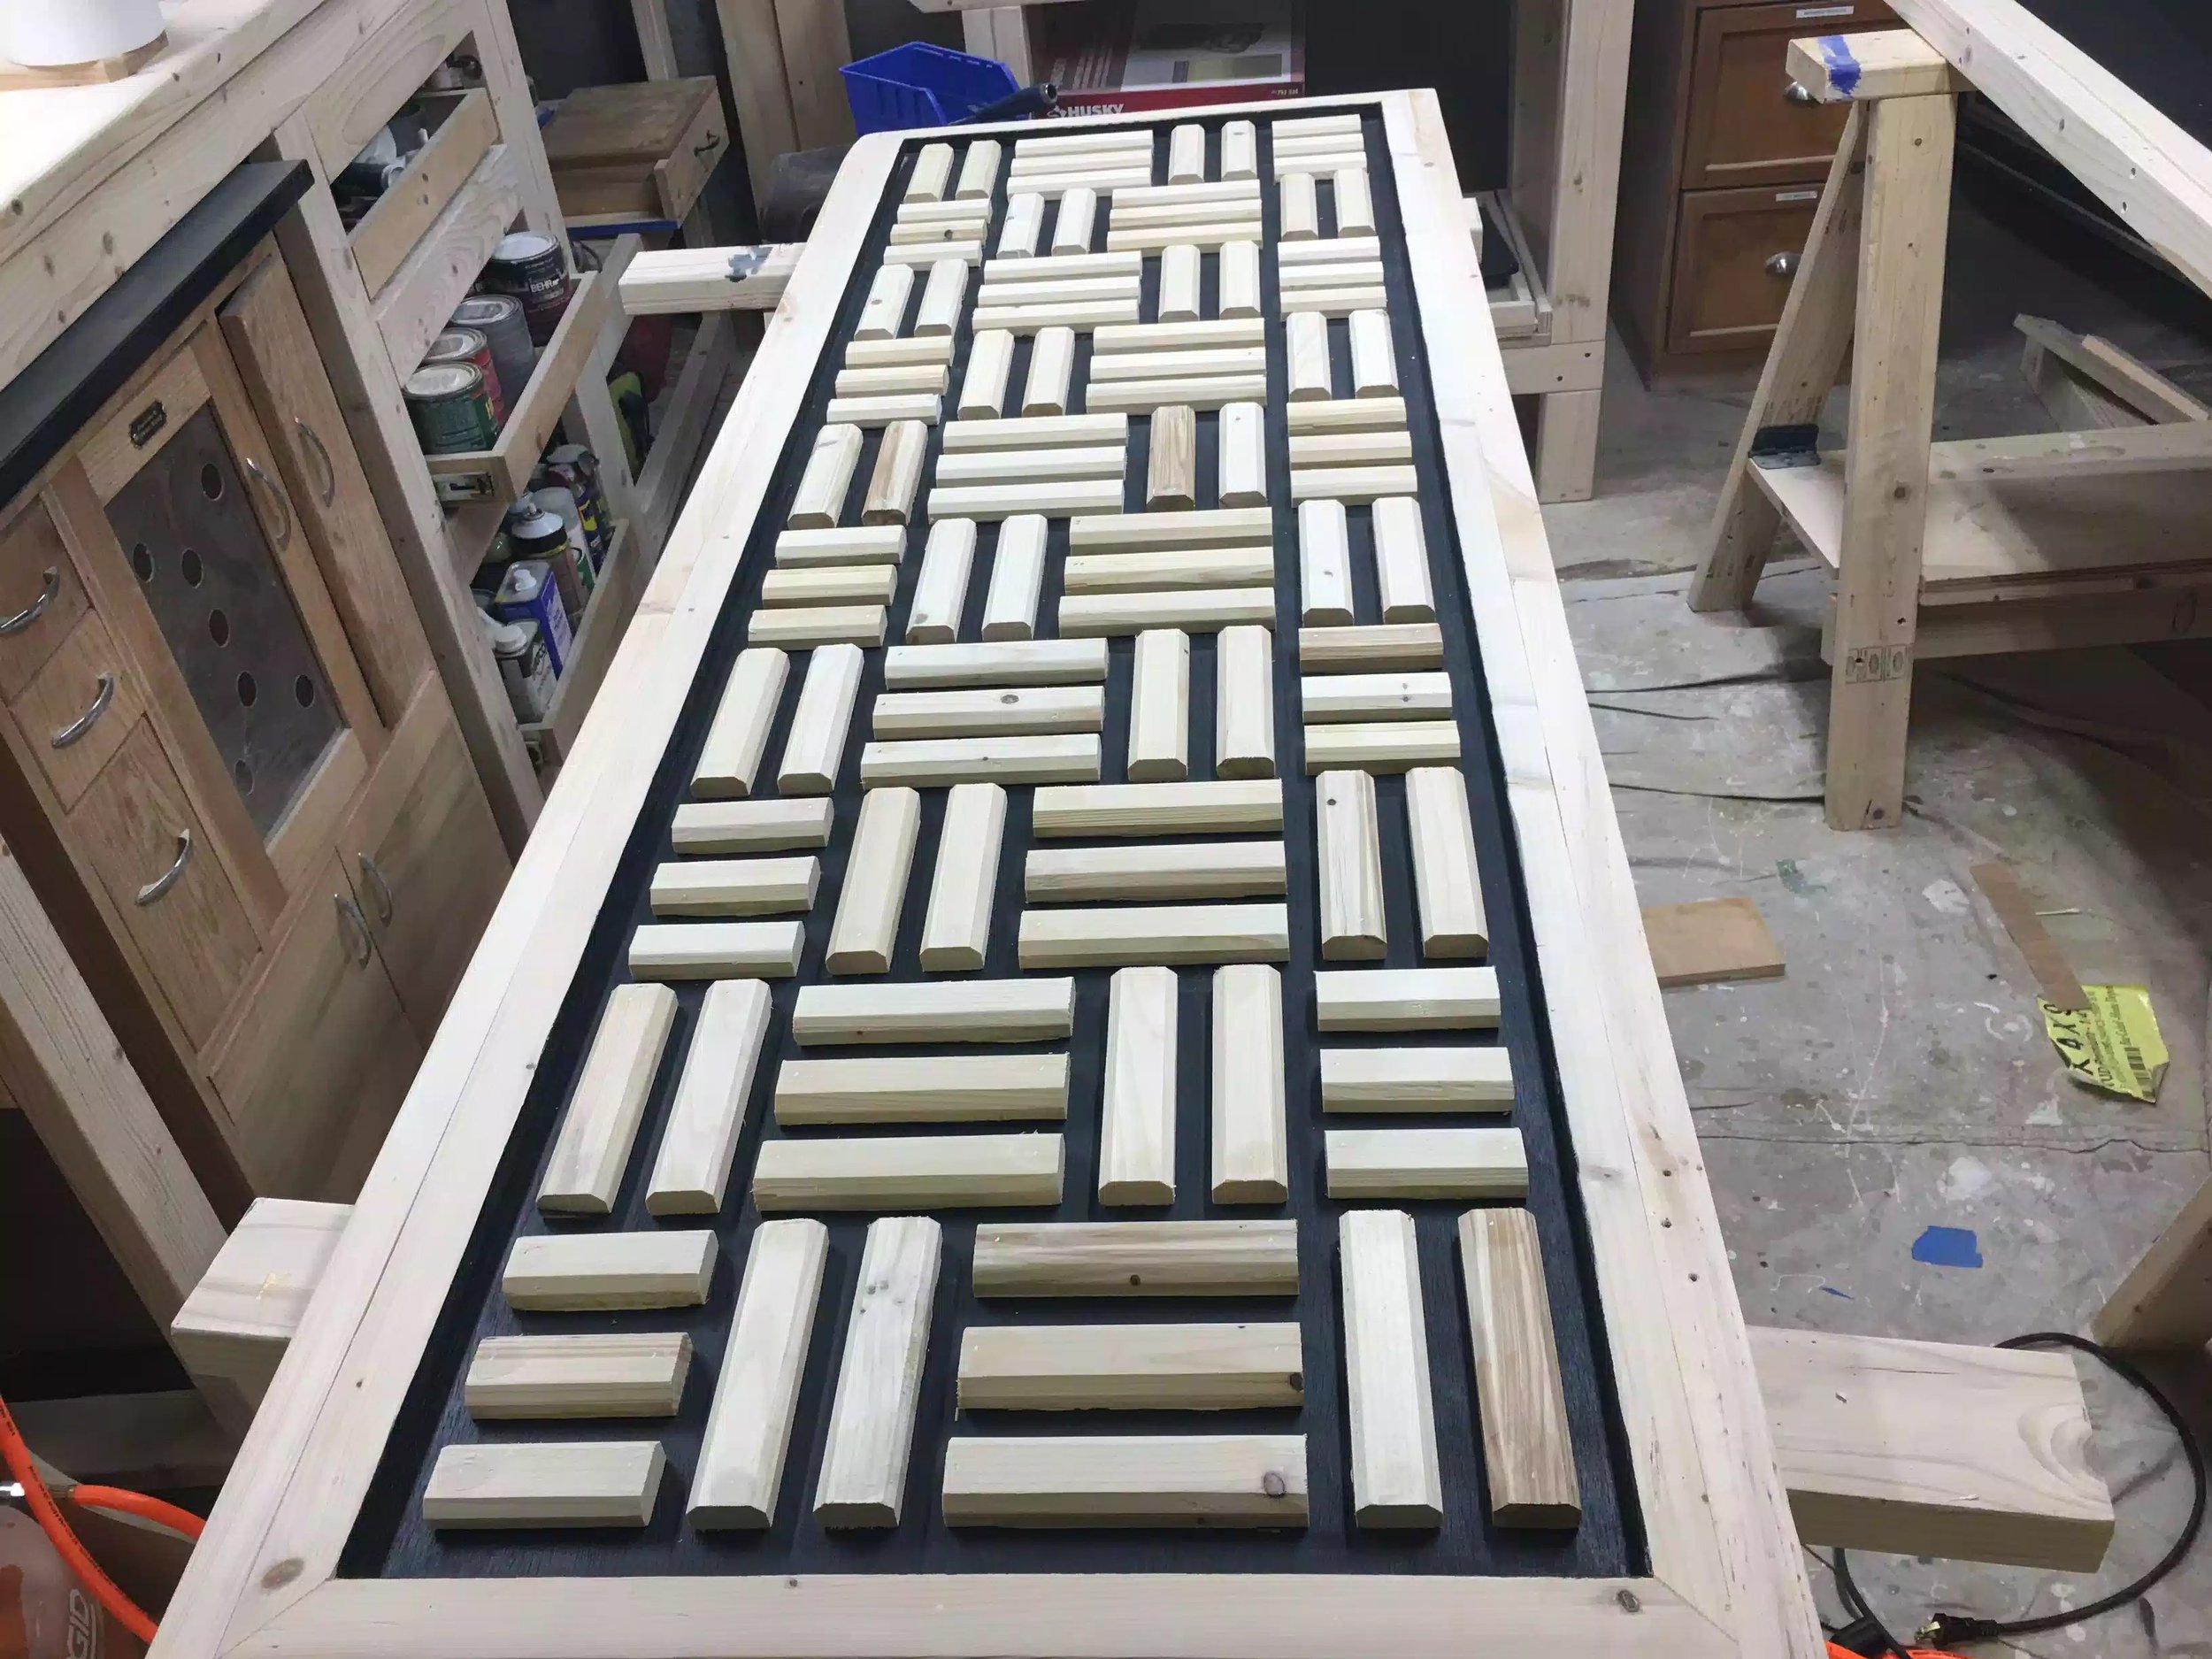
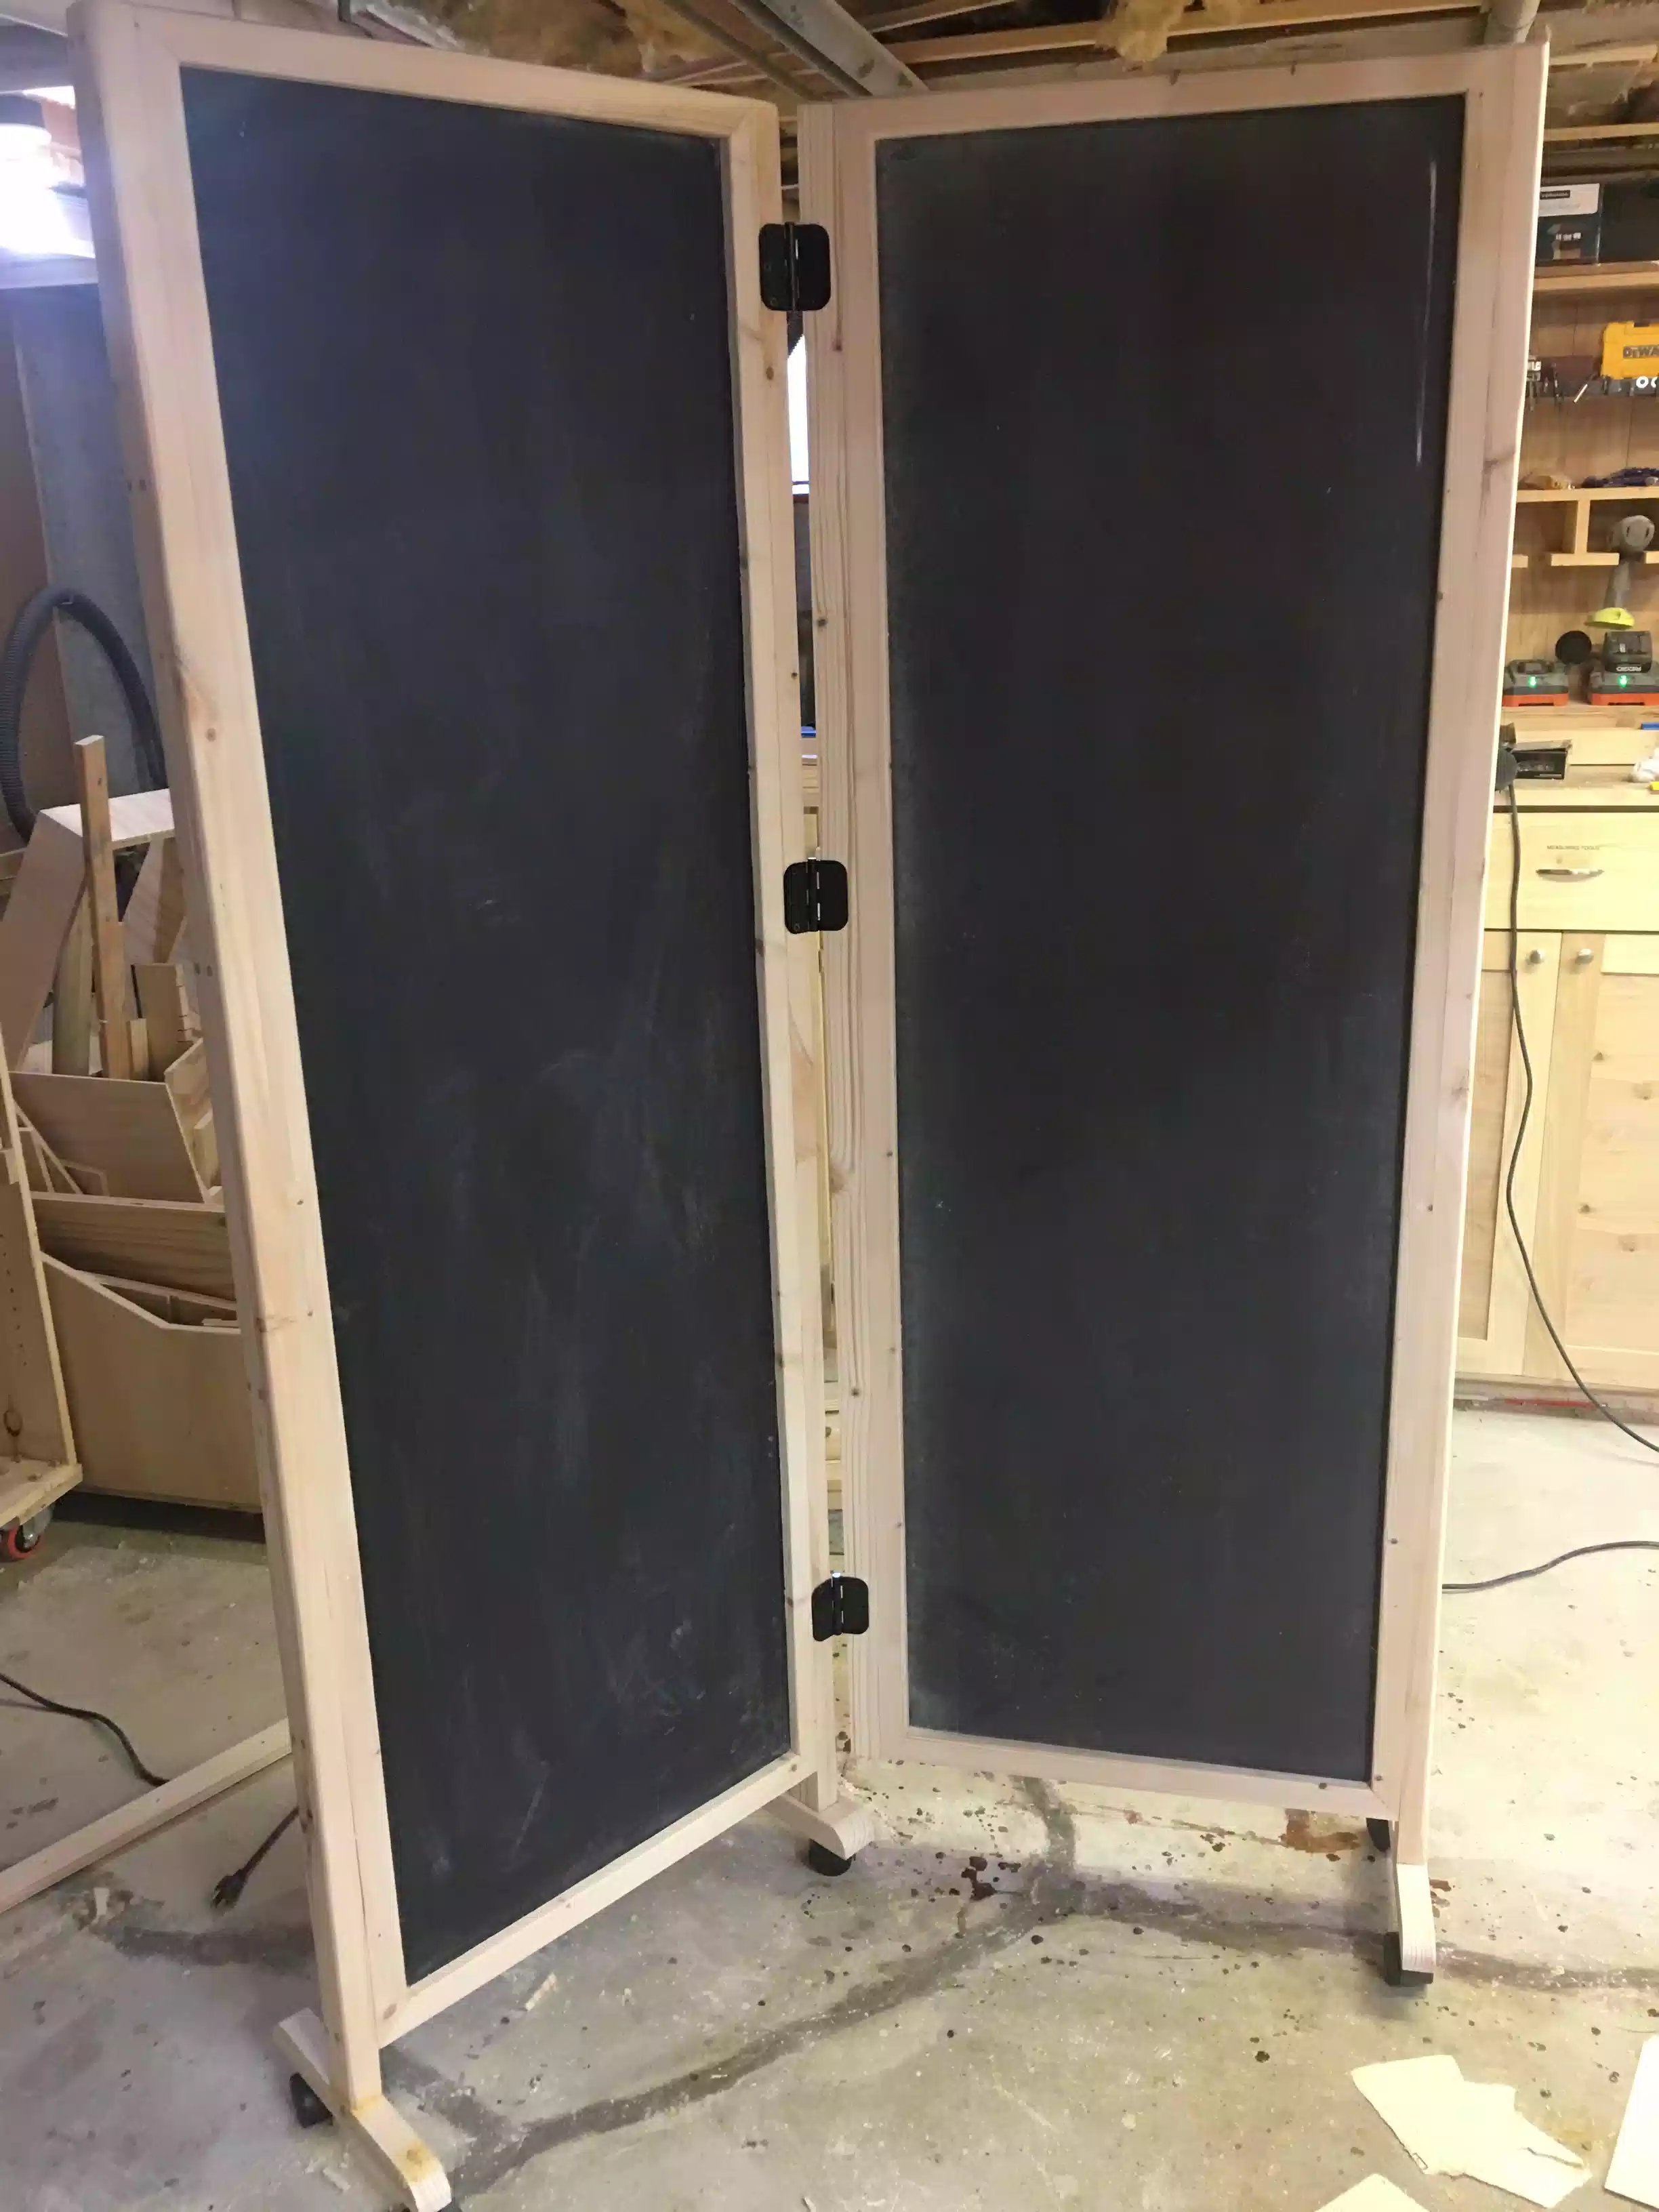
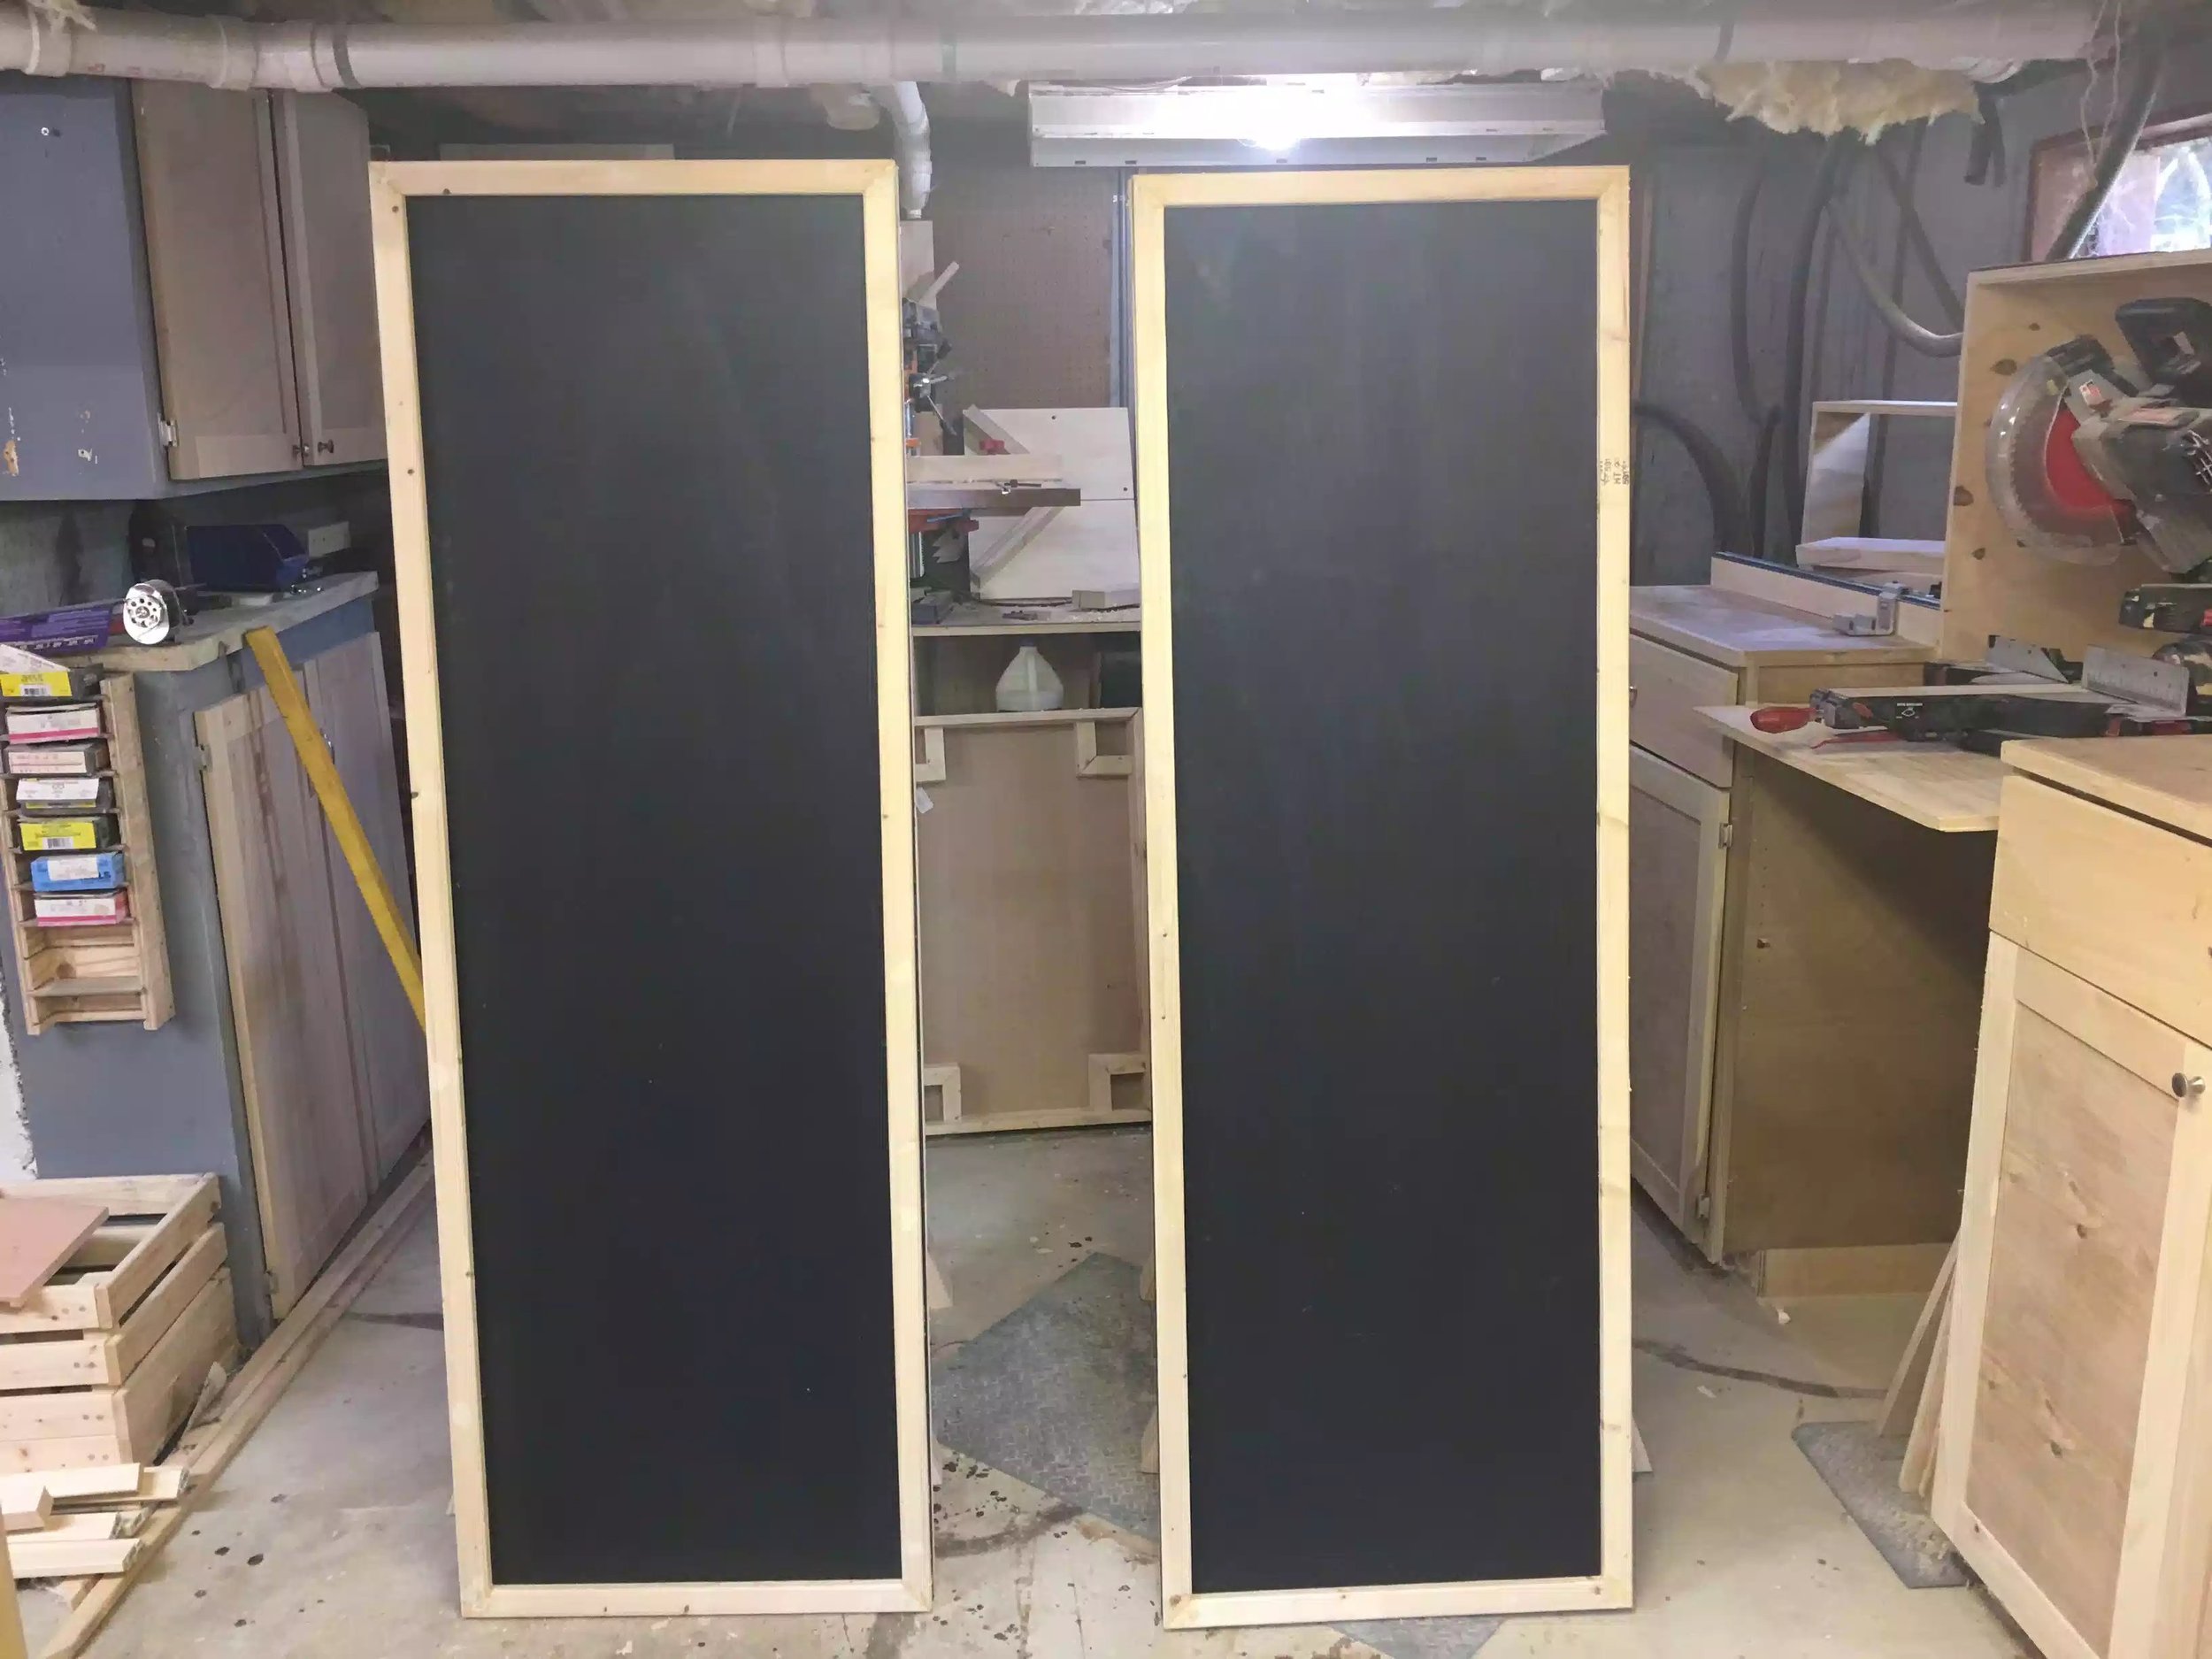
The Room Divider has a one of kind herringbone wooden pattern on the front and also has a cork-board and chalkboard surfaces on the back, ideal for hanging notices or writing weekly family notes on the back side. Since I have 2 young children it works great for hanging all their school art or perfect for hanging seasonal card such as Christmas or Thanksgiving. If you are a work from home parent which is why I made it, the herringbone wood pattern makes for a eye catching backdrop to them conference & video calls that never seem to stop occurring.

THE ROOM DIVIDER HAS THE FOLLOWING FEATURES:

  • Stylish wooden herringbone pattern on the front
  • A chalk-board & cork board sections on the back side
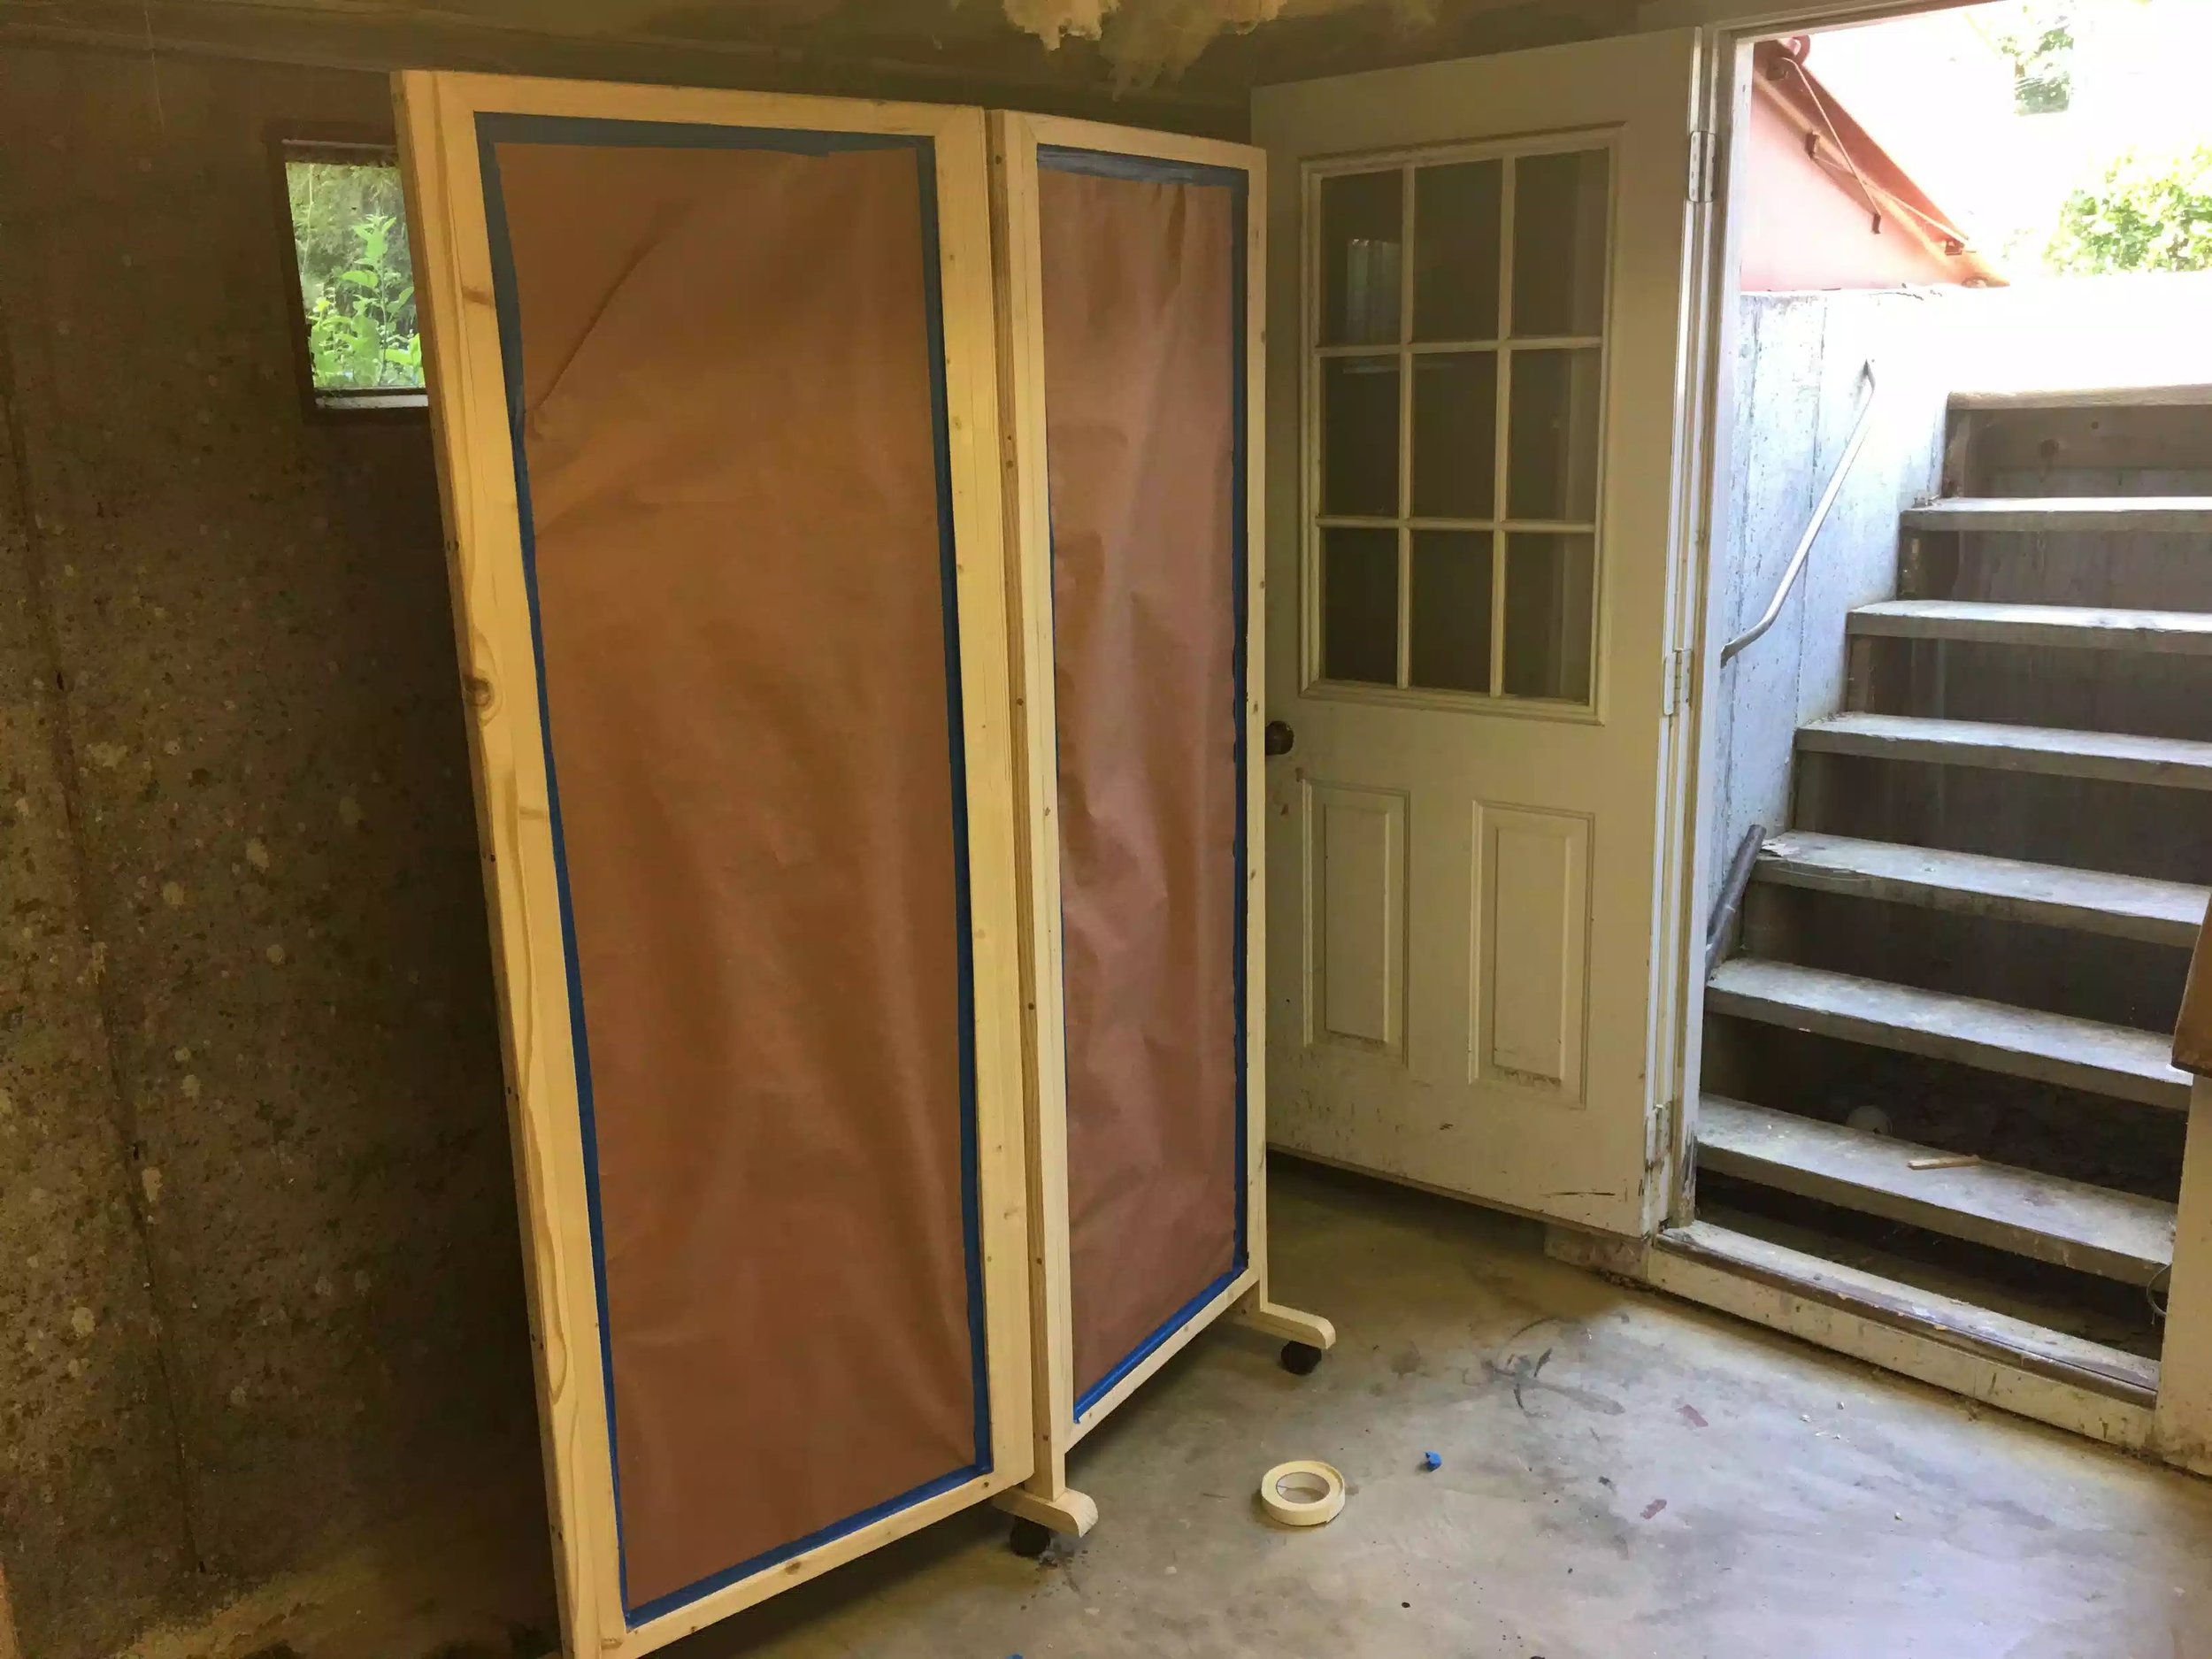
  • The divider is also portable and moves on 6 castors

MY PLANS INCLUDE:

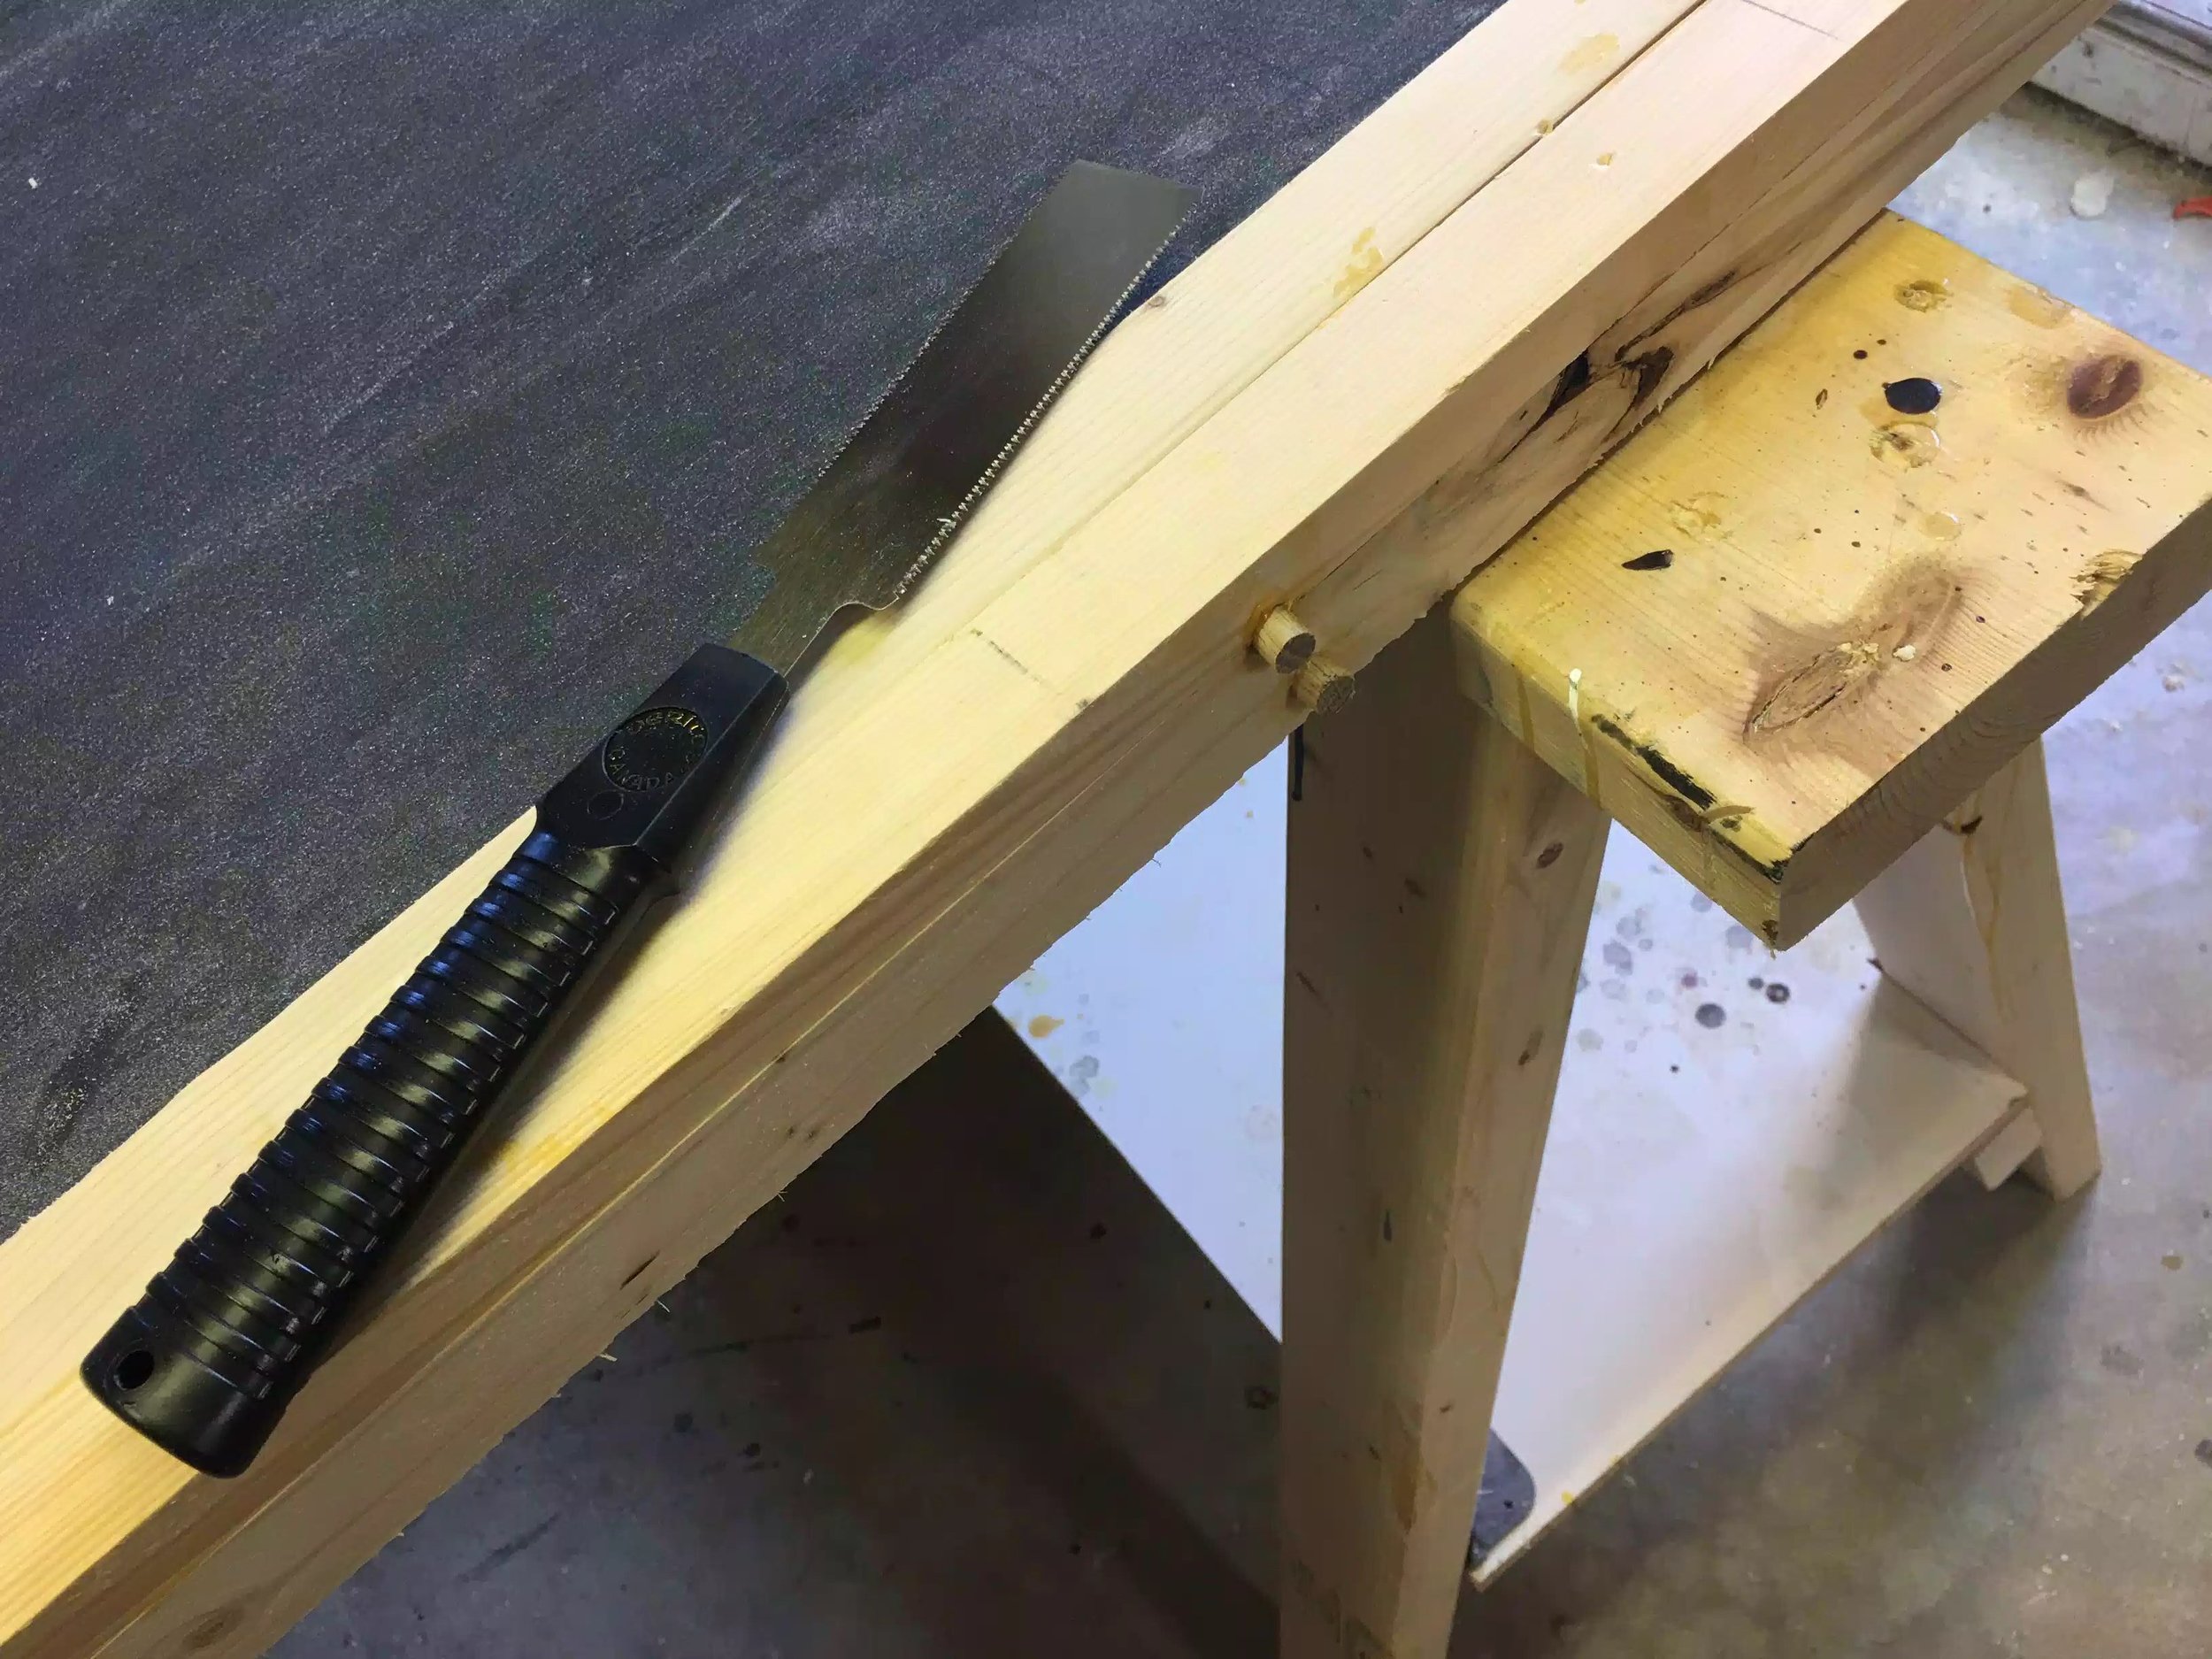
  • Step by step color plans that include diagrams and written instructions for building this.
  • A cut-list for every component in the Divider
  • A tool list of what tools you need for building this project.
  • A written step by step document that details the various parts of the project.
  • I also documented every phase on the project in my blog that you can see real project pictures.

ROOM DIVIDER: ALL FINISHED

So after almost 6 weeks the room divider is all finished and was installed in the home office yesterday. I was hoping that I just needed to install the divider without any problems, but in keeping with this project it had one more hurdle to throw my way. My design had one flaw with it and that was I wanted the divider to firstly fit in the door opening, but since I had to add more wood to frame when attaching the each panel to each other using the butt hinges it through my overall width off so now it would not fit into the space.

Secondly the leg design although was very strong interfered with the panel butting up nicely to the wall so I needed to change the design and method for the room divider to still maintain its portability.

LEG DESIGN CHANGE

As I mentioned earlier I needed to change the foot design on the dividers because I could not install the dividers flush up to the wall so Instead of using 2"x2" material with the mortise and tenon joint to secure the foot to the leg as seen below. I changed it by using 2"x4"s and added a different kind of caster to them.

Here was the oroginal foot design with the mortise & tenon joint, I also used castor wheels that had stems that went into the leg. 

Here was the oroginal foot design with the mortise & tenon joint, I also used castor wheels that had stems that went into the leg.


NEW LEG DESIGN

This foot design was very different because it didn't stem from the bottom of the leg, instead i used 3 pieces of 2x4x12 and cut a dado to wrap around the bottom of the panel and then I used different castors, these castors didn't have a stem so all I had to do was screw the castors into the feet.I also made one more change my original legs had on 5 castors but the revised legs have six.

Here you can see the new leg assembly, you can see the notch that I cut into the 2x4, I also chamfered the 2x4 to match the herringbone pattern.

Here you can see the new leg assembly, you can see the notch that I cut into the 2x4, I also chamfered the 2x4 to match the herringbone pattern.

Here is a viiew from the top down, I didnt add the casters yet, I wanted to determine if the new design could balance the dividers and it did.

Here is a viiew from the top down, I didnt add the casters yet, I wanted to determine if the new design could balance the dividers and it did.

I didn't want to take any chances with my kids banging into the panels or pushing it over on top of all my computers, I decided to secure the dividers to the door frames. I basically used some loop hooks and chain that way if I need to move the divider I can just unhook it from the door frames

Here is a picture of the chains securing the room divider

Here is a picture of the chains securing the room divider

ROOM DIVIDER : IN ITS NEW HOME

Finally the project is complete,this project had a lot of things that I liked and a whole lot more challenges that I didn't even see coming, but after everything is said and done. I love the divider, its definitely one of a kind (in a good way). My wife loves it as it provides that much needed element of enclosure that lets her have a productive work day.

Below are some pictures of the divider in its home separating the kitchen from the office. The side that has the wood pattern is the office and the back side is where our kitchen is as my kids can use the chalk board as is already on evident.

I hope you have enjoyed this project blog and if you feel like you want to undertake this project I will have plans available soon.

Until next time take care.

Office Side, I really like the black back drop as it makes the pattern pop

Office Side, I really like the black back drop as it makes the pattern pop

image-2031.jpeg
Here you can see the chalk-board and cork notice board, this will provide a nice size area  to hang family art work.

Here you can see the chalk-board and cork notice board, this will provide a nice size area  to hang family art work.

A little close up of the back side of the divider

A little close up of the back side of the divider

NEXT: NEW PROJECT SAND & WATER TABLE

ROOM DIVIDER: DAY 14

Today was a very productive day that had its ups and downs, some aspect of today I was very happy at and some I wasn't happy at all with. I can almost say that the project is completed except for the finishing stage where I use my HVLP sprayer. Since I have a lot to go through I will start by summarizing what I completed below.

WHAT I GOT DONE TODAY

  • Chalk-board paint completed and dried
  • Cork board prepping
  • Installing the cork board
  • My Opinions of the cork board
  • Room Divider construction complete
  • Applying finish preparation

CHALK BOARD COMPLETED

After using the Rustoleum chalk board paint yesterday, I gave it a day to completely dry even though the can says 2-4 hours I wanted to make sure as my basement is very humid and usually the drying time on any project in my shop usually takes a lot longer to dry. 

I am very please at how the paint came out and highly recommend the Rustoleum brand. I needed to condition the paint because the directions on the paint can instructed me to smear chalk all over the painted surface and so that is what I did below.

I needed to condition the painted surface with chalk so that's what I did.

I needed to condition the painted surface with chalk so that's what I did.

Needless to say I was extremely happy at how the chalk board paint came out, and my kids and the rest of the family will have a lot of use with this divider.

Needless to say I was extremely happy at how the chalk board paint came out, and my kids and the rest of the family will have a lot of use with this divider.

CORK BOARD PREPARATION

I needed to complete some preparation on the panel before I could add the cork board

  • I added some painters tape around the outside of the area that was receiving the cork board, because I was using a very high strength spray adhesive I didn't want to get any adheive on the elgs and face frames as these surfaces were going to be receing a poly based finish and well adhesive would not blend well with this.
I have used a lot of painters tape in this project , here you can see the outside edges all covered and it worked a charm.

I have used a lot of painters tape in this project , here you can see the outside edges all covered and it worked a charm.

  • I also needed to prep the cork board tiles, the tiles came in 12" x 12" pieces so I first laid them on the panel to determine what pieces needed to be cut to size and the order in which they were to be applied to the panel.
Here is the dry fit all completed, all the tiles have been cut and sized to fit inside the face frame. As you can see I had a mishap with one of the panels, it tore badly as I was cutting it so I needed to do a patch. The cork board that I purchased…

Here is the dry fit all completed, all the tiles have been cut and sized to fit inside the face frame. As you can see I had a mishap with one of the panels, it tore badly as I was cutting it so I needed to do a patch. The cork board that I purchased was not great.

Here are the instruments I used to cut the cork board, box cutter with a new blade in it, a straight edge used to guide the blade, measuring tape and marker. This worked OK.

Here are the instruments I used to cut the cork board, box cutter with a new blade in it, a straight edge used to guide the blade, measuring tape and marker. This worked OK.

All cut

All cut

  • After cutting all the tiles to final size I laid them out on my out-feed table and applied the 3M -90 spray adhesive this product is awesome, but care is needed in lining all the tiles up especially on a project this size. I also needed to apply the adhesive on the plywood panel as well so as to ensure a good bond when the tiles are placed.
Here you can see the cork board tiles all laid out on my out-feed table ready to receive the spray adhesive

Here you can see the cork board tiles all laid out on my out-feed table ready to receive the spray adhesive

Spray adhesive all applied.

Spray adhesive all applied.

CORK BOARD INSTALL

After applying the spray adhesive I had roughly 10 minutes to apply the tiles to the plywood panel because that is how long optimum adhesion can take place. So I started at the top and worked my way down the panel making sure to install each panel where it belonged on the panel. After I placed all the tiles I went over the panel with a small "J" roller to ensure good adhesion.

Here are the first few tiles laid so far so good, I am glad that I applied the painters tape to the outside because the spray adhesiview went everywhere.

Here are the first few tiles laid so far so good, I am glad that I applied the painters tape to the outside because the spray adhesiview went everywhere.

Here is the finished panel, I have to say I was not impressed with the quality of the cork board. But nothing I can do about it now, needless to say that I will not be buying this brand of cork tile again

Here is the finished panel, I have to say I was not impressed with the quality of the cork board. But nothing I can do about it now, needless to say that I will not be buying this brand of cork tile again

CORK-BOARD OPINION

I had a big mishap that almost made me scrap the rest of the panels, While I was securing the 3rd panel down on the left side, the panel cracked right down the middle, I was not very rough with the cork board knowing that they are not the toughest but it cracked anyway and working with contact adhesive it would not allow me to move the panel, so I needed to do the best repair possible, I removed the damaged pieces and patched it as best I could, it does not look perfect. Its a real shame but there is not much I can do about it. I think in the future if I had to do this project again I would purchase a cork board roll and not the tiles. But there you have it, if it annoys me that much in the future I can always come back and just apply the roll all the way down the panel and cover up the patch and all the seems between the panels.

Here is why I was not impressed with the cork board I purchased.

  • The cork board packs I purchased had 4 tiles measuring  12" x 12" and they provided these little double sided stick tape tiles to stick them to the work surface that really wouldn't work because I tried an within 15 minutes the piece was on the floor.
  • The cork tiles themselves were very brittle, you needed kid gloves for them and even though I thought I was very careful, I was not careful enough.
  • They recommended a box cutter to cut the tiles and even with a a new blade in it the edges were not clean.
Terrible quality cork board. I need to figure a solutiuon to this.

Terrible quality cork board. I need to figure a solutiuon to this.

CONSTRUCTION COMPLETE

So after a lengthy project that has so many components to it today marked the end of the Room Divider build and I have to say that I love most of the divider apart from the cork board, that really ticked me off because I am very careful in all my projects and sub standard material can really take a really nice project and ruin it, but I will remedy this in the very near future.

All that is left is to apply the finish which I prepped for today , more on that next. Below are some pictures of the room divider and I have to say that the front looks awesome and the chalk board will be a big hit with my family.

Here is the front of the divider, I love the pattern and without doubt this was the longest part of the construction, it has 200 pieces that were chamfered with a router and then hand sanded. But I think it was worth every bit of effort.

Here is the front of the divider, I love the pattern and without doubt this was the longest part of the construction, it has 200 pieces that were chamfered with a router and then hand sanded. But I think it was worth every bit of effort.

A close up of the pattern. 

A close up of the pattern. 

Here is the back side of the panel, I am playing with the idea of adding a little bead molding around the inside edges of the cork board and chalk board , but I have not decided yet. I need my router table operational and that is next project for me…

Here is the back side of the panel, I am playing with the idea of adding a little bead molding around the inside edges of the cork board and chalk board , but I have not decided yet. I need my router table operational and that is next project for me after this. Really like the functionality of the cork and chalkboard just I am not happy about covering up blemishes

Close up of the cork board panel

Close up of the cork board panel

Chalk board looks great

Chalk board looks great

APPLYING FINISH: PREPARATION

Although I cant get to applying the poly-acrylic finish today I did get the prep done.

  • Since I didn't want any polyurethane on my chalkboard or cork-board I needed to cover them in such a way that I didn't spray them when applying the finish so I used what I had on hand and that was rosin paper, I use this when gluing up projects or applying finish so I cut two sheets to size and used double sided tape to stick them to the panels. I also used tape around the outsaide  to make sure that the paper didn't fall of
Here is the rosin paper covering the back side of the divider, covering the cork-board and chalk-board so as to avoid getting polyurethane on them.

Here is the rosin paper covering the back side of the divider, covering the cork-board and chalk-board so as to avoid getting polyurethane on them.

  • Since I will be using my HVLP sprayer to apply the poly-acrylic finish someone recommended that I make a sprayer stand so as that I could rest the sprayer on it while I fill the hopper (which is the container that holds the finish because trying to hold the sprayer and filling the hopper up would be difficult.

So I looked online and found this very simple stand made from scrap wood and so I went about making it, I think it took maybe 20 minutes and it will not win any prizes for looks but it will do a job for me. You can see it below

Here it is, it holds the sprayer in place and allows me access to the hopper.

Here it is, it holds the sprayer in place and allows me access to the hopper.

Here is another view its made from plywood and held together with screws.

Here is another view its made from plywood and held together with screws.

NEXT

  • All that is left is to add the poly acrylic finish, I will probably add 2 or 3 coats and then I will move it upstairs.
  • I might need to add a way to secure the top of the panel to the doorway as it is very heavy and I have kids running all over my house.

Until next-time take care

ROOM DIVIDER: DAY 13

APPLYING THE CHALK-BOARD PAINT

Today I didn't get that much time in the shop because I needed to go back to Home Depot because when I purchased the Chalk-board paint they gave me the can that needs to be tinted in stead of the can that I ordered which was black.

So it turned out that the can that I ordered was out of stock and they gave me what they thought was the right product. So after all that I had to get a tinted chalk board paint and although I thought it was black on the color chart it turned out to be a very dark grey, and its OK because after I used it on the panel it looked fine. Below i have some pictured of the panel all painted up .

Another view of the full panel.

Another view of the full panel.

I used a brush to cut the paint into the sides and then came back with a roller to do the rest of the panel

I used a brush to cut the paint into the sides and then came back with a roller to do the rest of the panel

Here is the panel after the paint has been applied, I kind of like the color.

Here is the panel after the paint has been applied, I kind of like the color.

Here is a picture of the full panel.

Here is a picture of the full panel.

NEXT

  • I need to apply the cork tiles on the right side panel
  • Finally I need to apply my Poly-Acrylic with my HVLP sprayer. I think that will be a wrap on this project.

Until next time , take care

ROOM DIVIDER: DAY 12

So today's activities included a trip to my local home center to purchase some latex primer and chalkboard paint.

WHAT I DID TODAY

  • Went to Home Depot
  • Applied Latex Primer
  • Finished the Right panels Herringbone Pattern

WENT TO HOME DEPOT

I still needed to go to Home Depot to finish up getting my supplies for the divider which included:

  • Latex Primer (little did I know that it was recommended that I needed to use a primer before applying the chalk-board paint) so I needed to get that.
  • I also needed to purchase the chalk-board paint.

Below you can see the products I purchased and links to them

APPLIED LATEX PRIMER

So to get started with applying the chalk-board paint I needed to apply the primer to ensure good adhesion of the chalk-board paint. 

I learnt from my mistake when applying the black semi gloss paint to the front of the panels, so I applied painters tape to perimeter of the panel before applying the primer, below you can see some of the pictures of latex paint and blue painters tape.

Here is the primer I used

Here is the primer I used

Here is the panel after the primer has been applied, I used a 6" roller to apply and the painters tape kept the primer away from legs and face frames of the panel.

Here is the panel after the primer has been applied, I used a 6" roller to apply and the painters tape kept the primer away from legs and face frames of the panel.

Here is another view of the panel

Here is another view of the panel

Another picture of the primed panel

Another picture of the primed panel

FINISHED THE RIGHT PANEL

The other day I finished applying the herringbone panel on the left side so today I got the right panel finished, this panel will receive the cork-board on the back side. Basically everything that I did on the left panel was repeated on this panel. 

  • Used the template to position the wood pieces
  • Glued and brad nailed the pieces in position, each template took care of 2 rows at a time and I got a scare when I thought I didn't have enough room to lay the final row of the pattern, but thank go I did have enough room and my measurement for the panel was the same as the left side. That would of been really bad and would of been very hard to rectify.
The right side panel all complete, just need to add the cork-board to the back

The right side panel all complete, just need to add the cork-board to the back

Here is another view of the right side panel, I cant wait to get both of these panels together and see what they look like.

Here is another view of the right side panel, I cant wait to get both of these panels together and see what they look like.

NEXT:

  • I need to finally apply the chalk-board paint
  • I need to buy and install the cork-board: I am currently researching the best way of attaching the cork tiles to the plywood panel. I think possibly applying spray contact adhesive will work.
  • Finally get to use my HVLP sprayer to apply the Poly-Acrylic finish to the divider.
Here is a picture of my HVLP spray gun.

Here is a picture of my HVLP spray gun.

ROOM DIVIDER: DAY 11

Let me give you a brief status update as to where the room divider project stands up until yesterday and then I will provide today's activities.

I made the layout template, after making the template I realized that a few of the spaces were a little tight so I needed to shave a few of the herringbone pieces down so as that they would fit in the template, you will see black circles on the template , these are the places that I needed to adjust.

Here is the template that I made, as I metioned above I needed to slim some of the pieces down, I marked the template with black marking to show which ones needed the adjusted size.

Here is the template that I made, as I metioned above I needed to slim some of the pieces down, I marked the template with black marking to show which ones needed the adjusted size.

I also applied the second coat of black paint to the front of the panels , so all that was needed  was to start adding the herringbone pattern pattern which I started today.

WHAT I DID TODAY

  • Some Sanding
  • Using the template
  • 2 Rows complete
  • 4 Rows Complete
  • All 5 rows completed
  • Some Cosmetic Touches
  • One Panel Complete.

SOME SANDING

After I painted the 2nd coat of the semi gloss black paint on the front of the dividers I needed to sand down the legs and face frames because to be honest I am not that great a painter and some black paint had gotten onto some parts that didn't need paint.

Here I am using my orbital sander after the paint had dried, as you can see it created a lot of dust build up on the panel, so I just vacummed that up and wiped it down with a damp rag. I sanded it as before from 80 grit - 220 grit

Here I am using my orbital sander after the paint had dried, as you can see it created a lot of dust build up on the panel, so I just vacummed that up and wiped it down with a damp rag. I sanded it as before from 80 grit - 220 grit

USING THE TEMPLATE

After ironing out all the little imperfections in the template it was time to put it to work. My process for laying the pieces was simple but had a lot of repitition.

  1. I applied glue to the backs of the herringbone pieces
  2. Put them in position into the template
  3. I added a 1/4" shim to the left side of the template to make sure any imperfections in the face frame were leveled out.
  4. Finally used my brad nailer and used 1 1/4" brads to secure the pieces while the glue set.
  5. Finally I lifted the template up and moved it down and repeat.
Here you can see the template in action.

Here you can see the template in action.

TWO ROWS COMPLETE

Here is the 2 rows complete.

Here is the 2 rows complete.

Here is another view of the first 2 rows.

Here is another view of the first 2 rows.

FOUR ROWS COMPLETE

Here is another view of the first 4 rows. I am moving along at a nice pace.

Here is another view of the first 4 rows. I am moving along at a nice pace.

Here you can see 4 rows down, basically the template replicated because the template does 2 rows at a time.

Here you can see 4 rows down, basically the template replicated because the template does 2 rows at a time.

ALL FIVE ROWS COMPLETED

I have to say I really love the design that I have made, it might not be everyone's favorite because its very symmetrical but I love how allighned it looks. 

All 5 rows completed, I really love how this looks and more importantly the wife loves it too.

All 5 rows completed, I really love how this looks and more importantly the wife loves it too.

A close-up of the pattern.

A close-up of the pattern.

One panel down and one more to go.

One panel down and one more to go.

COSMETIC TOUCH-UPS

So because I used my brad nailer to pin the pieces of the wood pattern to the panel it left horrible little indents where the brad penetrated the wood, so I used a product that I always use  

This little product is a life saver

This little product is a life saver

Before the filler was applied, so ugly.

Before the filler was applied, so ugly.

After the filler is applied, so much better. Cannot even see the indents

After the filler is applied, so much better. Cannot even see the indents

PANEL ONE COMPLETE

So after all that work today I finally have one panel complete as far as the pattern is concerned, I need to do it all again to finish the pattern on both panels. I took a few pictures on the panel in its vertical position, you can see them below.

Sorry for the poor picture quality, its in part of the workshop that still has the florescent lighting, some day I will get rid of that.

Sorry for the poor picture quality, its in part of the workshop that still has the florescent lighting, some day I will get rid of that.

Here is another view

Here is another view

So after spending most of the morning in the shop I felt really accomplished in what I got done, I really didnt think that I would have gotten as much done as I did but hopefully tomorrow I can get the other panel complete. I finally see the light at the end of the this project and I have learnt so much so far. Really enjoying this project I didnt think it would take this long but the project is extremely involved and I doing  lot of firsts.

COMING NEXT

  • Complete the other panel
  • Basically everything that was done today needs to be done on the other panel
  • I need to apply chalkboard paint & cork board to the back side of the panel
  • Finally need to apply the Minwax poly acrylic finish with my HVLP sprayer.

Until then, take care

ROOM DIVIDER: DAY 10

So today I got a little time in the shop, so I didnt get a whole lot done because I had to pick up my new router.

WHAT I GOT DONE TODAY

  • A replacement tool
  • Made a layout template for the pattern.

REPLACEMENT TOOL

Whenever I get a new tool I am always excited especially a tool like this, since my Craftsman router had broken during the week I needed a replacement so I went online and saw a Bosch 1617EVSPK on sale. I have been wanting this router for a long time now but I make it a rule that I don't just purchase a tool whenever I already have a similar tool that operates. So with my Craftsman breaking I decided to pull the trigger on ordering this tool kit.

The router had great reviews and since Bosch is a very reputable brand in power tools and has the following features I didn't hesitate.

  • 1/4" S. R. Collet Chuck 
  • 1/2" S. R. Collet Chuck 
  • 16mm Shaft Wrench 
  • Collet Nut Wrench 
  • Chip Shield 
  • Fixed Base 
  • Plunge Base
  • T-Handle Hex Height Adjustment Wrench 
  • Pack of 3 10-24 Screws for Table Mounting 
Here is my new toy I cant wait to get started with this

Here is my new toy I cant wait to get started with this

It has a very powerful 2 .25 HP motor, and I love the wooden handles, the kit came with a fixed and plunge base

It has a very powerful 2 .25 HP motor, and I love the wooden handles, the kit came with a fixed and plunge base

It also comes in this very sturdy carry case, I have to say its better than most of my tool cases 

It also comes in this very sturdy carry case, I have to say its better than most of my tool cases 

The only downside of ordering a new router is that I need to replace my router plate insert for my Kreg router table because the screw holes are located in different place on the base of the tool. 

I also need to remake a lot of my shop made jigs such as the circle cutting jig and my dado and groove jig, but I will make them when I need to.

TEMPLATE JIG

I decided to make a template to use when placing the herringbone pieces onto the divider because the pattern is very symmetrical and I need all the pieces to line up.

So I made the pattern using 3/4" plywood and I also used the 6" and 3 3/4" pieces to set the template you can see pictures below. So when it comes to me actually putting the pattern on the dividers I just need to apply the pieces into the jig and glue and brad nail them in place and not have to worry about the spacing. I stuck it all together with just glue, I tried using staples but they didnt work

I made this 2d printout using my Sketchup software so as that I knew exactly how long the jig puieces needed to be.

I made this 2d printout using my Sketchup software so as that I knew exactly how long the jig puieces needed to be.

My first jig I tried using MDF put it didn't work very well , but you can see the pieces in place, I need to do 10 rows per divider so you can see why I needed a template. I remade this template out of plywood

My first jig I tried using MDF put it didn't work very well , but you can see the pieces in place, I need to do 10 rows per divider so you can see why I needed a template. I remade this template out of plywood

I just used clamps and glue to keep this all together.

I just used clamps and glue to keep this all together.

Here is the finished template.

Here is the finished template.

Here is another view of the template, hopefully now with a bit of luck I can lay the herringbone pattern without much problems

Here is another view of the template, hopefully now with a bit of luck I can lay the herringbone pattern without much problems

NEXT

  • Need to do a final sanding of the legs and face frames
  • Need to apply a second coat of black paint
  • Lay the pattern on the dividers using today's jig
  • Need to apply a water-based poly using my HVLP sprayer

Until then take care.

ROOM DIVIDER : DAY 9

So today I got a half-day in the shop and I got the following completed, I really feel like this project is never going to end but I am enjoying the process.

WHAT I DID TODAY

  • MILLED THE REST OF 1X2'S
  • CROSS CUT THE LENGTH IN THE 200 PARTS
  • HAND SANDING TIME
  • THE PATTERN

MILLED THE REST OF THE 1X2'S

So i finished milling the rest of the wood for the pattern, this process was the same the same as my last post . I used my palm router with a chamfer bit in it and ran the 8 foot length of 1x2 in sections until I got 9 lengths completed, then i used my sander to smooth over the length to make it smooth to the touch.

Here are the lengths of wood all with the chamfer profile.

Here are the lengths of wood all with the chamfer profile.

Here is a close-up of the chamfer.

Here is a close-up of the chamfer.

CROSSCUT THE LENGTHS

All that was left was to crosscut all the lengths of wood to get the 200 pieces I needed, I started this on my last post I needed to cut 84 more pieces of the 6" and 60 pieces of the 3 3/4" pieces. The same as the last day I used my temporary stop block on my miter saw station because my Kreg stop block could only repeat cuts longer than 12". 

Here are all the remaining pieces that I cut tonight, since the chop saw left very rough ends I needed to hand sand them next . If only these were gold bars lol.

Here are all the remaining pieces that I cut tonight, since the chop saw left very rough ends I needed to hand sand them next . If only these were gold bars lol.

Here is another picture of my temporary stop block set-up on the chop saw.

Here is another picture of my temporary stop block set-up on the chop saw.

and more saw-dust.....really don't like a messy shop

and more saw-dust.....really don't like a messy shop

This was a messy process , the amount of sawdust created using the router and miter saw was a lot, really need dust collection on these tools.

This was a messy process , the amount of sawdust created using the router and miter saw was a lot, really need dust collection on these tools.

HAND SANDING

After I finished cross cutting all the individual pieces that make up the herring bone pattern, my miter saw left a lot of chip out on some of the pieces and since these were going to be focal point of the dividers I needed to clean them up.

So I used 220 grit sandpaper and cleaned up the edges with the paper, I needed to sand 144 pieces and it took some time but I needed to do them and to be honest I don't mind hand sanding i get to sit down and enjoy the process.

You can see how ugly the edges look on the pieces, that is why I needed to hand sand them.

You can see how ugly the edges look on the pieces, that is why I needed to hand sand them.

Here are most of the pieces that I habd sanded.

Here are most of the pieces that I habd sanded.

Finally after all that hand sanding , here are the 200 pieces that will make up the pattern on the front of the dividers.

Finally after all that hand sanding , here are the 200 pieces that will make up the pattern on the front of the dividers.

THE PATTERN

Since I had all the parts ready to use in the pattern, I wanted to see the pattern with real wood and not a 3D image so I arranged the pieces into my predetermined pattern and you can see the image below. The pattern shows just 2 rows so the final divider will have 10 rows and I think it will look awesome.

I also identified a problem, I need to make sute the spacing on all pieces are uniform other wise it will look terrible if they are not all in line with each other, so I think I am going to have to make a pattern jig when laying them out on the divider. It will not be anything fancy I will make it from scrap... more to come on that

Here is the pattern, its very symetrical but I think it will look good, I need to make a jig to keep all these pieces in line with each other or it will look terrible.

Here is the pattern, its very symetrical but I think it will look good, I need to make a jig to keep all these pieces in line with each other or it will look terrible.

NEXT

  • Make the pattern layout jig
  • Give the dividers another sanding
  • Apply another coat of black paint to the fronts.
  • Starting applying the herringbone pieces
  • Apply a protective finish using my HVLP 
  • Apply chalk-board paint
  • Apply cork-board
  •  

ROOM DIVIDER: DAY 8

In my last post I mentioned that my router had a problem, well I tried everything that I know as well as solicited advise from fellow woodworkers and nothing worked so I have to order a whole new router because I desperately need it for my shop, other than my table-saw the router table set up is one of the most used tools in my shop.

I will discuss it more below:

WHAT I DID TODAY

  • Ordered a new router
  • Router Table workaround
  • Starting to mill the herringbone design pieces.

ORDERED A NEW ROUTER

My craftsman router served me well over the last 3 years but the other day I had a problem with it, I could not loosen the collet nut that holds the router bit, after days of researching the problem I did receive a lot of advise from fellow woodworkers but I could not get anything to work, instead of throwing it away, I am going to work on it when I have more time. Below you can see my router table that I spent a lot of time and money on and the router was the heart and soul of this tool.


Here is home made router table with the Kreg router table and fence.

Here is home made router table with the Kreg router table and fence.

So I decided to buy a better quality router, one that has a decent size motor and will last longer than 3 years. So I found this router on sale at Home Depot and its made by Bosch, which is a very reputable brand and had fantastic reviews. You can see the router below, the only snag is that it will take 2 weeks to get to me

This will be my new router it has 2 1/4" HP and is way more powerful than my Craftsman so it should perform very nicely.

This will be my new router it has 2 1/4" HP and is way more powerful than my Craftsman so it should perform very nicely.

ROUTER TABLE WORKAROUND

So with my router table out of action for the remainder of this project I needed a work-around so as that I can complete the herringbone pattern. I came up with this.

I still had a functioning palm router its not my ideal set up because I needed to add a chamfer to over 200 pieces of wood so I decided to chamfer 8' sections of the 1x2 that I will be using. But I needed to do it in sections because I need to clamp the work pieces to my outfeed table which is only 48" long and then router each one , the beauty of the router table is that I can run the wood through the bit but since I can't do that I ran the router through the wood which is a lot slower.

Below are the steps I took to start this process.

  • Clamped my 1x2x8 to the out-feed table
  • Ran the palm router with a Chamfer bit to the wood in 3 parts , doing 3 foot at a time and then moving the work-piece up after each 3' section was complete.
  • Then sanded it with my orbital sander
  • Finally move it to my chop saw to cut each 6" section away from the length of wood.
Here you can see the palm router beside the the length of wood that I will be chamfering, I basically clamped it in place and them moving the board up after every 3 feet was completed.

Here you can see the palm router beside the the length of wood that I will be chamfering, I basically clamped it in place and them moving the board up after every 3 feet was completed.

Here is a close-up of my palm router with the Chamfer profile bit in it.

Here is a close-up of my palm router with the Chamfer profile bit in it.

Here you can see the chamfer profile on the end of the 8' length, next to the miter saw station to cut them all down.

Here you can see the chamfer profile on the end of the 8' length, next to the miter saw station to cut them all down.

HERRINGBONE TIME

I have over 20 lengths of wood to chop up after applying the chamfer to each edge of the 1x2's so I decided to set-up a stop block on my miter saw station. To do that I needed to install a temporary stop block because my Kreg stop block system on my miter saw station can only repeat cuts that are 12" or longer.

So I basically used a piece of scrap and clamping it to my fence on the miter saw station and then cutting all my 6" pieces 140 in total. Below you can see some pictures of the process.

Here is my temporary stop block which is set 6'' from the blade in my Miter Saw station.

Here is my temporary stop block which is set 6'' from the blade in my Miter Saw station.

Here is a close-up of one of the pieces

Here is a close-up of one of the pieces

So I got a little more than 56 done I need another 100 or so.

So I got a little more than 56 done I need another 100 or so.

WHATS NEXT

The progress on this project is starting to slow down because my children are home now for the summer months and time available for the shop will be much more limited, but I will try and keep the progress on this project going.

  • Repeat today's axctivities

ROOM DIVIDER: DAY 7

WHAT I DID TODAY

Hi everyone,

Well I took a day off from the project to enjoy the weather and got back in the shop today, I also hit a roadblock to forced me to change my original plans regarding the middle leg.

  • Project Revision
  • Middle Foot (Revision)
  • More Sanding
  • Added the hinges
  • Free standing Unit

PROJECT REVISION

When I originally planned my project I thought if I just left the middle leg with just a castor on the base and not make a foot like I did on the left and right sides because all I was using the middle leg for was for pivoting the divider sides, well that didn't work out because too much weight would of been put on the butt hinges that I was using to join the two panels.

So to remedy this I decided to make a small foot and add 1 castor and not 2 castors as I previously did on the left and right sides.

I also needed to add clearance to middle of the two panels to allow for the panels to move on the butt hinges, so I added another piece of lumber on the left side of the right panel and glued and screwed it in place.

MAKING THE MIDDLE FOOT (REVISION)

As I stated in my project revision I needed to make a middle foot to support the weight of the dividers and to move some of the weight away from the hinges. So I changed my joinery from a mortise and tenon joint to basically designing  a foot riser and added a castor. The reason for changing the joint was because I needed a lot more wood to insert the castor stem and therefore could not add a tenon because the stem would not be able to be inserted.

So I made 6" foot and centered a mortise that was the same size of the  leg since I could not make a tenon. Then I used my router to clear out most of the waste and then used my chisel's to square the mortise. In essence the leg end was a type of tenon but wood was not removed as is traditionaly done to create tenon shoulders. It was the best solution I could come up with. Below you can see pictures of this step

Here I just hogged out most of the mortise using my palm router  and then I used my chisels to square the mortise corners.

Here I just hogged out most of the mortise using my palm router  and then I used my chisels to square the mortise corners.

Test fitting the leg foot , I made the foot oversize and trimmed it to 6".

Test fitting the leg foot , I made the foot oversize and trimmed it to 6".

Here I needed to drill a 3/8" hole for the caster stem to fit up into the foot. This way I had a starting point to drill up into the actualy leg and not worrying if both holes were in the same place to receive the castor

Here I needed to drill a 3/8" hole for the caster stem to fit up into the foot. This way I had a starting point to drill up into the actualy leg and not worrying if both holes were in the same place to receive the castor

Finally I needed to add a round-over to mimic the other feet on the left and right side so I just used the masking tape to add a curve and then I cut it at the band saw, and smoothed it at my spindle sander

Finally I needed to add a round-over to mimic the other feet on the left and right side so I just used the masking tape to add a curve and then I cut it at the band saw, and smoothed it at my spindle sander

Here is the finished foot and it looks great, I know I made it correctly because the plywood panel is plum and I can even move the panel around on 3 casters.Success

Here is the finished foot and it looks great, I know I made it correctly because the plywood panel is plum and I can even move the panel around on 3 casters.Success

When I was taking a lot of these pictures I thought a 4" foot was long enough and after making the entire foot I had a knot right in the middle of the mortise and it cracked so I had to replace the entire foot so I made it from scratch again and made it 2" longer.

MORE SANDING

After I finished working on the middle foot I had to sand the entire 2 panels again and I also finished rounding over the legs . I used a mixture of belt sander and orbital sander and used from 80 grit - 220 grit. Below you can see my temp sanding station.

Here are my sanding tools and a hand planer.

Here are my sanding tools and a hand planer.

ADDING THE HINGES

I added 3 butt hinges to the center of the 2 panels , I placed them at the top, middle and bottom. I secured the left side of the hinge to one panel and then added a little spacer block and secured the rest of the hinges. 

I also needed to temporarily prop the bottom left side of the right panel because that didn't have a castor to support it so I just put scrap-wood underneath that side making sure that top of each panel was level with each other, it wasn't pretty but it was very quick way of achieving a level top and bottom, then I finished securing the right sides of the hinges. Oh yea I also used clamps to pull both panels together into the spacer block I positioned in between the dividers that way I was assured the hinges would line up under each other.

Here is the top hinge secured on one side, you can see the spacer blocker in the middle, you can barely see the clamps holding the panels together.

Here is the top hinge secured on one side, you can see the spacer blocker in the middle, you can barely see the clamps holding the panels together.

Here you can see all 3 hinges attached to the left side and the clamps 2 on each side holding everything together until I get to the other side of the hinges

Here you can see all 3 hinges attached to the left side and the clamps 2 on each side holding everything together until I get to the other side of the hinges

All hinges attached and we have a function divider.

All hinges attached and we have a function divider.

FREE STANDING DIVIDERS

It has taken me a long time in getting this far and with so many obstacles on my journey thus far, but today we have a free standing room divider that can move and bend and not fall over. I feel accomplished and whats more important the wife really likes it, but were not finished yet.

A closer look, don't worry about that black panels I need to apply another coat of paint to that.

A closer look, don't worry about that black panels I need to apply another coat of paint to that.

Free standing unit that can pivot, not bad looking

Free standing unit that can pivot, not bad looking

Final picture of the panel, looks awesome

Final picture of the panel, looks awesome

NEXT

  • Today I came across a broken router, specifically the collet nut on my Craftsman router is stuck so I am trying to either fix it or order a new one, I need the router for the next phase of the project specifically for the herringbone design I need to make.
  • I have to prepare the wood for the herringbone, there are a lot of pieces to this, cant get this step done until my router is functional.
  • Need to apply a 2nd coat of black paint to the front face(s) of the dividers.
  • Need to purchase and install cork-board, and chalkboard paint to the back of the dividers
  • Finally need to put 2-3 coats of Poly-Acrylic to the project I am using a HVLP sprayer to do this.

Until then, take care


ROOM DIVIDER: DAY 6

WHAT I DID TODAY

  • Secured the right leg in position
  • Cleaned up the wooden plugs 
  • Sanded the face frames and legs
  • Router Time
  • Secured the left foot 

SECURED THE RIGHT LEG

As I did yesterday I secured the right leg into position today, using the same biscuit slot joinery.

Same as before using the biscuit slots to join the leg piece to the plywood frame.

Same as before using the biscuit slots to join the leg piece to the plywood frame.

CLEANED UP THE WOODEN PLUGS

Yesterday I added the wooden oak plugs to cover the the screw heads that I used to secure the legs to the frame in addition to the biscuits.

They were left proud yesterday so today I used my flush trim saw to cut the excess plug off. Below you can see the before and after pictures of the plugs.

Here you can see my flush trim saw and the proud plugs.

Here you can see my flush trim saw and the proud plugs.

You can see the plugs here after I used my flush trim saw but before sanding them.

You can see the plugs here after I used my flush trim saw but before sanding them.

Nice and flush

Nice and flush

SANDED THE DIVIDER

After flushing up the plugs I decided to sand everything from 80 - 150 grit sand paper using my belt sander and also my orbital sander

On projects this large I usually started with my belt sander with 80 grit to get rid off all the glue squeeze out and after all the glue is gone I use my random orbital sander to really make it smooth using 150 grit and then finally 220 grit sandpaper.

Sorry I didn't take any pictures because its sanding and a lot more of that to come!!!

ROUTER TIME

In order to remove all the sharp corners on the legs and the frame in general I used my Rigid Palm router with a 1 /4" roundover bit in it to curve the edges making it easy on the hands when you need to move the divider about.

Here is my palm router with the round-over bit in the colet. 

Here is my palm router with the round-over bit in the colet. 

Here you can see the round-over profile, I had to really zoom to catch this.

Here you can see the round-over profile, I had to really zoom to catch this.

SECURED THE FOOT

I needed to secure the foot in place so as that I could determine how long the middle leg needed to be be. All that I needed to do was to apply glue to the mortise and tenon joint and then drill a 3/8" hole through the leg and into the foot in ordered for me to add a dowel rod to add more strength to the joint. It might be overkill but I figured this one part of the entire project needs to be as strong as I can make it because it is what makes the entire divider move able and also keeps it vertical and erect.

Started my marking the midline on the foot so as that I position the dowel through both the leg and foot.

Started my marking the midline on the foot so as that I position the dowel through both the leg and foot.

Here you see the tenon and foot, I marked very carefully because if I screwed this up the project would be very diffuclt to undo.

Here you see the tenon and foot, I marked very carefully because if I screwed this up the project would be very diffuclt to undo.

Here is the bored out hole

Here is the bored out hole

Here is the dowel passed through the hole I just bored and glued in place.

Here is the dowel passed through the hole I just bored and glued in place.

Here is the dowel flush trimmed , all that was needed now was to add clamping pressure.

Here is the dowel flush trimmed , all that was needed now was to add clamping pressure.

I needed to add clamping pressure in place so as that the glue joint was strong on the foot, I needed to get creative because I don't currently own any clamps that can reach 7 feet, so I used the clamp the clamp trick.

I needed to add clamping pressure in place so as that the glue joint was strong on the foot, I needed to get creative because I don't currently own any clamps that can reach 7 feet, so I used the clamp the clamp trick.

So that all I got done today, tomorrow I hop to get the following completed

  • Secure the other foot
  • Sand the other panel, basically a repeat of todays activities.

Until then Take Care

Room Divider: Day 5

WHAT I DID TODAY

  • Made the other foot for the right leg,
  • Attached the casters
  • Created Biscuit Slots for the legs
  • Clamping Time
  • Filled the leg holes with wood caps to hide the screws


MADE THE SECOND FOOT

I cut a piece of 2"x2" to 12' long, and created it the same as that last foot by creating a mortise, but in addition I rounded the front and back of the foot so as that you would not stub your toe on the sharp corners so I removed them. Using  my band saw and spindles sander to achive this


I really like the rounded profile of the foot.

I really like the rounded profile of the foot.

Here is the side profile of the round-over, I am using my oscillating spindle sander to smooth the blade marks left from the band saw., really love this tool and I use it alot more than I thought I would. You could also use some sand paper.

Here is the side profile of the round-over, I am using my oscillating spindle sander to smooth the blade marks left from the band saw., really love this tool and I use it alot more than I thought I would. You could also use some sand paper.

Here is the right side panel after mking the foot

Here is the right side panel after mking the foot


ATTACHED THE CASTORS

So today I started working on the other foot, I started by cutting a piece of wood to 12".

Then like the other piece I created the mortise that the leg's tenon will fit onto it and that was the same process as before using the drill-press.

I also decided to round the front and back of the foot so as that you would not stub your toe I achieved this by cutting most of wood away using my band-saw and then smoothing the contour with my spindle sander.

Here I am making the 3/8" diameter holes to insert the castor stems for the wheels, I set up a stop block on my drill-press so as that the holes are centered and 1 1/2' from the ends of the foot

Here I am making the 3/8" diameter holes to insert the castor stems for the wheels, I set up a stop block on my drill-press so as that the holes are centered and 1 1/2' from the ends of the foot

Here you can see the top side of the foot.

Here you can see the top side of the foot.

Here you can see the  pair of feet with the casters attached.

Here you can see the  pair of feet with the casters attached.

TIME FOR SOME BISCUITS

I decided in the design stages of the project that I would strength the leg by attaching it to the plywood panel by using biscuit's and screw's combined with wood glue. If you don't have a biscuit joiner you could just use screws and glue.

I started off my marking the leg and the plywood panel by drawing a line across both parts and then lighning my biscuit joiner and plunging the blade that created a semi-crcle slot into the wood which is where the biscuit will be inserted.

Here is what the biscuit slot looks like on the front piece, the pack piece has the biscuit inside, when you add glue to both pieces the glue swells the biscuit up to lock the biscuit inside the cavity , which strengthens the joint.

Here is what the biscuit slot looks like on the front piece, the pack piece has the biscuit inside, when you add glue to both pieces the glue swells the biscuit up to lock the biscuit inside the cavity , which strengthens the joint.

This is just before I applied the glue to the pieces, doing a dry fit is always a good idea to make sure all the parts line up to each other. You don't need any scares here because you have limited time to applying the glue and clamping them up.

This is just before I applied the glue to the pieces, doing a dry fit is always a good idea to make sure all the parts line up to each other. You don't need any scares here because you have limited time to applying the glue and clamping them up.

TIME TO CLAMP

Here is another shot of the glued up panel

Here is another shot of the glued up panel

Here is the glued up panel with the legs attached, I used a total of 4 clamps to keep everything alighned until I added the screws in the next step.

Here is the glued up panel with the legs attached, I used a total of 4 clamps to keep everything alighned until I added the screws in the next step.

ADDED WOOD PLUGS

After also adding wood screws to the legs, I usually add mechanical fasteners to add strength to a joint and it also acts as clamps while my glue sets up so as that I can use the clamps elsewhere but don't sacrifice a good glue joint. But using screws has its drawbacks one of them being they look ugly. So I countersunk the screw holes and come back and add wooden plugs to cover the screw heads.

I had a length of 3/8" wooden dowel that I cut up on my table-saw using a crosscut sled, then added glue to the countersunk holes I previously put into the legs.

Here are the plugs, I will leave them proud until the glue dries then come back and use my flush trim saw to clean them up.

Here are the plugs, I will leave them proud until the glue dries then come back and use my flush trim saw to clean them up.

Here you can see all the oak plugs, there still proud I will clean them up later.

Here you can see all the oak plugs, there still proud I will clean them up later.

TOMORROW

  • Clean up the wood plugs I added
  • Secure the right leg .
  • I am going to add a roundover using my palm router to the legs
  • Finally I need to determine the lenth of the center leg that will be receiving a castor

ROOM DIVIDER: DAY 4

WHAT I DID TODAY

  • Sanded the legs and cleaned up the miter joints
  • Cut a tenon on the leg
  • Cut a mortise on the leg base

SANDING

The last day I prepared a wood putty by mixing sawdust and glue and applying it to the miter joint to clean it up, today I finished sanding the legs down and cleaning up the miter joint below you can see a before and after picture. 

I sanded all 3 legs and also sanded the face-frames on the front and back of the black plywood panels. 

Here is a before picture of the mitered joint

Here is a before picture of the mitered joint

Here is the miter joint after the putty dried and I have sanded it.

Here is the miter joint after the putty dried and I have sanded it.

CUT THE LEG TENON

I am attaching the leg to a leg base by means of a mortise and tenon joint, the leg base will receive the castors one of each end to make it mobile.

I hand-cut the tenon with my Japanese pull saw  and then cleaned the tenon up with some chisels.

My first step in this process is to place layout lines on the leg using my marking tools and then took my time in using my saw to cut most of the waste leaving a little wood to dial in the the exact dimension of the tenon. 

When cutting my mortise and tenon joint I always cut the tenon first because its easier to change the tenon size than it is to change the mortise size.

Here are the tools i used to complete most of the tenon, I used my Incra measuring tool, machinest square, Japanese saw to define the tenon shoulders

Here are the tools i used to complete most of the tenon, I used my Incra measuring tool, machinest square, Japanese saw to define the tenon shoulders

Here you can see the layout lines for the placement of the tenon.

Here you can see the layout lines for the placement of the tenon.

Here is the cut tenon, still needed to clean it up just a little.

Here is the cut tenon, still needed to clean it up just a little.

CUTTING THE MORTISE

I wish I owned a Festool Domino to make floating mortise and tenon it would be so much quicker than do it by hand but I don't, and probably never will because they are so expensive. I have to use the means that are available to me, to that end I use my drill press with a forstner bit to dig out most of the mortise waste and then I use my mallet and chisels to square the mortise walls and corners, below you can see pictures of me do this.

Here is a closeup off the holes created to define the mortise.

Here is a closeup off the holes created to define the mortise.

Using my drill press to cut the mortise, I used my fence on the drill press to center the mortise.

Using my drill press to cut the mortise, I used my fence on the drill press to center the mortise.

After using the drill press I took the leg over to my bench to clean up the mortise with my chisels

After using the drill press I took the leg over to my bench to clean up the mortise with my chisels

Here is a close up of the foot, I will be adding 2 castors one at each end of the foot.

Here is a close up of the foot, I will be adding 2 castors one at each end of the foot.

Here is the leg in its current state.

Here is the leg in its current state.

That is all I got done today, there is a lot more to do I still need to do the following for the legs and feet;

  • Complete the other mortise and tenon leg foot
  • I also need to attach the legs to the plywood panels using biscuits and screws
  • I also need to determine size of the middle leg because I am not adding a foot, only a castor is getting attached
  • After I attach the legs I am going to add a round-over profile using my router to soften the corner edges

Until then, take care

ROOM DIVIDER : DAY 3

WHAT I DID TODAY

  • Cleaned up the legs
  • Attached the face frames 
  • Miter Joint Tips/Tricks

CLEANING UP THE LEGS

Yesterday I glued up the legs into a solid leg, this morning after the glue had dried and set I went  about the process of removing all the glue squeeze out, since I made the legs oversize I could achieve this by ripping the legs on the table-saw by removing a skim cut. I also needed to make the legs top and bottom flush so I used my new Veritas flush trim saw to cut them to final size. There is still more work to do on the legs such as sanding them, add biscuit slots so as that I can attach them to the panels, cut a tenon on the bottoms and I will probably also add countersunk holes to add some screws,  but at least they are made.

You can see the leg blank that is oversized I ripped the sides and use my flush trim saw to clean them up. 

You can see the leg blank that is oversized I ripped the sides and use my flush trim saw to clean them up. 

ATTACHED THE FACE-FRAMES

Yesterday I cut all the face frames for the plywood panels and today it was tyime to attach them. I used 1 1/4" brads from my brad gun and wood glue to attach them.

Each side of the panels were receiving them so  I placed them on the panels and added the glue and then nailed them in place. I also needed to start cleaning them up because I needed to fill all the brad indents by using a special filler just for this task. I also needed a way to make the miter joints look a little tighter (they always seem to move a hair when the glue is setting, the gap always seems bigger than it is because the 45 degree angle compounds the gap so it looks like the grand canyon,so I i used a method that a lot of woodworkers are familiar with, but more on that in a second.

I just added the glue and brad nails, waiting on the glue to set up.

I just added the glue and brad nails, waiting on the glue to set up.

Doing a dry fit of the face frames, next to add the glue.

Doing a dry fit of the face frames, next to add the glue.

Here is the front side of the panels, still have alot of work to do but they are starting to take shape.

Here is the front side of the panels, still have alot of work to do but they are starting to take shape.

This is the back side og the panels, I will be adding chalkboard paint and corkboard, later in the project

This is the back side og the panels, I will be adding chalkboard paint and corkboard, later in the project

MITER JOINT TIPS/TRICKS

Sometimes when you make miter joints you try so hard to make sure that joints line up to make it look like the wood corners around the project seamlessly, but despite your best efforts and your attention to detail you find yourself with the smallest of gaps but it looks like you could drive a bus through the gap. So a while ago I specifically solicited advise from fellow woodworkers what they do in this situation and the one that I like the most is this.

Sawdust Paste

Whenever you cut wood by either ripping or crosscutting the boards keep the sawdust that you generate because if you mix that sawdust with wood-glue you can use it to fill in them little gaps that you have. So I got in the habit of bagging sawdust and keeping it for occasions such as this, espicially hardwoods such as oak or maple, but on this occasion its pine.

Below are pictures of me applying the paste , I will need to come back to the miter joints tomorrow and cleaning them up so the gap totally disappears.

Here is my little set-up. The sawdust is in the plastic container, my glue bot and a scrap piece of plywood to do my mixing.

Here is my little set-up. The sawdust is in the plastic container, my glue bot and a scrap piece of plywood to do my mixing.

Here is the joint after I have applied the wood paste, i will clean it up tomorrow.

Here is the joint after I have applied the wood paste, i will clean it up tomorrow.

If you would like to learn more about this process I found a useful article in Popular Mechanics explaining it

Tomorrow I will be cleaing up the face frames by sanding them, I will also be cutting some of the biscuits slots so I can attach the legs to the plywood panels.

Until then, Take Care

Room Divider : Day 2

Today was a very busy day in my day to day life so I didn't get too much accomplished in the shop, but I did make progress, just a little!!!

WHAT I DID TODAY

  • Went to Woodcraft and availed myself of a great sale!!
  • Inspected the painted panels
  • Milled the parts that make up the legs of the divider
  • Glued up the legs

WENT TO WOODCRAFT

I love going to this store as they have everything that I want as a woodworker but I would need to win the lottery to buy everything that I wanted. They did however have a sale on Japanese handsaws so I purchased 1 and got another one half off, I also got the Veritas flush trim saw which has been on my shopping list for a little time, but you can see some of the pictures I took below

The saw on the left and right are Japanese handsaws one of them has a blade stiffner and one without,These saws are on the espensive  side but they cut like a hot knife through butter.

The saw on the left and right are Japanese handsaws one of them has a blade stiffner and one without,These saws are on the espensive  side but they cut like a hot knife through butter.

You can see the blades here. The Gyokucho Cross cut blade is on the right, dovetail Gyokucho is on the left and the Veritas flush trim saw is in the mddle, 

You can see the blades here. The Gyokucho Cross cut blade is on the right, dovetail Gyokucho is on the left and the Veritas flush trim saw is in the mddle, 

The Japanese saw in action, this saw is so nice and every once in a while its nice to use hand tools to get the job done. I love the grip very comfortable on the hands.

The Japanese saw in action, this saw is so nice and every once in a while its nice to use hand tools to get the job done. I love the grip very comfortable on the hands.

INSPECTED THE PAINTED PANELS

The panels look awesome and the I can totally see the grain definition come though the paint which  is unusual, but the panels are ready to receive the face frames tomorrow.

Can totally see the grain come through the paint, the pictures don't do it justice. Anyway it doesn't really matter because the herringbone pattern will be covering the majority of this panel

Can totally see the grain come through the paint, the pictures don't do it justice. Anyway it doesn't really matter because the herringbone pattern will be covering the majority of this panel

MILLING THE LEGS

Tonight I used some 2x wood to make the legs of the divider, but because my divider thickness is 2 1/4" thick I needed to prepare 2 pieces of wood to make up that thickness, so I used my tablesaw with a feather-board to keep the board aligned as I milled the lumber. I needed to make 6 pieces as I am going to be gluing up the 3 legs out these in the next step.

Here you can see me pushing the board through the blade using a feather-board to keep the lumber straight as it going through the blade

Here you can see me pushing the board through the blade using a feather-board to keep the lumber straight as it going through the blade

LEG GLUE-UP

I milled up 6 pieces of lumber

  • 3 @ 1.5"x1.5"
  • 3@ 1.5" x .75" which will give me my 2 1/4" thickness so as that I can attach them to the plywood and face frames, but first I need to glue up the 3 sets of legs and you can see the pictures below of the glue-up and the multitude of clamps lol
Here re the 6 boards getting ready to be glued up, if you are one that does a lot of glue-ups you should get this Glue-bot container which is what I use to apply glue especially on glue-ups like this one. I made the boards longer so as that I can cu…

Here re the 6 boards getting ready to be glued up, if you are one that does a lot of glue-ups you should get this Glue-bot container which is what I use to apply glue especially on glue-ups like this one. I made the boards longer so as that I can cut them to final size when the glue sets.

Here is another angle of the glue-ups.. glad I made those extra saw horses.

Here is another angle of the glue-ups.. glad I made those extra saw horses.

Here are the boards all clamped together for the night, instead of clamping each individual leg I organized all the legs into one assembly . I just made sure that I orientated the board faces so as that the boards wouldnt be all glued together. I us…

Here are the boards all clamped together for the night, instead of clamping each individual leg I organized all the legs into one assembly . I just made sure that I orientated the board faces so as that the boards wouldnt be all glued together. I used a lot of clamps lol... its true what they say you can never have enough clapmps

Well that's it for today, tomorrow I will be cleaning up the legs and attaching the face frames to the plywood panels...……. until then have a great day


Project Office Divider : Day 1

This morning I went to my local home center and purchased most of the supplies to get me started on this project, and I am looking forward to this build because there is a little artistic element to the project.

WHAT I DID TODAY

  • Purchased supplies for the project
  • Cut the Plywood Panels in the divider sections
  • Made the face frames for the front and back of each divider.
  • Painted the Plywood Panels

Cut the Plywood Panels

Nothing really exciting here, I just cut the panels to the dimensions I wanted which are 72' high x 24" wide.

Here are the 2 panels cut to final dimensions 72" x 24"

Here are the 2 panels cut to final dimensions 72" x 24"

FACE FRAMES

I made the face frames out of 1x2 material. I cut the parts to final size and also mitered the corners at 45 degrees. I didn't secure them to the plywood panel yet because I need to paint both of them in the next step, and to avoid being extremely careful not to get black paint on them I decided to add after the paint had dried, so I will be doing that tomorrow.

The face frames are important because I use them to attach the entire divider to the legs, and I will probably use biscuit joints. But to me honest I am also playing around with the idea of just screwing them together and maybe coving them with dowels, to be determined.

Here I am trying to get correct miter cuts on the corners, I used clamps to secure the corners to make sure they line up when it comes to securing them.

Here I am trying to get correct miter cuts on the corners, I used clamps to secure the corners to make sure they line up when it comes to securing them.

Nice and tight miter, just the way I like them

Nice and tight miter, just the way I like them

Another close-up of the mitered corner

Another close-up of the mitered corner

I used my machinist square to make sure the face frame is flush to the plywood edge, because that is where my legs will be secured to the divider, everything looks square and flush. I am looking for no daylight between the square and the boards edge.

I used my machinist square to make sure the face frame is flush to the plywood edge, because that is where my legs will be secured to the divider, everything looks square and flush. I am looking for no daylight between the square and the boards edge.

PAINT TIME

When I was designing the dividers I decided that a black backdrop to the herringbone wood pattern I will be putting on the front side of the dividers would add a lot of definition to the panel. So I purchased a can of semi-gloss black paint, its also water based so as that we can clean it when it gets dirty.

Below you can see what I mean with my Sketchup drawing

The black contrast adds so much definition to the front side of the dividers.

The black contrast adds so much definition to the front side of the dividers.

Below are just a series of pictures of the painted up boards, and the saw horses worked out great.

I don't usually use black paint on any of my projects , but I really like how the grain of the plywood came through the paint, I am curious to see if its there tomorrow.

I don't usually use black paint on any of my projects , but I really like how the grain of the plywood came through the paint, I am curious to see if its there tomorrow.

Only one side of the boards will be painted black as I have other plans for the back side. Here are the 2 panels all painted, I will let them dry over night.

Only one side of the boards will be painted black as I have other plans for the back side. Here are the 2 panels all painted, I will let them dry over night.

Here is another view of the boards painted up.

Here is another view of the boards painted up.

So that's all I had time for tonight, catch you on my next post.

Take care


Room Divider : Design Phase

So like in so many of my projects I turned to my Sketchup Pro 3D Software and started designing the divider that will be positioned between the kitchen and office. I sat down and decided what I wanted the divider to look like and what functionalities I wanted to have in it, so I came up with these

  • Needs to be portable so we can use it as a back drop when on video conferences, so I will be adding 5 or 6 castors
  • Needs to be multi-functional since one side will be facing the kitchen and the other side the office. I have come up with an idea of adding chalkboard paint on one panel and on the other install cork board so as that my kids can hang their school art on or even use to hang Christmas cards.
  • Needs to be original. To accomplish this I have designed a herringbone pattern using scrap 1x2 material that I have (probably need to but some more).

Below is an image from Sketchup that I am using for the herringbone pattern.

Room Divider : Front Side

Room Divider : Front Side

Room Divider: Back Side (left side will have corkboard and the right will have a chalkboard.

Room Divider: Back Side (left side will have corkboard and the right will have a chalkboard.