In my last post I mentioned that my router had a problem, well I tried everything that I know as well as solicited advise from fellow woodworkers and nothing worked so I have to order a whole new router because I desperately need it for my shop, other than my table-saw the router table set up is one of the most used tools in my shop.
I will discuss it more below:
WHAT I DID TODAY
- Ordered a new router
- Router Table workaround
- Starting to mill the herringbone design pieces.
ORDERED A NEW ROUTER
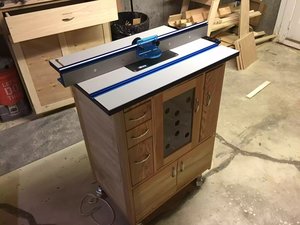
My craftsman router served me well over the last 3 years but the other day I had a problem with it, I could not loosen the collet nut that holds the router bit, after days of researching the problem I did receive a lot of advise from fellow woodworkers but I could not get anything to work, instead of throwing it away, I am going to work on it when I have more time. Below you can see my router table that I spent a lot of time and money on and the router was the heart and soul of this tool.
Here is home made router table with the Kreg router table and fence.
So I decided to buy a better quality router, one that has a decent size motor and will last longer than 3 years. So I found this router on sale at Home Depot and its made by Bosch, which is a very reputable brand and had fantastic reviews. You can see the router below, the only snag is that it will take 2 weeks to get to me
This will be my new router it has 2 1/4" HP and is way more powerful than my Craftsman so it should perform very nicely.
ROUTER TABLE WORKAROUND
So with my router table out of action for the remainder of this project I needed a work-around so as that I can complete the herringbone pattern. I came up with this.
I still had a functioning palm router its not my ideal set up because I needed to add a chamfer to over 200 pieces of wood so I decided to chamfer 8' sections of the 1x2 that I will be using. But I needed to do it in sections because I need to clamp the work pieces to my outfeed table which is only 48" long and then router each one , the beauty of the router table is that I can run the wood through the bit but since I can't do that I ran the router through the wood which is a lot slower.
Below are the steps I took to start this process.
- Clamped my 1x2x8 to the out-feed table
- Ran the palm router with a Chamfer bit to the wood in 3 parts , doing 3 foot at a time and then moving the work-piece up after each 3' section was complete.
- Then sanded it with my orbital sander
- Finally move it to my chop saw to cut each 6" section away from the length of wood.
Here you can see the palm router beside the the length of wood that I will be chamfering, I basically clamped it in place and them moving the board up after every 3 feet was completed.
Here is a close-up of my palm router with the Chamfer profile bit in it.
Here you can see the chamfer profile on the end of the 8' length, next to the miter saw station to cut them all down.
HERRINGBONE TIME
I have over 20 lengths of wood to chop up after applying the chamfer to each edge of the 1x2's so I decided to set-up a stop block on my miter saw station. To do that I needed to install a temporary stop block because my Kreg stop block system on my miter saw station can only repeat cuts that are 12" or longer.
So I basically used a piece of scrap and clamping it to my fence on the miter saw station and then cutting all my 6" pieces 140 in total. Below you can see some pictures of the process.
Here is my temporary stop block which is set 6'' from the blade in my Miter Saw station.
Here is a close-up of one of the pieces
So I got a little more than 56 done I need another 100 or so.
WHATS NEXT
The progress on this project is starting to slow down because my children are home now for the summer months and time available for the shop will be much more limited, but I will try and keep the progress on this project going.
- Repeat today's axctivities


