Craft Beer Flight

Craft Beer Flights : On sale

I finally got around to putting these beautifully hand crafted Beer Flights in both my Stores here on the site and also on Etsy.com.

These flights make a perfect gift for the craft beer lovers. I made two types that I will detail the differences below.

Craft Beer Flight : Design 1

This craft beer flight is made up of 3 contrasting wood species. I used Brazilian Sapelle, Curly Maple and Walnut. They measure approx 13” x 4” x 2-1/4”. This set includes 4 glasses that are 5oz in size.


Craft Beer Flight: Design 2

This craft beer flight is made up of 2 contrasting wood species. I used Brazilian Sapelle & Curly Maple . They measure approx 13” x 3” x 2-1/4”. However this set does not include the glasses simply because I ran out, but the flights have 2” diameter holes that will fit a myriad of beer sampler glasses that are not hard to find, however if you really want this style with the glasses I am selling limited supply on my Etsy store.


I only made a handfull of these flights so if you like them snatch them up before they sell out.

PDF PLANS AVAILABLE

On the other hand if you would like to make these beer flights yourself I am also selling a complete set of plans that are on sale for only $10.00 in the store. I have put a link below.

Craft Beer Flight Plans
$15.00
Add To Cart

Thanks for reading and have a great day.

CRAFT BEER FLIGHTS : FINISHED

So for the last couple of days I have been busy applying all the coats of poly 3 in total and sanding between each coat then finally I burnished each flight with very fine steel wool to remove that sheen that always appears when you use oil based polyurethane.

But today I finally got to take some pictures of the finished flights. I really enjoyed this project and loved working with all the types of woods that made up this project.

Below are some pictures that I took and one more thing I take such terrible pictures of my crafts I have actually starting using some photo editing software to see if I can improve my pictures to a degree that matches the woodworking craftsmanship that goes into make items such as these. The pictures I take for selling purposes are terrible and want to improve them. I purchased Paint-shop Pro 2019 and its a real learning curve for me having never used editing software again so I am studying and practicing and the picture directly below is a result of what I have learned so far.

Here is my efforts using PaintShop Pro 2019. Not bad but I have a long way to go.

Here is my efforts using PaintShop Pro 2019. Not bad but I have a long way to go.

Here is one style that I made using Maple and Sapelle woods

Here is one style that I made using Maple and Sapelle woods

Here is the other style I made using Sapelle, Maple and Walnut

Here is the other style I made using Sapelle, Maple and Walnut

CRAFT BEER FLIGHTS : PICTURE COMPILATION

In the coming days I will be making these Craft Beer Flights available for purchase in my shop, I will let you all know when that is.

I will be taking a break for the month of December for the holiday period so I dont have any more projects on the books until the new year, I am going to be doing my anuual shop cleaning and trying to reorganize my shop for 2019.

Until the new year have a safe and happy holiday’s.

Craft Beer Flight : Part 6

Today was all about prepping for finish and applying finish to the flights. I chose to use a Oil based Polyurethane finish because of its properties to protect from moisture since we are adding beer glasses into the mix.

TODAY’S ACTIVITIES INCLUDED

  • Finish Sanding

  • Prep for finish

  • Before & After

FINISH SANDING

So before I could head into applying the first coat of the finish I needed to smooth all surfaces down so I used my miscellaneous sanding equipment which included:

  • Belt & Disc Sander

  • Random Orbital sander

  • Oscillating spindle sander

I used all these machines to get every surface smooth to about 320 grit.

I used Varathane Oil Based poly on the flights, I usually thin this out but because I need all the protective properties I didn’t this time.

I used Varathane Oil Based poly on the flights, I usually thin this out but because I need all the protective properties I didn’t this time.

Here are both styles of flights all sanded I have to say that I really love both and especially love all the contrasting woods I used.

Here are both styles of flights all sanded I have to say that I really love both and especially love all the contrasting woods I used.

Here is a close up the Maple & Sapele style

Here is a close up the Maple & Sapele style

Here is the other style of flight with Sapele, Maple & Walnut

Here is the other style of flight with Sapele, Maple & Walnut

PREP FOR FINISH

So now that all my sanding was completed I needed to ready my work bench for some finishing work. I made my own finishing stands as the store bought ones were a little expensive, so I used some scrap plywood and and screws. They are super easy to make and whats also handy about them is that you can make a lot of different sized stands and they can be stacked as well. I have put some pictures below.

Here is a few stacked, makes storage easy. As you can see on one I have screws protruding through the top, this is what your work piece sits on while applying the finish.

Here is a few stacked, makes storage easy. As you can see on one I have screws protruding through the top, this is what your work piece sits on while applying the finish.

Here is the top side of the stand, I used a forstner bit to drill a recess into the top that way the screw protrudes and allows each stand to sit onto each other.

Here is the top side of the stand, I used a forstner bit to drill a recess into the top that way the screw protrudes and allows each stand to sit onto each other.

Here are the stands in action, these are cheap and can be batched out how many you need and all you need is some scrap plywood and screws.

Here are the stands in action, these are cheap and can be batched out how many you need and all you need is some scrap plywood and screws.

Next I needed to lay out all my flights onto their respective stands and go about applying the finish, as I said before I used an oil base polyurethane but I also used a foam disposable brush as I feel I get really nice finish using them.

Here are all the flights laid out on the rosin paper that I use to protect the work surface.

Here are all the flights laid out on the rosin paper that I use to protect the work surface.

BEFORE & AFTER FINISH

Next I needed to add the finish and below you can see a few before and after pictures of the flights.

Before Finish

Before Finish

After finish, although the finish is still wet in this picture I really like how the finish brings the flight to life. I will probably use 2/3 coats sanding between each coat.

After finish, although the finish is still wet in this picture I really like how the finish brings the flight to life. I will probably use 2/3 coats sanding between each coat.


BEFORE FINISH

BEFORE FINISH

AFTER FINISH WOW… the finish as you can probably tell is still wet but really love the 3 contrasting woods especially the Sapelle on the outside edges.

AFTER FINISH WOW… the finish as you can probably tell is still wet but really love the 3 contrasting woods especially the Sapelle on the outside edges.


Here is the how I left the flights today.

Here is the how I left the flights today.

NEXT

  • I need to apply at least one more coat of poly and then I need to determine whether to add any more coats, I don’t want the wood to feel like plastic

  • Then they will be ready for sale.

Well that’s all I have for today, to be honest I am not going to document every coat I apply to the flights so the next post regarding this project will be the wrap up post, until then

Take Care & Thanks for reading

PS: I do need to start my monthly newsletter for November so if you would like to be added to the subscribers list please click here

CRAFT BEER FLIGHT : PART 5

So today I got a little done, wasn’t a very busy day because of the glue-up.

TODAY’S ACTIVITIES INCLUDED :

  • Finished putting the dadoes in the flights.

  • The Glue-up

DADOES

I finally finished putting all the dadoes in the bottom sides of the flights. As I did previously I put a 1/2” dado stack into the table saw and raised it 1/4” high. Below is a picture of the finished flights, now that all joinery is cut so as that I glue in the sides and then its on to the glue up.

So all the flights are made all 9 of them.

So all the flights are made all 9 of them.

THE GLUE-UP

The glue-up was a lot of fun trying to figure out how I was going to glue up 9 flights at the same time with only 13 clamps. The glue-up consisted of just attaching the two feet into the dadoes I just cut.

My solution was to use the jig that I had just made for the pipe clamps . I used a brace across the pipe clamps that way I could clamp 2 flights back to back and only use 4 clamps for the bottom feet of the flight, then I used the rest of the clamps to secure the tops of the flights, its very complicated but here are some pictures to clarify.


Here you can see the pipe clamp jig with the braces stretching across all the flights, this way I could save on clamps and 2 separate clamps across both feet instead of using individual clamps for each foot.

Here you can see the pipe clamp jig with the braces stretching across all the flights, this way I could save on clamps and 2 separate clamps across both feet instead of using individual clamps for each foot.

Here is a closer look at the top clamps securing the front feet and bottom brace can support the back feet

Here is a closer look at the top clamps securing the front feet and bottom brace can support the back feet

Another close up picture

Another close up picture

This clamping jig is really versatile otherwise I would have needed to buy a boat load clamps, I could fit 4 flights this way and the other 5 were clamped elsewhere using the back to back method.

NEXT…

  • I need to do one more finishing sanding and wipe them down

  • Finally I need to apply a couple coats of oil based Polyurethane.

Craft Beer Flight : Part 4

As I mentioned in the last part I had basically made 1 beer flight and today had a lot of rinse and repeat, and I am a man of my word. But there was also some other steps that I had started and will finish tomorrow.

TODAY’S ACTIVITIES INCLUDED:

  • Finish cutting all the glass holes

  • More Router Time

  • Oscillating Spindle Sander Time

  • More Sanding, but with my orbital sander

  • Creating the dadoes

CUTTING HOLES

Since I had only cut all the holes in 1 of the 9 flights I had to finish cutting all them holes. Nothing really new here as I documented this step in a previous part. Every Flight was to receive four 2” wide holes for the 5 Oz glasses to fit into. So it was back to the drill press to batch out this step. I did do one thing different and that was I gang cut two flight tops at a time. But to be honest I don’t think it was any faster because cutting two at a time seemed to bog down my little bench-top drill press and cant honestly say it was any faster.

Here is me starting to cut out the holes, it hadn’t dawned on me to start gang cutting them together yet.

Here is me starting to cut out the holes, it hadn’t dawned on me to start gang cutting them together yet.

After finishing all the hole cutting I had these little disc that I thought looked awesome and didn’t want to throw them away, not sure what to use them for YET!!!

After finishing all the hole cutting I had these little disc that I thought looked awesome and didn’t want to throw them away, not sure what to use them for YET!!!

Here is all the holes finished, next I needed to bring all these piece to the router table. This picture is of the maple and Sapele flights.

Here is all the holes finished, next I needed to bring all these piece to the router table. This picture is of the maple and Sapele flights.

Here is the other style, I was very careful to match all pieces in order of me cutting them so as that the grain matched on the whole piece once glued up.

Here is the other style, I was very careful to match all pieces in order of me cutting them so as that the grain matched on the whole piece once glued up.

ROUTER TIME

As I also did in a previous step I ran the flight parts through a 1/4” round-over profile bit in the router, I like the look of round-overs and they also feel great to the touch. I spent a decent amount of time doing this as I needed to do 8 flight with 3 parts that is a lot of routing, but they did come out awesome.

Here is a picture of the flight top and I used to round-over the inside edges of the holes and I also rounded over the top face of the flight.

Here is a picture of the flight top and I used to round-over the inside edges of the holes and I also rounded over the top face of the flight.

This picture shows all pieces after the round-over has been applied to the edges.Next is sanding

This picture shows all pieces after the round-over has been applied to the edges.Next is sanding

Here is a close-up of the top with the round-over profile applied.

Here is a close-up of the top with the round-over profile applied.

Here is what the sides look like with the round-over applied.

Here is what the sides look like with the round-over applied.

OSCILLATING SANDER TIME

Now that I have completed all the router work on all the pieces it was time to get rid of the tool marks left behind by the router bit, to get all the curves I used my spindle sander and this is an awesome tool, its not a multi-function tool but all the same it is very good at sanding all them circular shapes in the wood and it will takes the finishing touches up a notch.

Here is my WEN Oscillating Spindle Sander, this tool is a real joy to use, I used my 1” diameter sanding sleeve to get into all the curves, I could have used a 2” sanding sleeve but didn’t want to replaced all the sleeves as that would have been tim…

Here is my WEN Oscillating Spindle Sander, this tool is a real joy to use, I used my 1” diameter sanding sleeve to get into all the curves, I could have used a 2” sanding sleeve but didn’t want to replaced all the sleeves as that would have been time consuming, anyway the narrower diameter fit very well into all the curves I had.

MORE SANDING:ORBITAL SANDER

Now that all the curves were sanded it was time to sand all the faces and edges of the parts and to do that I used my orbital sander on a non-slip mat because most of the part’s were very small and I needed to keep them stationary. I started with 100 grit sandpaper on the sander and finished with 320 grit and all the parts were very smooth to the touch.

Here is a image of my sander and the non slip router mat but I use almost all the time when I need to sand something that is very small and clamps and vises are not the best options to hold down the work-piece

Here is a image of my sander and the non slip router mat but I use almost all the time when I need to sand something that is very small and clamps and vises are not the best options to hold down the work-piece

DADO TIME

Now this is a step that I didnt do before and that is creating the dado groove to receive the feet on the under side of the flight top.

I put a 1/2” wide dado stack into my table-saw and raised it to a 1/4” high as that was the depth of the dado, I measured 1/2” from each side so as that when the glasses were in place they didn’t interfere with the feet or sides.

Here you can see the feet sitting in the dado I just cut, the dado groove runs the entire width of the flight, I have to say that it looks great for a simple joint and it is also extremely strong.

Here you can see the feet sitting in the dado I just cut, the dado groove runs the entire width of the flight, I have to say that it looks great for a simple joint and it is also extremely strong.

Here is a close-up of the dado joint, fits like a glove.

Here is a close-up of the dado joint, fits like a glove.

Here is where I leave it for today, this is a picture of one of the flights done, just need to be glued up.

Here is how I left 1 of the flights , tomorrow more rinse and repeat.

Here is how I left 1 of the flights , tomorrow more rinse and repeat.

That is where I leave it for today.

NEXT:

  • Finish cutting all the dadoes

  • The Glue up

  • Applying the finish.

Thanks for reading and I will catch you next time.

Craft Beer Flight : Part 3

So this morning I had a pretty productive day until my drill press broke but I fixed it. I had a decent amount of work to do but only had half the time I usually have, but I still declare it as a productive morning.’

TODAY’S ACTIVITIES INCLUDED

  • Finished some surface Sanding

  • Cut parts to size

  • Some Layout

  • Drill Press Time

  • Crisis

  • Holes all cut

  • A little routering

  • Happy so far

SANDING

After doing all the hand planing yesterday I had very little to do with my random orbital sander, I started with 120 grit paper and finished with 320 grit and I was very happy with the feel of the wood. After all the events of the past two days of gluing up and ripping wood I now finally have 3 lengths of wood that I can now turn into 2 styles of flight.

Below you can see the lengths of wood all ready to be chopped into individual flights.

Here ate the 3 pieces of wood all ready to be chopped up.

Here ate the 3 pieces of wood all ready to be chopped up.

Here is the soft Maple & Sapele wood style

Here is the soft Maple & Sapele wood style

Here is the Soft Maple, Sapele & Walnut style.

Here is the Soft Maple, Sapele & Walnut style.

CUT PARTS TO SIZE

Using my plans I cut all the pieces to final length and made sure to cut the pieces in sequence so as that grain wrapped all around the flight adding that little visual interest if someone was looking at it closely.

I set up my miter station so as that I didn’t have to measure the work-piece every-time I needed to cut it. So I made some pre-dimensioned spaces to use for each size cut.

Here is the work-piece on my chop saw with the spacer, there was a decent amount of cuts and they all came out exactly as I wanted.

Here is the work-piece on my chop saw with the spacer, there was a decent amount of cuts and they all came out exactly as I wanted.

Here is a close-up of the spacer.

Here is a close-up of the spacer.

Here are the 3 parts came out the exact dimensions I wanted.

Here are the 3 parts came out the exact dimensions I wanted.

SOME LAYOUT

I needed to do a little layout on the parts mainly because I was cutting so many holes in the 3 parts and I needed to make sure all the cuts were in the right places.

Using my 3D plans I used this to determine where to make my layout marks especially on this piece as there is 3 half-circles to be cut.

Using my 3D plans I used this to determine where to make my layout marks especially on this piece as there is 3 half-circles to be cut.

I used my combination square to mark the center points of where the holes that would hold the glasses were to be cut.

I used my combination square to mark the center points of where the holes that would hold the glasses were to be cut.

DRILL PRESS TIME

Most of the cutting and shaping in this project will be done on my bench-top drill press using 3 different diameter hole saws, doing half-circles on the bench-top cause a few problems which I encounter and also their solutions

  • Make difficult cuts on a small sized work-pieces

    My solution to this problem was to enclose the work-piece on all sides so as that that both sides of the half cut were supported and didn’t pop out and also very importantly was my fingers were no where near the cutting edges of the hole-saws.

  • Keeping the parts orientation the same on all parts while cutting

    I used a system of little fences surrounding the work-piece so as that the work-piece didn’t move while I was cutting out the 1” diameter half circle

Here you can see how I surrounded the work-pieces I used scrap wood and double sided tape to secure the pieces. Worked great

Here you can see how I surrounded the work-pieces I used scrap wood and double sided tape to secure the pieces. Worked great

Here is an image of me starting to cut the large glass holder holes.

Here is an image of me starting to cut the large glass holder holes.

  • Obstacle using the hole saw.

    One of the problems that I encountered using the hole saw was that the hole saw had a drill bit centered inside the hole saw and that proved difficult in centering the hole saw on the work-piece, but what I didn’t realize was that it could be removed. You can see the drill bit in the hole saw below.

As you can the drill bit in the center of the hole saw is there to make sure that cut is centered, but was easily fixed as it unscrewed from the saw.

As you can the drill bit in the center of the hole saw is there to make sure that cut is centered, but was easily fixed as it unscrewed from the saw.

CRISIS

Right when I started cutting the little side holes my drill press had broken, the entire chuck came off the drill press, but it was an easy fix after watching some YouTube video I had it fixed in under a half an hour. I think what happened was that the chuck was never properly seated on the arbor so I tapped the whole chuck onto the arbor and so far I have not encountered any problems, below you can see the chuck still attached to the hole saw.

Here is the chuck, thank god for YouTube and some quick thinking on my part.

Here is the chuck, thank god for YouTube and some quick thinking on my part.

HOLES ALL CUT

After most of the morning cutting holes and layout all six of my beer flights have sides completed I need to finish cutting all the glass holder holes . But as you see below they look pretty good. I did get a little tear out on the big holes but I cleaned all that up on my spindle sander. In my next step I will also add them through the router with a round-over bit and that will clean them up even more. There are some pictures below

Here is the top before finish sanding

Here is the top before finish sanding

Here are all the parts before I got to sand them, I used my spindle sander to clean them up.

Here are all the parts before I got to sand them, I used my spindle sander to clean them up.

ROUTER TIME

I wanted to add a little profile to all the edges as I think it gives them that polished look and a nice professional look. So I used my trusty router table and 1/4” round-over bit and routered most of the edges of the pieces. I needed to be very careful with the small side feet as it wouldn’t take much to blow out a piece of the sides.

Below you can see the finished profiled edges.

Before routing

Before routing

After Routing,

After Routing,

Here are all 3 pieces routered and I have to say look great, I also added the same profile to the top side of the large flight piece but I didn’t do the bottom face as I will need to add a dado groove in there next.

Here are all 3 pieces routered and I have to say look great, I also added the same profile to the top side of the large flight piece but I didn’t do the bottom face as I will need to add a dado groove in there next.

Here is a closer look at the profiled edge on the top piece.

Here is a closer look at the profiled edge on the top piece.

ALMOST DONE, BUT NOT QUITE YET

Although I still have to glue the legs in and cut the dado grooves on the underside of the top I needed to see what they look like all assembled , I also needed to make sure that the glasses all fit, so here are some images of them pre-assembly

image-6529.jpeg
image-6491.jpeg
image-7124.jpeg

So that is what I got done today, I still have a good bit of repetitive work as I am making 6 of these. But so far so good.

NEXT

  • Cut Dado grooves on the underside of the top so as that I can glue the feet on.

  • Rinse & Repeat on the other 6-8 Flights

  • Apply finish

Craft Beer Flight : Part 2

So today marked the second day of the project and before I could get started on a side project and that was a Pipe Clamp glue-up jig and I created its own blog entry and you can find it in the link below.

TODAY’S EVENTS INCLUDED

PIPE CLAMP GLUE-UP JIG

I wont go into too much detail on this as I created a project blog detailing the build, but I will say this. After yesterday’s glue-up I was very frustrated both during and after . Glue-ups need a good system and a little rehearsal because my system was flawed it didn’t matter how much planning went into it, it would never be a pleasant experience.

I had researched making this some time ago but it was always put on the long finger and put onto my to-do list, which I never got to do. But because this project had a lot of different parts in gluing it up I tried a method that didn’t work and decided before I move one more step in the current project I needed to get this done.

Anyway the project is super easy and if you have scrap plywood lying around it will not cost anything to make. Its basically a jig that has a front & back with 2 two sides. It can be broken down and stored away when not in use.

Below is the finished image of the jig, but [please feel free to go over to the blog entry for more details, the link is below)

Here is the finished clamping jig

Here is the finished clamping jig

BLANK CLEAN-UP

The boards needed a good bit of clean-up , and the blanks developed a bow in the middle so I tried to address this by turning the 5’ sections on there sides and trying to level it by running it through the table-saw blade, I really dont recommend doing this as it unsafe. But since I don’t have a planer or joiner I had to try something. It came out OK but tomorrow I will need to use my belt sander with some course paper to true the face up a little more.

Below you can see how I left it today

Here is the blanks as I left them today, I have some wood burn to clean up and then start turning these in beer flights, the fun stuff.

Here is the blanks as I left them today, I have some wood burn to clean up and then start turning these in beer flights, the fun stuff.

ONE FINAL GLUE-UP

The last thing that I wanted to get done today was to glue-up that final blank that I could luckily make after realizing that I had enough scrap pieces left from yesterday, I came up with a flight that is a little narrower but had maple & sapele woods that I could turn in another 2-3 flights.

Another bonus was that I could get to use the new glue-up jig that I just made and man o man was it a much better experience and hopefully will result in a much flatter glue-up than yesterday’s.

You can see some pictures below.

Here you can see the different design in the clamping jig. Most of the blank is maple with 2 contrasting Sapele pieces on each side.

Here you can see the different design in the clamping jig. Most of the blank is maple with 2 contrasting Sapele pieces on each side.

The jig worked an absolute charm

The jig worked an absolute charm

Another picture of the jig in action.

Another picture of the jig in action.

Well that is what I got done today, thanks for tuning in and I’ll catch you again later.

NEXT……..

  • Clean up the blanks with some sanding and make sure they are true and flat

  • Hopefully I can start cutting the blanks up so as that I can move onto the next step, layout.

Craft Beer Flight : Part 1

So today I started making the craft beer flights and boy was it a messy start, mainly because I needed to do pretty big glue-ups. They were not widest glue-ups but they sure were plenty long, anyway more about that later.

Today’s Events Included:

  • Ripping all the wood on the table-saw

  • My Designs

  • Glue-up Prep

  • Glue-Up


Ripping the wood

So I needed to take all the wood and cut them to the dimensions that I made on my plan, I ultimately wanted a 4-1/2” wide flight and using 3 species of wood which were Sapele, Maple and Walnut. So I needed to take these boards and cut them into smaller strips.

so I installed a rip blade in my table-saw and also placed a feather-board in place so as that the wood piece would move while I was ripping it.

Here is the table-saw set up I made with the feather-board in place

Here is the table-saw set up I made with the feather-board in place

Here is the 3 species of wood that I will be ripping.

Here is the 3 species of wood that I will be ripping.

Here are all the pieces ripped and came out great as there was no burn marks on the wood as I used a rip blade.

Here are all the pieces ripped and came out great as there was no burn marks on the wood as I used a rip blade.

Here is another close up of the boards that were just ripped.

Here is another close up of the boards that were just ripped.

My Designs

So here is the design I came up with I really like the contrasting woods and should come out great, I was lucky enough to make another design by some of the leftover off cuts that I had.

So here is the design I came up with I really like the contrasting woods and should come out great, I was lucky enough to make another design by some of the leftover off cuts that I had.

Since I had more maple and sapele left over I could make this design as well its really nice as well. So what started out as making 6 flights I will be able to make 8-9.

Since I had more maple and sapele left over I could make this design as well its really nice as well. So what started out as making 6 flights I will be able to make 8-9.

Glue-Prep

The glue-up was going to be a little complicated because I wanted to glue up three 5 foot sections all at one time. I wanted a system where I would clamp all three together with dividers between each of the glue-ups and that way I would not need a ton of clamps, but that turned out to be not the most efficient way and I didn’t get one of the glue-ups done. I was using Titebond II and the open time was not long enough to fit in 3 glue-ups so I just did 2.

I really dislike the method I used and really need to rethink my process, I use 3 pieces of plumbing white pipe on top of wooden risers as you can see in the picture below, and the dividers that I used to separate each glue-up were different heights so I couldn’t use clamping cauls, I will know more tomorrow after the glue has set but I think I am going to have a fair bit of surface sanding because I don’t have a planer.

I also had to make a trip to the local big box store to purchase more clamps as the clamps I had were too short so I got the Bessey Pipe Clamps and a couple of 24” black pipe pieces. After I finished for the day I started researching better clamping set-ups If my shop was a little bigger I would just make a clamping table but since that is not possible I found another method which is portable and can be broken down and stored away when not in use. I think I am going to make this tomorrow and probably make a few different rail sizes depending on what size clamps I will be using at any specific time.

As you can see its a front and back rail with stretchers on either side, he notched out half circles to accommodate the pipe clamps, The stretchers are help together using a half-lap joint and when not in use can be just pulled up and the jig can be…

As you can see its a front and back rail with stretchers on either side, he notched out half circles to accommodate the pipe clamps, The stretchers are help together using a half-lap joint and when not in use can be just pulled up and the jig can be stored away.I think I will make mine the same but I will add different sized stretcher depending the size of clamps I will be using, they usually range from 12” - 36”. Click here for the website I found this on.

Here are the white PVC pipe that I have nesting in some scraps, but didn’t work great because the scraps kept falling over.

Here are the white PVC pipe that I have nesting in some scraps, but didn’t work great because the scraps kept falling over.

The idea of the white pipe was that it gave the work-piece a flat surface to sit on, and it also afforded me to add height to the glue up so as that I could place clamps on the bottom and top surfaces of the work-piece.

The idea of the white pipe was that it gave the work-piece a flat surface to sit on, and it also afforded me to add height to the glue up so as that I could place clamps on the bottom and top surfaces of the work-piece.

Here is the final pieces with all the glue applied, I will not be doing this again. But we live and learn.

Here is the final pieces with all the glue applied, I will not be doing this again. But we live and learn.

I really do like the patterns on the flight and think they will be really nice when finished.

That’s all I got done today and thanks for reading.


NEXT

  • Build the pipe clamp glue-up jig… I might need to get some plywood but I am not sure if I have enough scrap to get this done.

  • If I have enough time I need to do some surface sanding on the 2 glue-ups I got done today and I would like to get the other glue-up completed hopefully using the new jig.


Craft Beer Flight : Prototype

Some times its beneficial to make a prototype of the project that you eventually want to make especially when you are marrying 2 elements together, most of the time on a project this size its not always necessary but I had to many unknown measurements especially considering putting glasses in the flight, and also it helps to have a tangible object in your hand to see any design elements that might look great on a computer but look bad on a finished project.

Below are the steps I took to make the prototype:

  • I used plywood to make the prototype as I had some on hand, but really any material could be used to make it. So my first step was to cut 3 pieces of plywood to my dimensions for the beer flight, a top and 2 sides

  • Next I had to do some layout

  • Cutting the circles & Circle cutting tools

  • Cutting the dadoes

  • Router Work

  • A little assembly

THE PARTS

There are only 3 parts to the beer flight, the top and two sides. Below is a picture of the plywood parts, when I actually get to making the flight I will be using 3 species of wood that I will need to glue up but I don’t have to do that now and this prototype project only took me like 90 minutes to make.

Here are the parts, the back pieces are the sides and the front piece is the top of the flight.

Here are the parts, the back pieces are the sides and the front piece is the top of the flight.

SOME LAYOUT

There was quite a lot of layout work in the design phase of this project, so I took all my dimensions from Sketchup and that was one of the main reasons I am making this prototype. Here are some of the dimensions that I needed to layout

  • Centering the holes for the glasses on the flight top, making sure to keep clear of the left & right legs that were underneath the top. So I measured 2-3/4” from each of the sides (left & right), the second measurement was 5-1/4” repeat that measurement as i did on the first. I also need to draw a centering line 2-1/4” from the top edge and where these lines intersected was the center hole I would use my hole saw to drill out the piece (more on that later)

  • Next for determining the center hole for each of the 4 holes that will be cut for the glasses. I needed a 2” diameter for each hole and I also wanted a 1/2” space between each of them holes. This was another reason for the prototype because I wanted to make sure that the 1/2” space was enough so as that the glasses didn’t bump into each other as the style of glass I was using had wider top than bottom.

  • Next piece of layout was for the feet mainly because I was cutting 3 half-circles into each piece. A half circle was to be cut halfway up the left & right side of each foot and that hole diameter was 1” and one half circle on the bottom and that diameter was 2-1/2” wide centered on the foot.

Here is the layout done on one of the feet.

Here is the layout done on one of the feet.

Here is he layout on the top piece, I also drilled pilot holes for the hole saw to track correctly.

Here is he layout on the top piece, I also drilled pilot holes for the hole saw to track correctly.

Here is the layout for the dadoes, I measured 1/2” from each side and drew lines indicating where I wanted the dado to go, that’s later.

Here is the layout for the dadoes, I measured 1/2” from each side and drew lines indicating where I wanted the dado to go, that’s later.

CUTTING THE CIRCLES & CIRCLE CUTTING TOOLS

So since all of my layout lines are in place I needed to actually cut the circles that I incorporated into the design. I used three different diameter hole saws (1”, 2” & 2-1/2”)for this and I also used my bench-top drill press doing this, you could use a handheld drill but it would be difficult especially on the half-circles.

I used my Milwaukee Hole saw set as it had all the circle saw diameters that I needed, what a great tool even in a under-powered drill press like mine.

I used my Milwaukee Hole saw set as it had all the circle saw diameters that I needed, what a great tool even in a under-powered drill press like mine.

Here is a close-up of the 2” diameter hole saw.

Here is a close-up of the 2” diameter hole saw.

Here is my current drill press set up, if you would like more information on how I made the drill press table or drawer cabinet you can find more information here.

Here is my current drill press set up, if you would like more information on how I made the drill press table or drawer cabinet you can find more information here.

Cutting the circles started with me cutting the 2” diameter holes in the top, I needed to cut 4 of these as they will house 4 glasses.

Here is the work-piece positioned under the hole saw, the work-piece was turned end for end to get both left and right sides done, the saw did a great job as I didn’t get any burn marks on the work piece.

Here is the work-piece positioned under the hole saw, the work-piece was turned end for end to get both left and right sides done, the saw did a great job as I didn’t get any burn marks on the work piece.

Here is a close-up of the circle cut-out.

Here is a close-up of the circle cut-out.

Next I needed to cut out all the half-circles in the feet and I needed a method that would not waste any of the wood I have, So I came up with a method on the drill press that allowed me to cut the feet to exact dimensions not bigger, sure I could of made an overside work-piece and drill the full circle out and cut the circle in half but that meant wasting wood.

So the method I came up with was to use 2 sacrificial plywood scraps to go either side of the the work-piece which were stuck in place with double sided tape on my drill press table and support the entire cutting edge of the hole saw and when I was finished I could put another work-piece in place and repeat until my sides were milled.

also another thing to note that the feet had 2 different diameter half-circles to be cut if you remember from my layout.

Below are some pictures of the process.

Here is one of the sides in place and to the left and right are 2 sacrificial pieces, he idea was to make sure that the entire cutting surface of the hole saw had something to drill into , thus keeping the hole saw tracking in the downward direction…

Here is one of the sides in place and to the left and right are 2 sacrificial pieces, he idea was to make sure that the entire cutting surface of the hole saw had something to drill into , thus keeping the hole saw tracking in the downward direction and not chewing up the main piece, and it worked out great. This picture shows me drill the 1” diameter holes on the sides of the feet.

Here is another shot showing all the holes drilled out.

Here is another shot showing all the holes drilled out.

Here is a close up of one of the sides. Came out great

Here is a close up of one of the sides. Came out great

CUTTING THE DADOES

The joinery method I will be using to join the feet to the underside of the top will be dadoes. These are just grooves that I cut out at the table-saw with my dado stack, the width of the dado stack is determined by what thickness wood you are using. I measured 1/2” from the left and right side.

The other main reason I was doing a prototype was because I wanted to make sure that when the glasses were sitting in the flight that they didn’t interfere with the feet in any way, and thank god I didn’t.

Here is the bottom face of top and you can see the 3/4” wide dado that is also 1/4” deep into the top.

Here is the bottom face of top and you can see the 3/4” wide dado that is also 1/4” deep into the top.

ROUTER TIME

Finally I wanted to add some decorative elements to the flight so I used my router with a 1/4” round-over bit in the router to clean up all the rough and sharp edges left on the outside edges of the parts, I also wanted to add a round-over to the inside edges of the holes where the glasses will be sitting.

One thing that I might change is using either a different router profile bit for the edges on the top, or just using a 1/2” round-over, but I need to think some more on that.

Below are some pictures of the round-overs that were applied.

Here is the round-over profile added to one of the holes on the top. This will look a lot better when its actually wood.

Here is the round-over profile added to one of the holes on the top. This will look a lot better when its actually wood.

Here is one of the feet rounded over. I like the look of it and don’t think I need a larger bit.

Here is one of the feet rounded over. I like the look of it and don’t think I need a larger bit.

Here you can slightly see the round-over to the top, its very faint that is why I am thinking of using a larger round-over bit , or perhaps even a roman ogee profile might look better, food for thought.

Here you can slightly see the round-over to the top, its very faint that is why I am thinking of using a larger round-over bit , or perhaps even a roman ogee profile might look better, food for thought.

ASSEMBLED PROTOTYPE

I am so glad that I made this prototype and got most of my questions answered and happy to realize that all of my dimensions were correct, although it will take a decent amount of time in fabricating the feet I think they are worth it and really think they will look great in the woods that I will be using.

I also like how the transition from the feet into the top is really nice and love the look of the very visible dado that will attach the feet to the flight. The only thing that I am questioning is the width of the flight top which is 4-1/2” wide, thinking possible that is too wide for 2” diameter glasses, so maybe after-all I will be adding a larger round-over profile to the top which will eat away some of that 1” on the front and back edges of the flight.

Below are several pictures of the finished prototype, I hope you like.

Frontal picture showing the glasses in there homes, there is about 1” clearance from the glasses to the table-top. Love the dado joint.

Frontal picture showing the glasses in there homes, there is about 1” clearance from the glasses to the table-top. Love the dado joint.

Here is the top view, 1/2” gap is perfect.

Here is the top view, 1/2” gap is perfect.

Here is the side foot, I think this is my favorite aspect of the prototype, really like the curves.

Here is the side foot, I think this is my favorite aspect of the prototype, really like the curves.

Even in plywood the dado joint looks awesome , imagine what this will be like in the real deal.

Even in plywood the dado joint looks awesome , imagine what this will be like in the real deal.

NEXT:

I will be starting the build. Hopefully I will catch you guys later.

New Project: Craft Beer Flight

INSPIRATION

I have been wanting to make one of these for some time now and I figured now would be a good as time as any, and they make a great gift. My last project was a success but to be honest I am a little worn out making Trivet’s but this is why I love woodworking as a hobby mostly because I can pick and choose what projects to make and when.

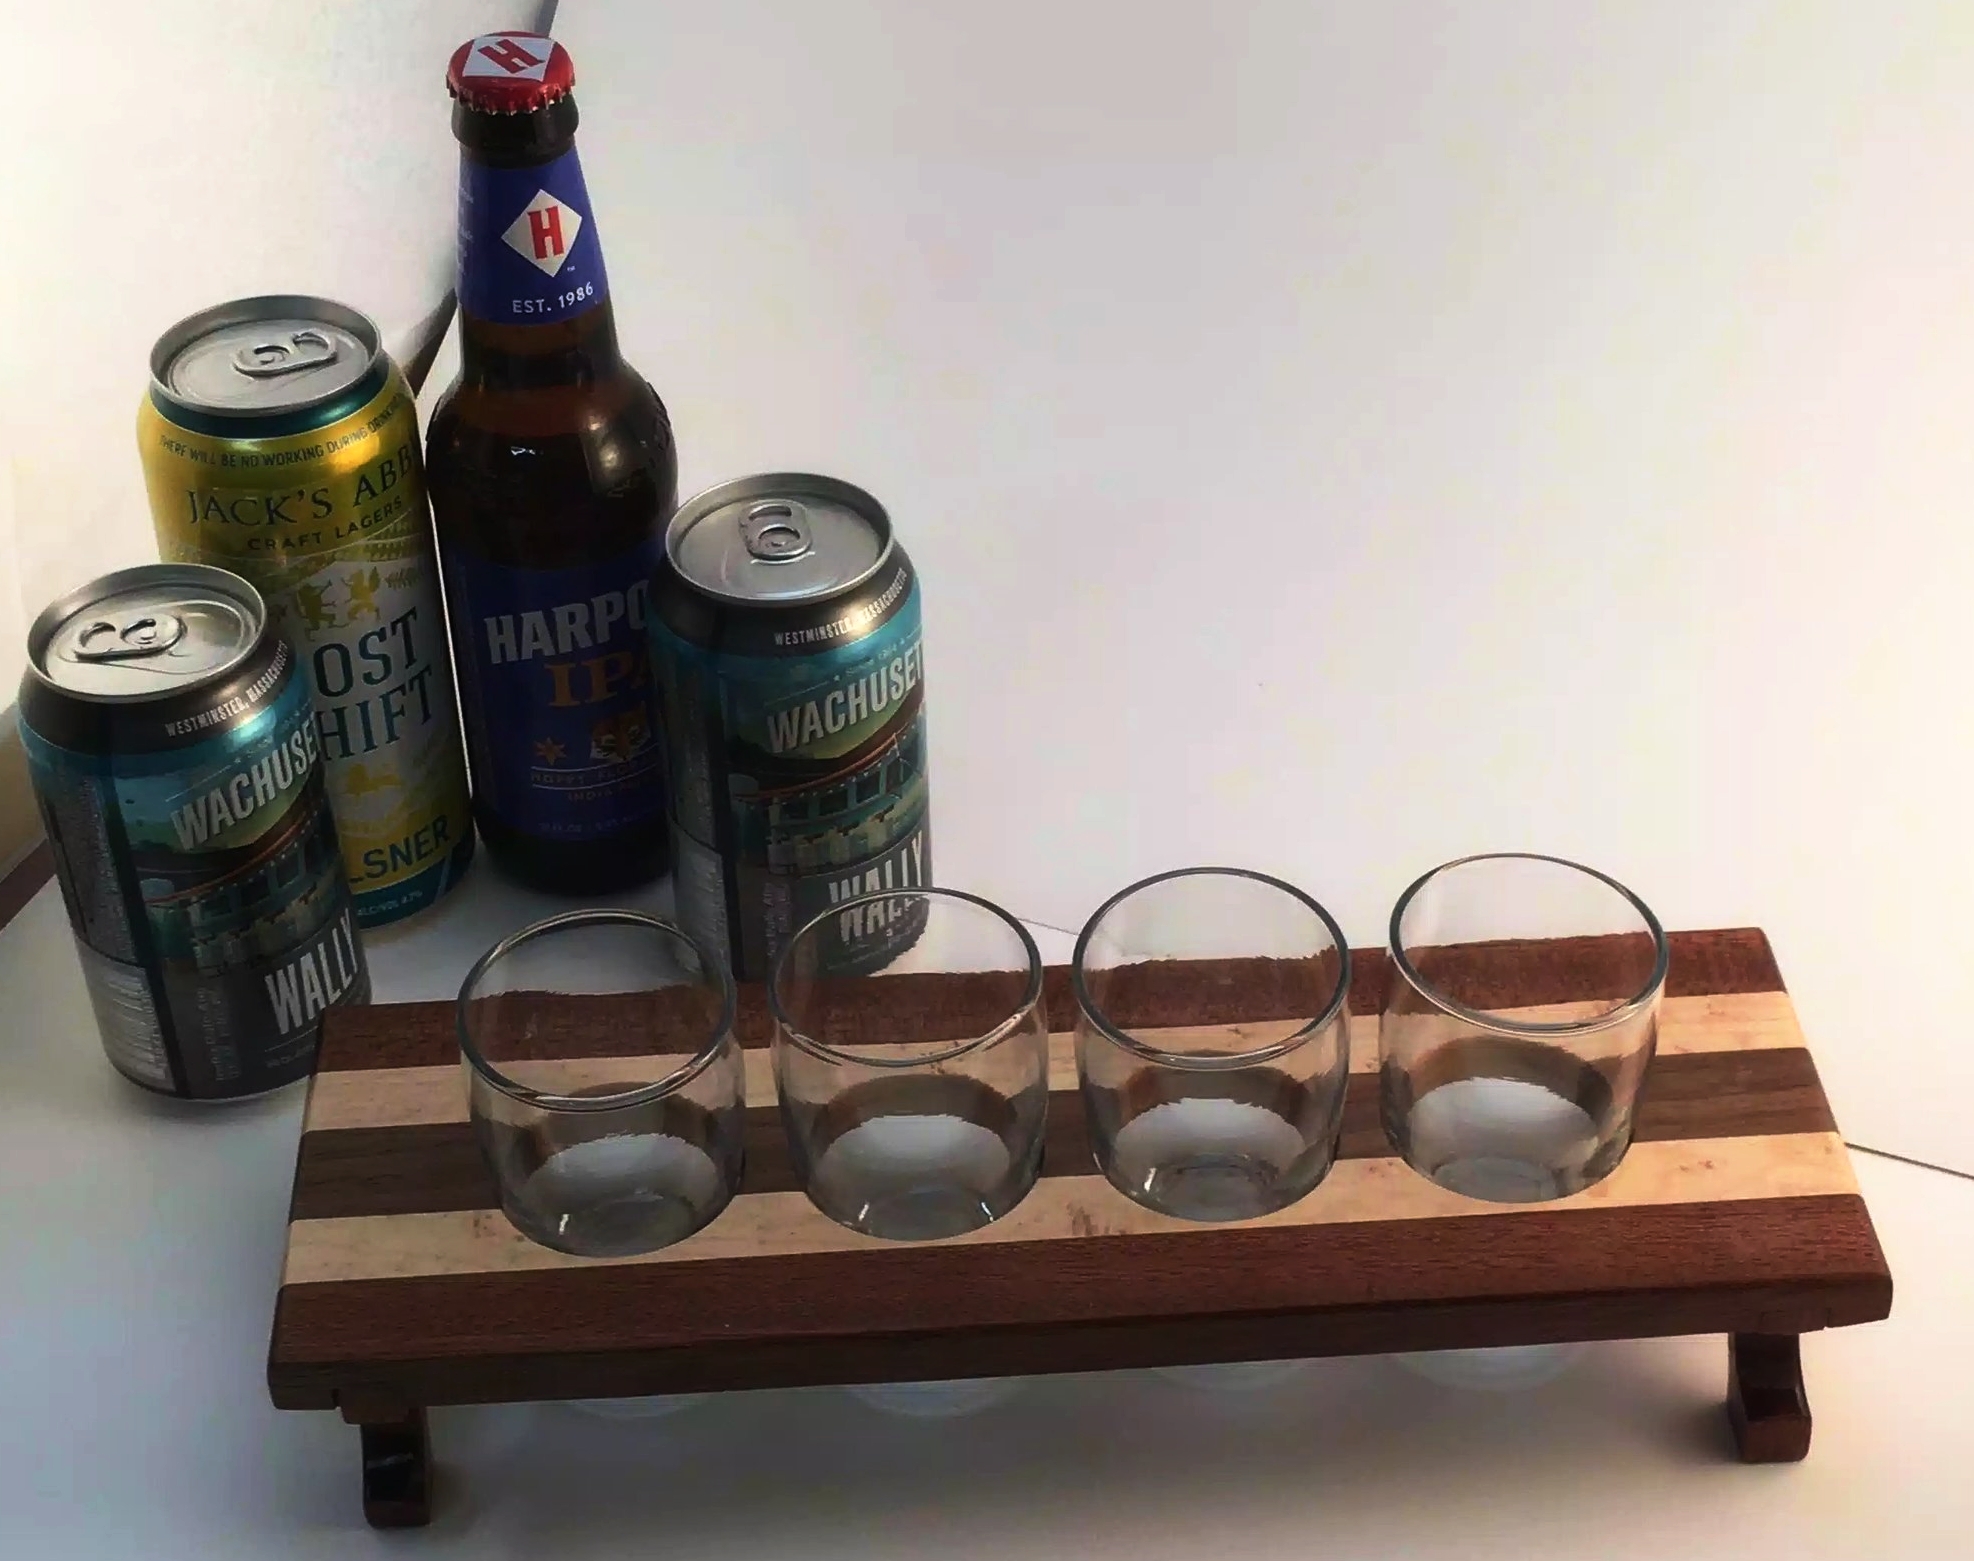
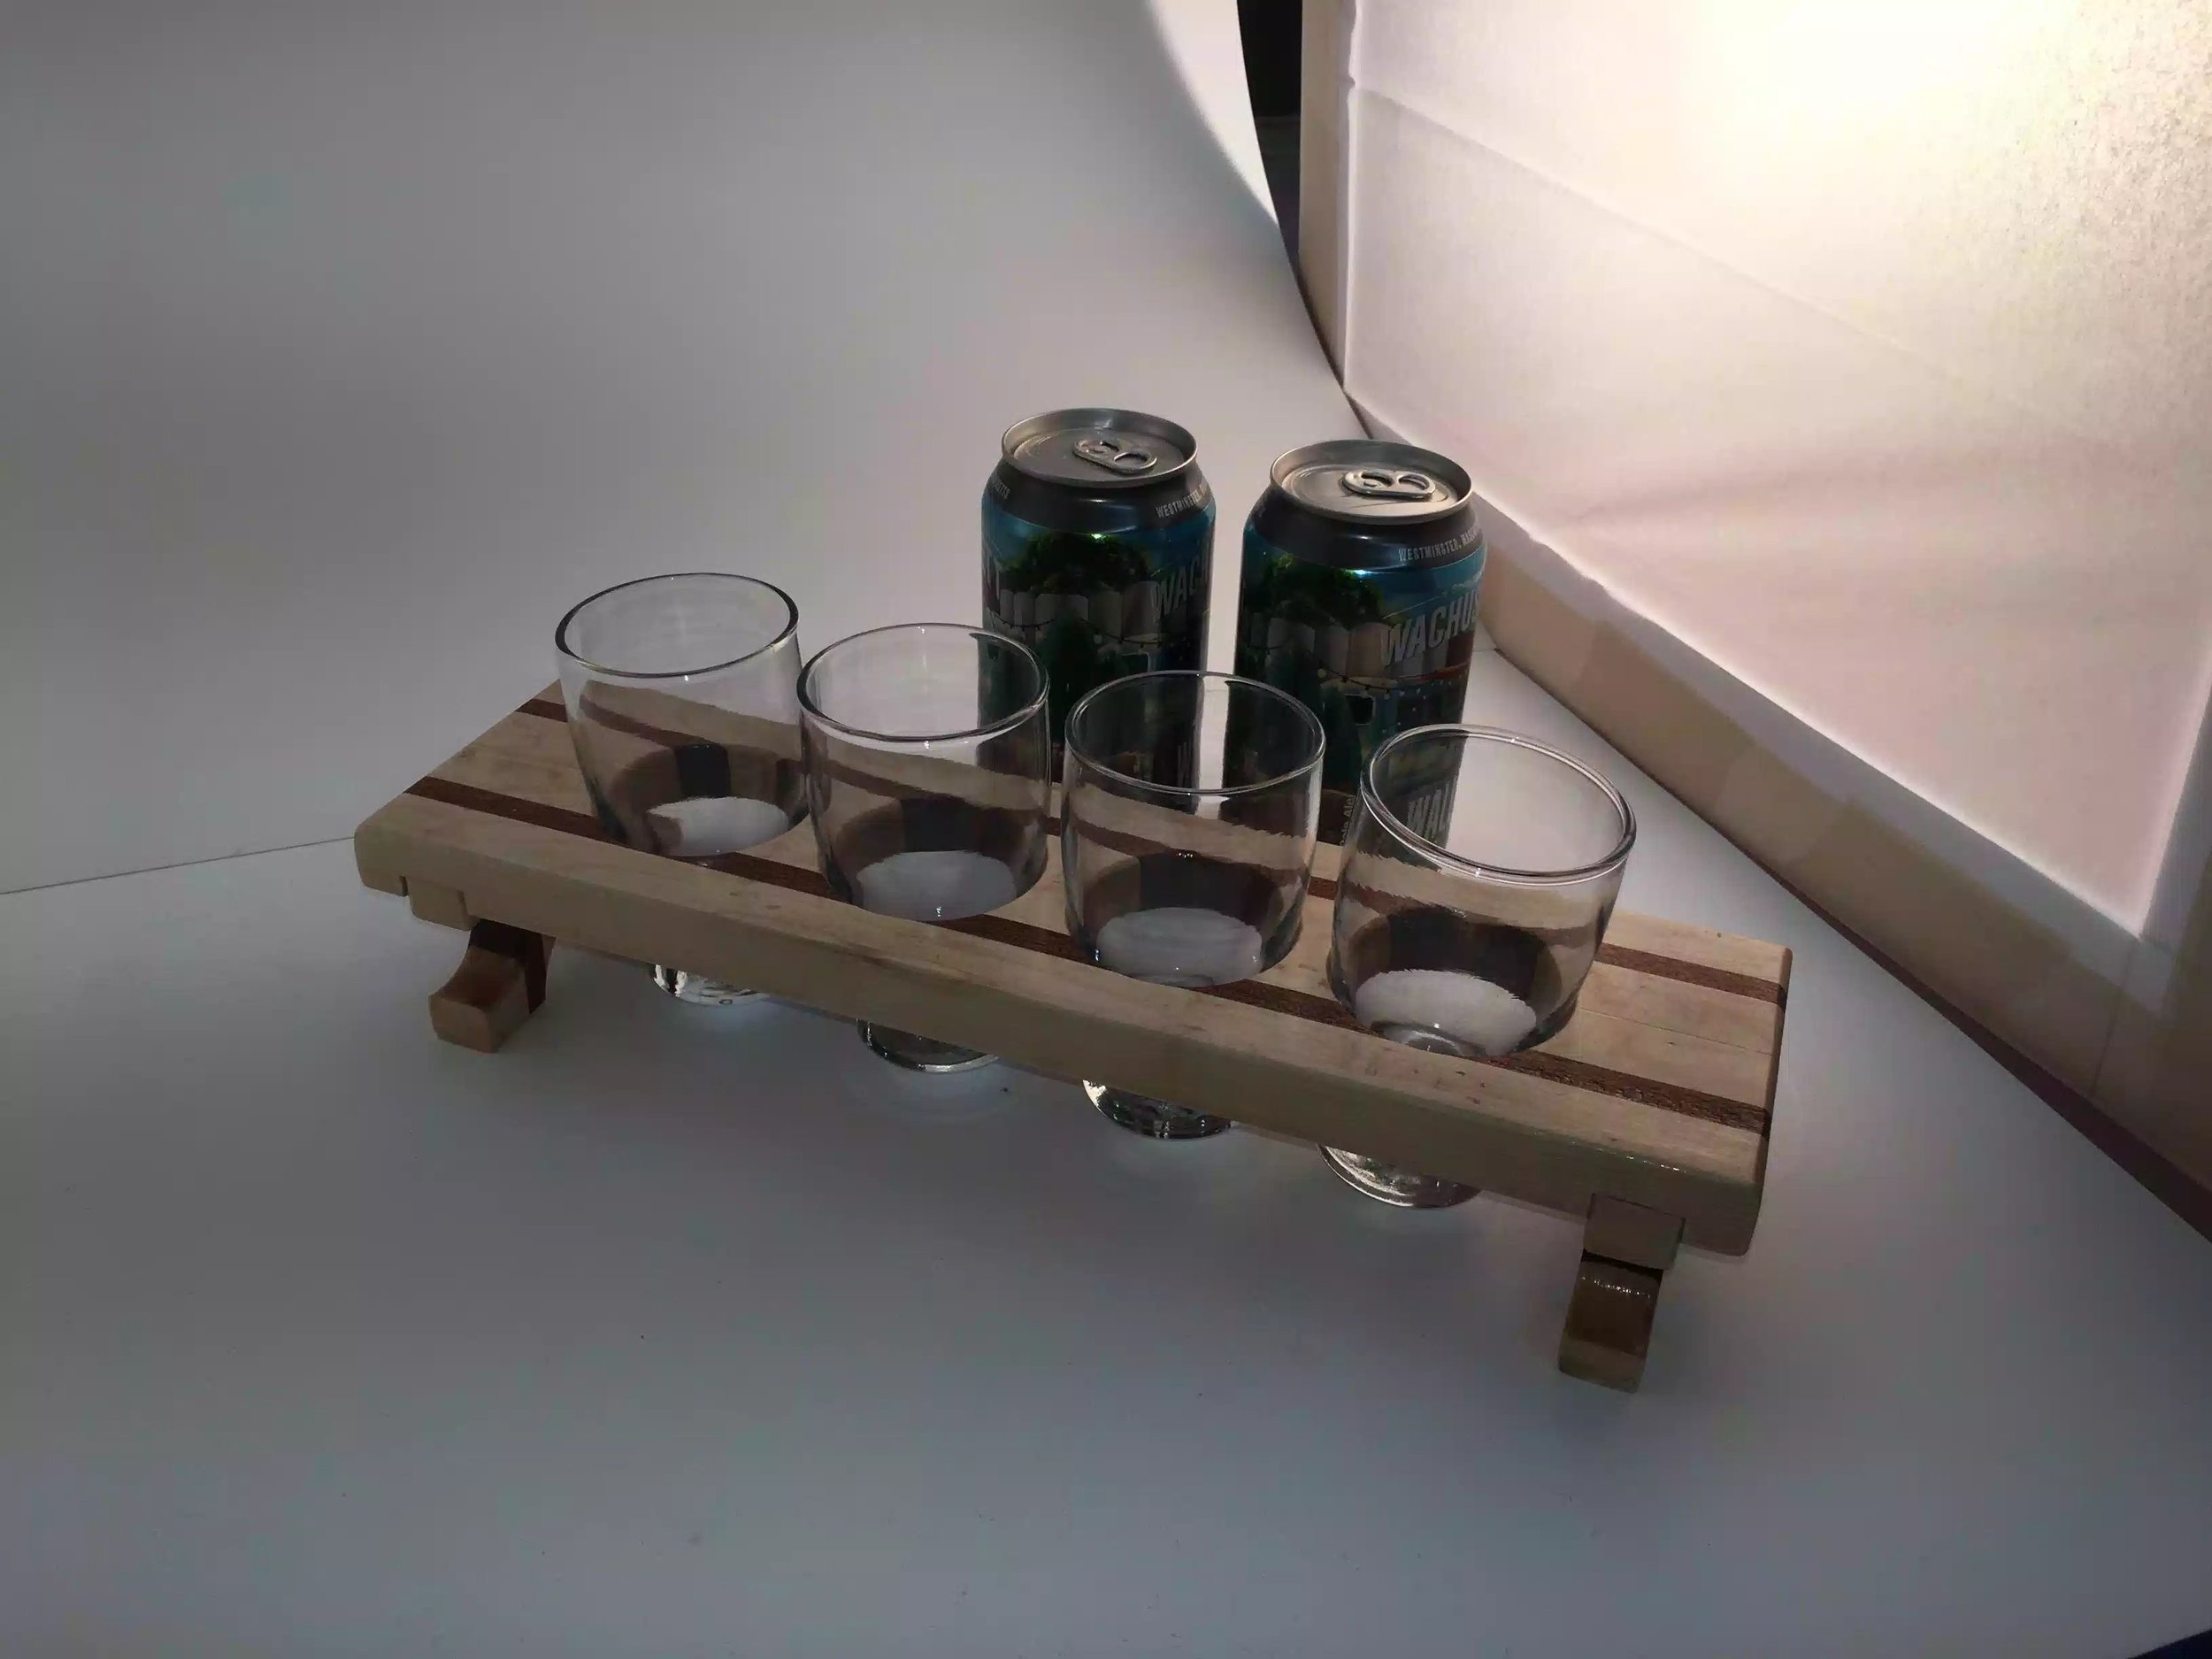
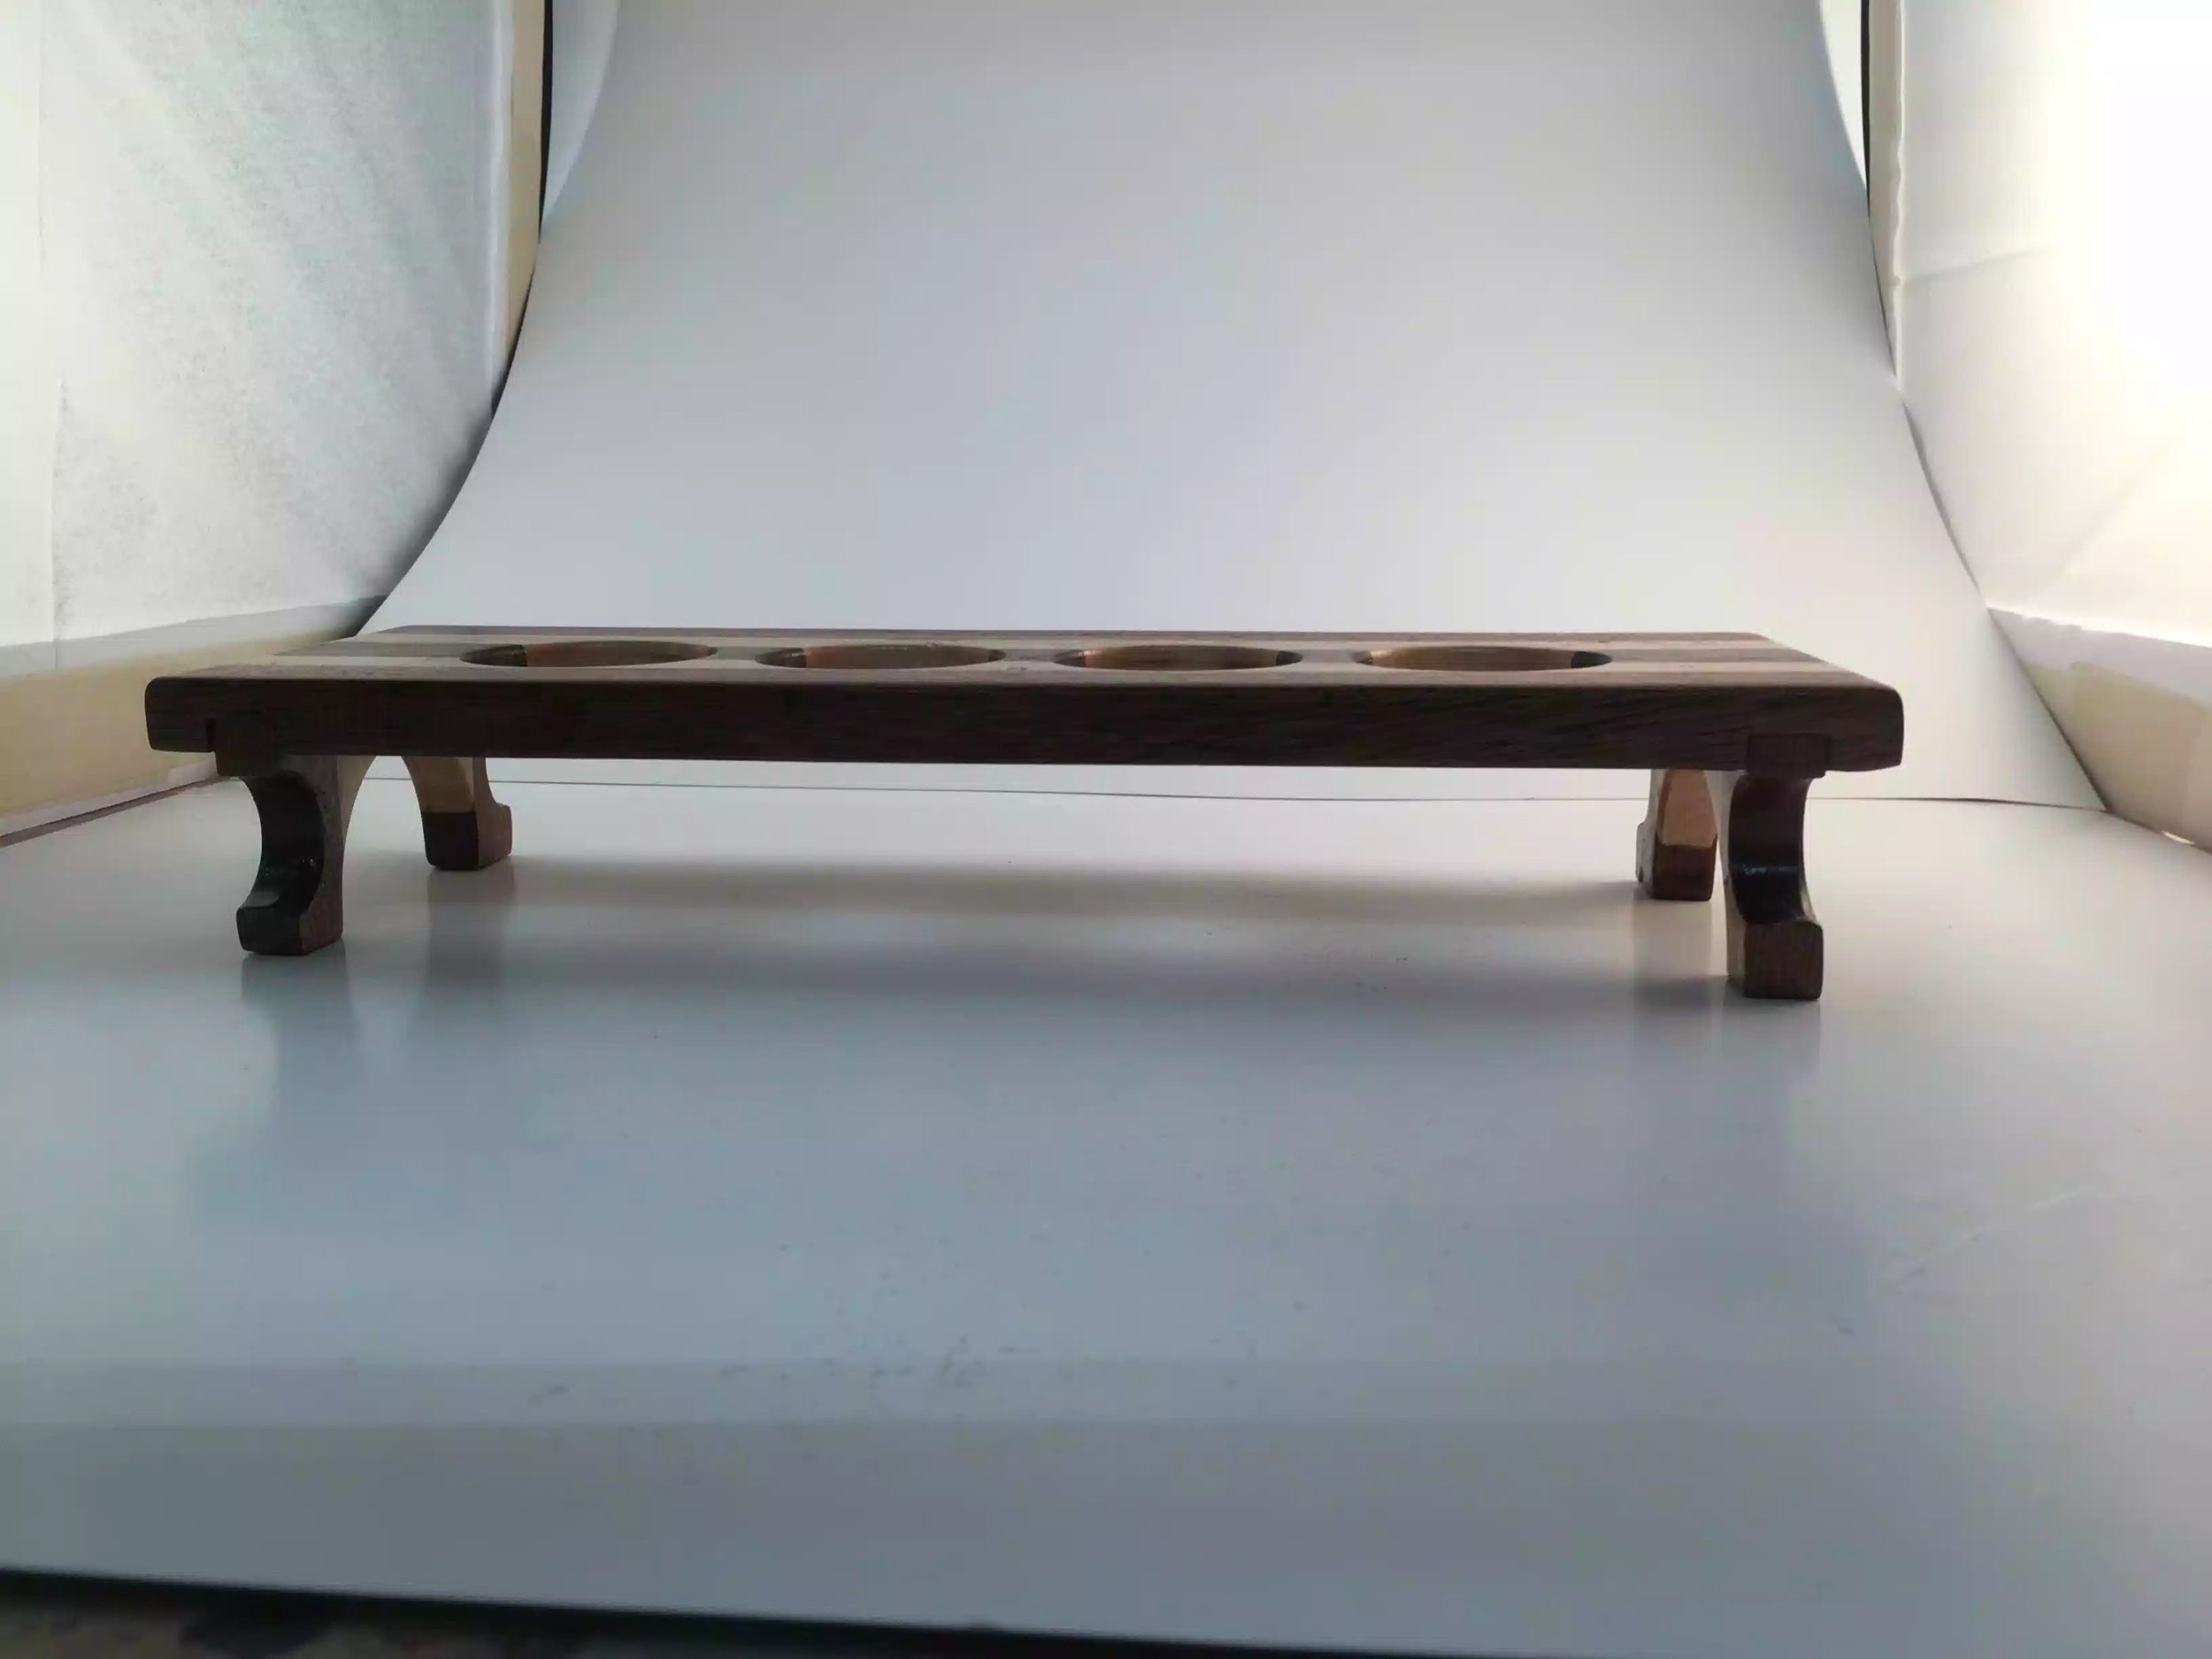
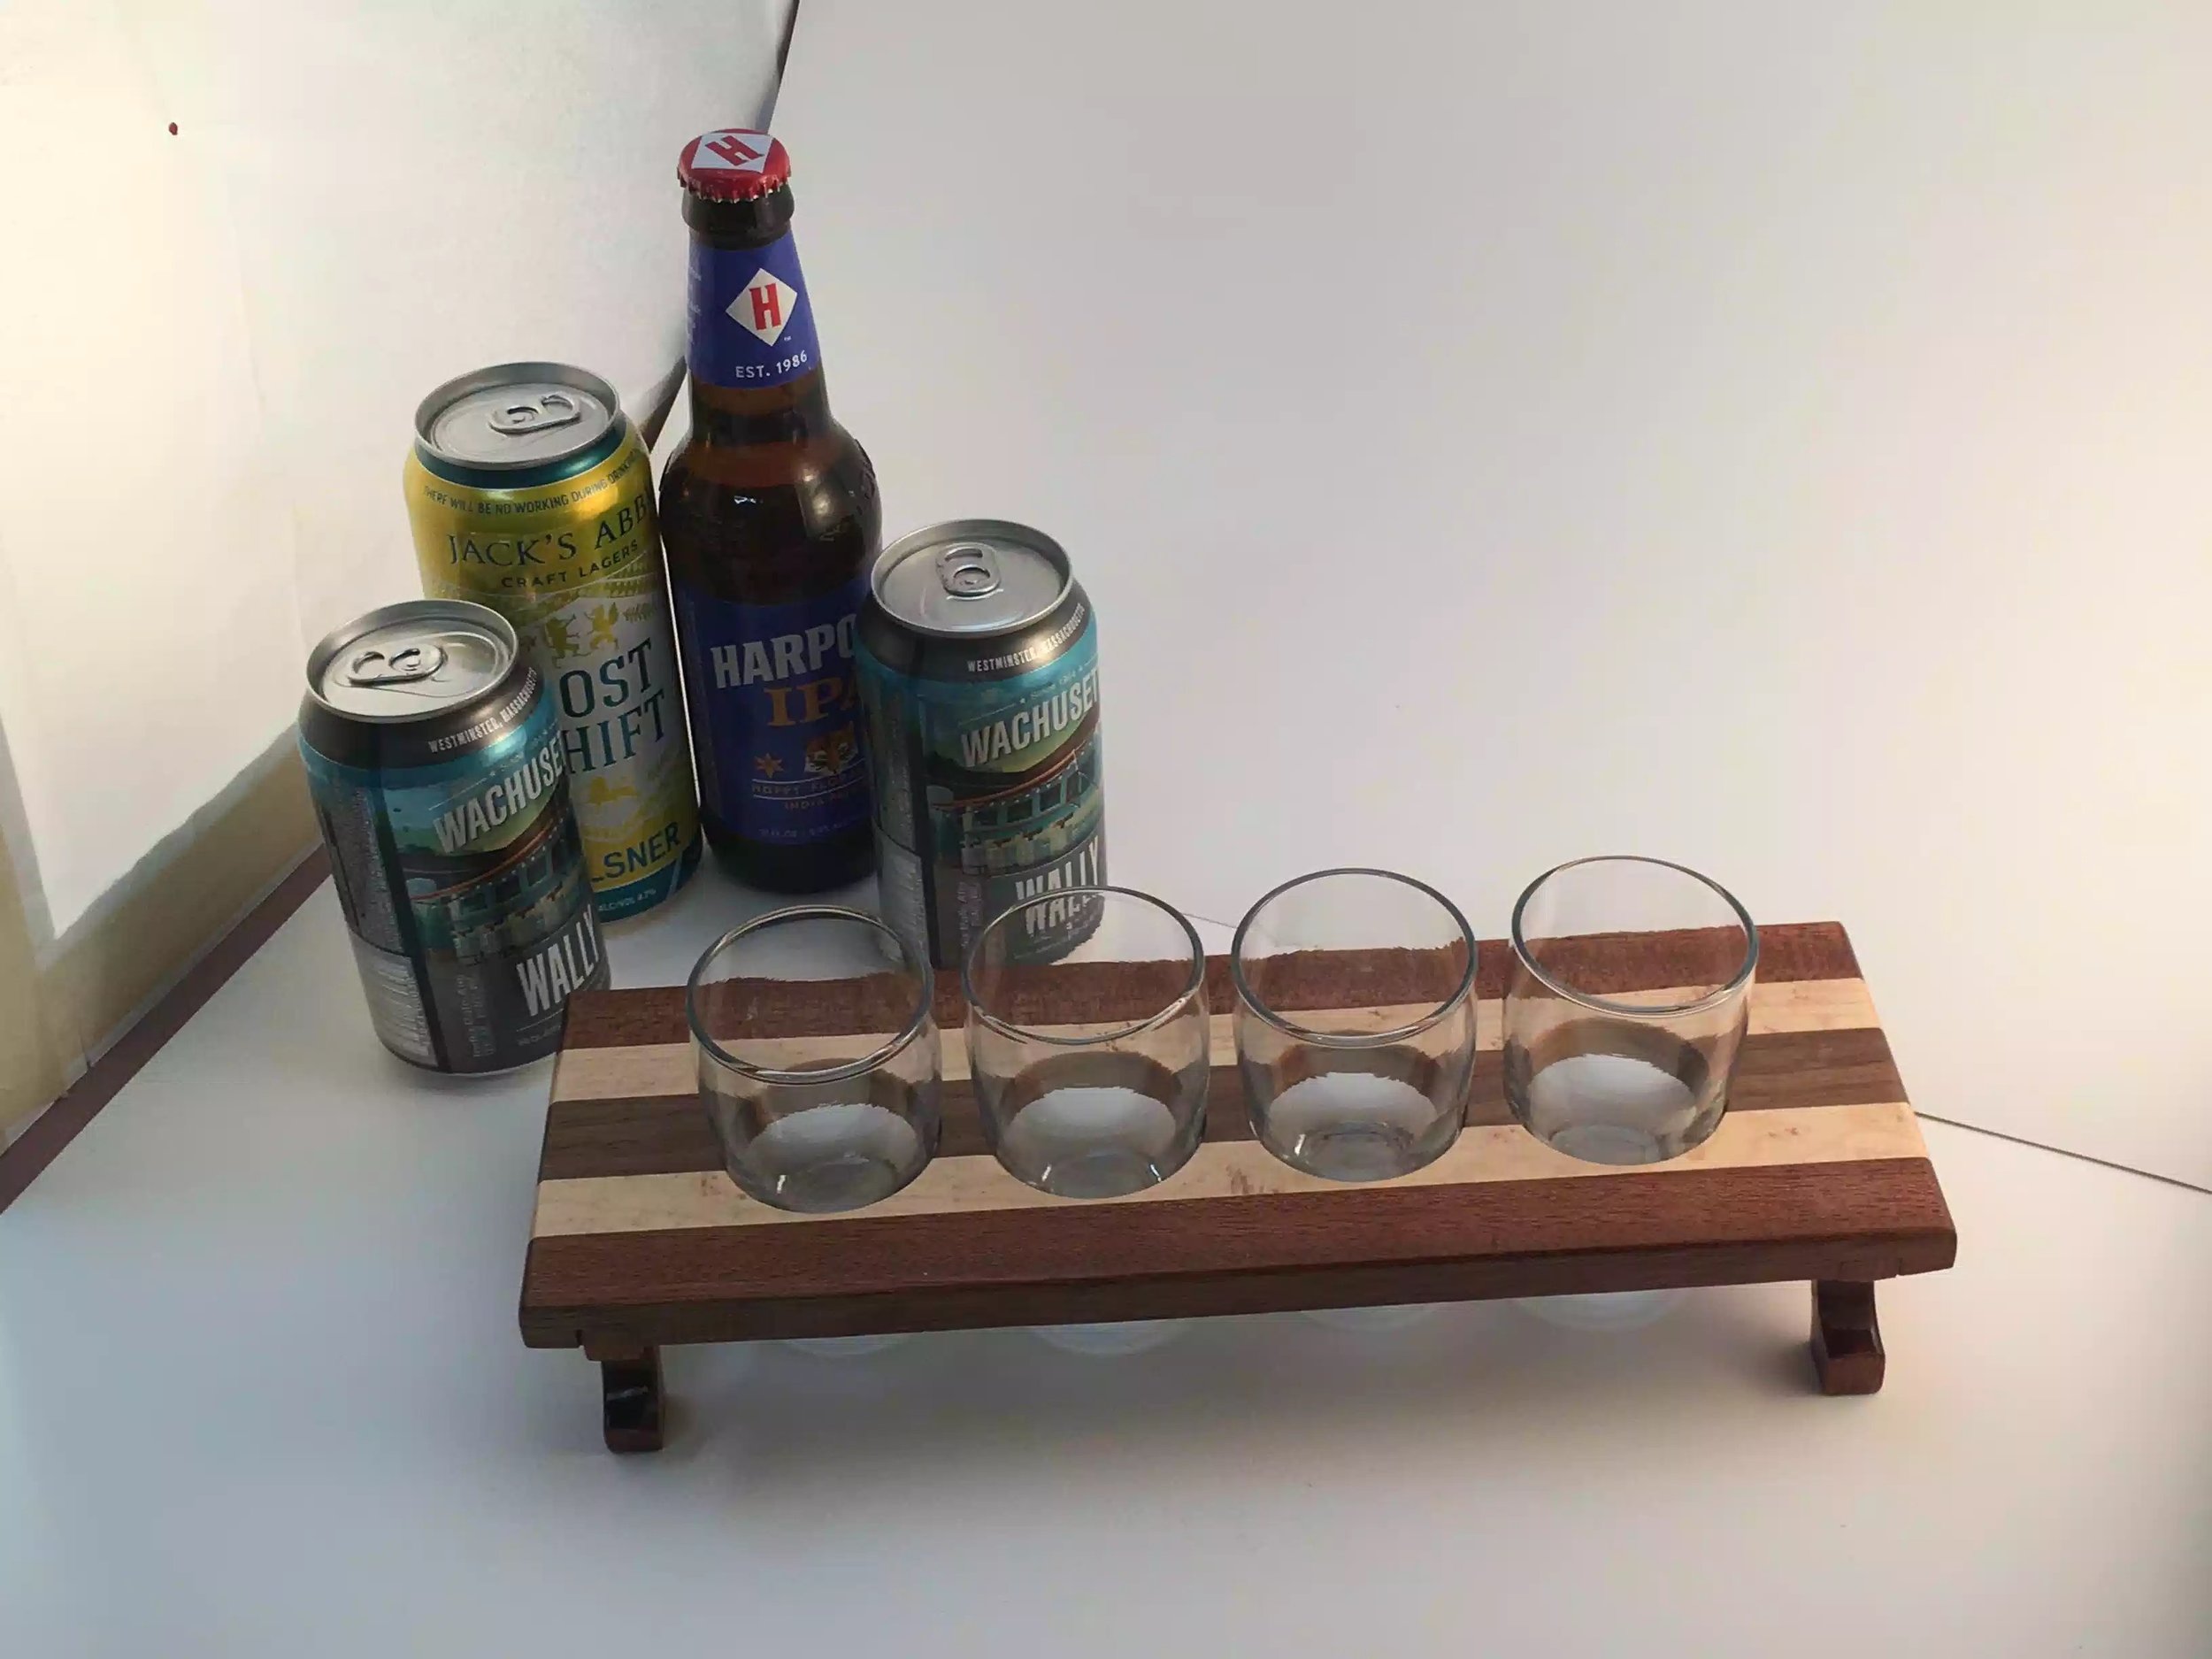
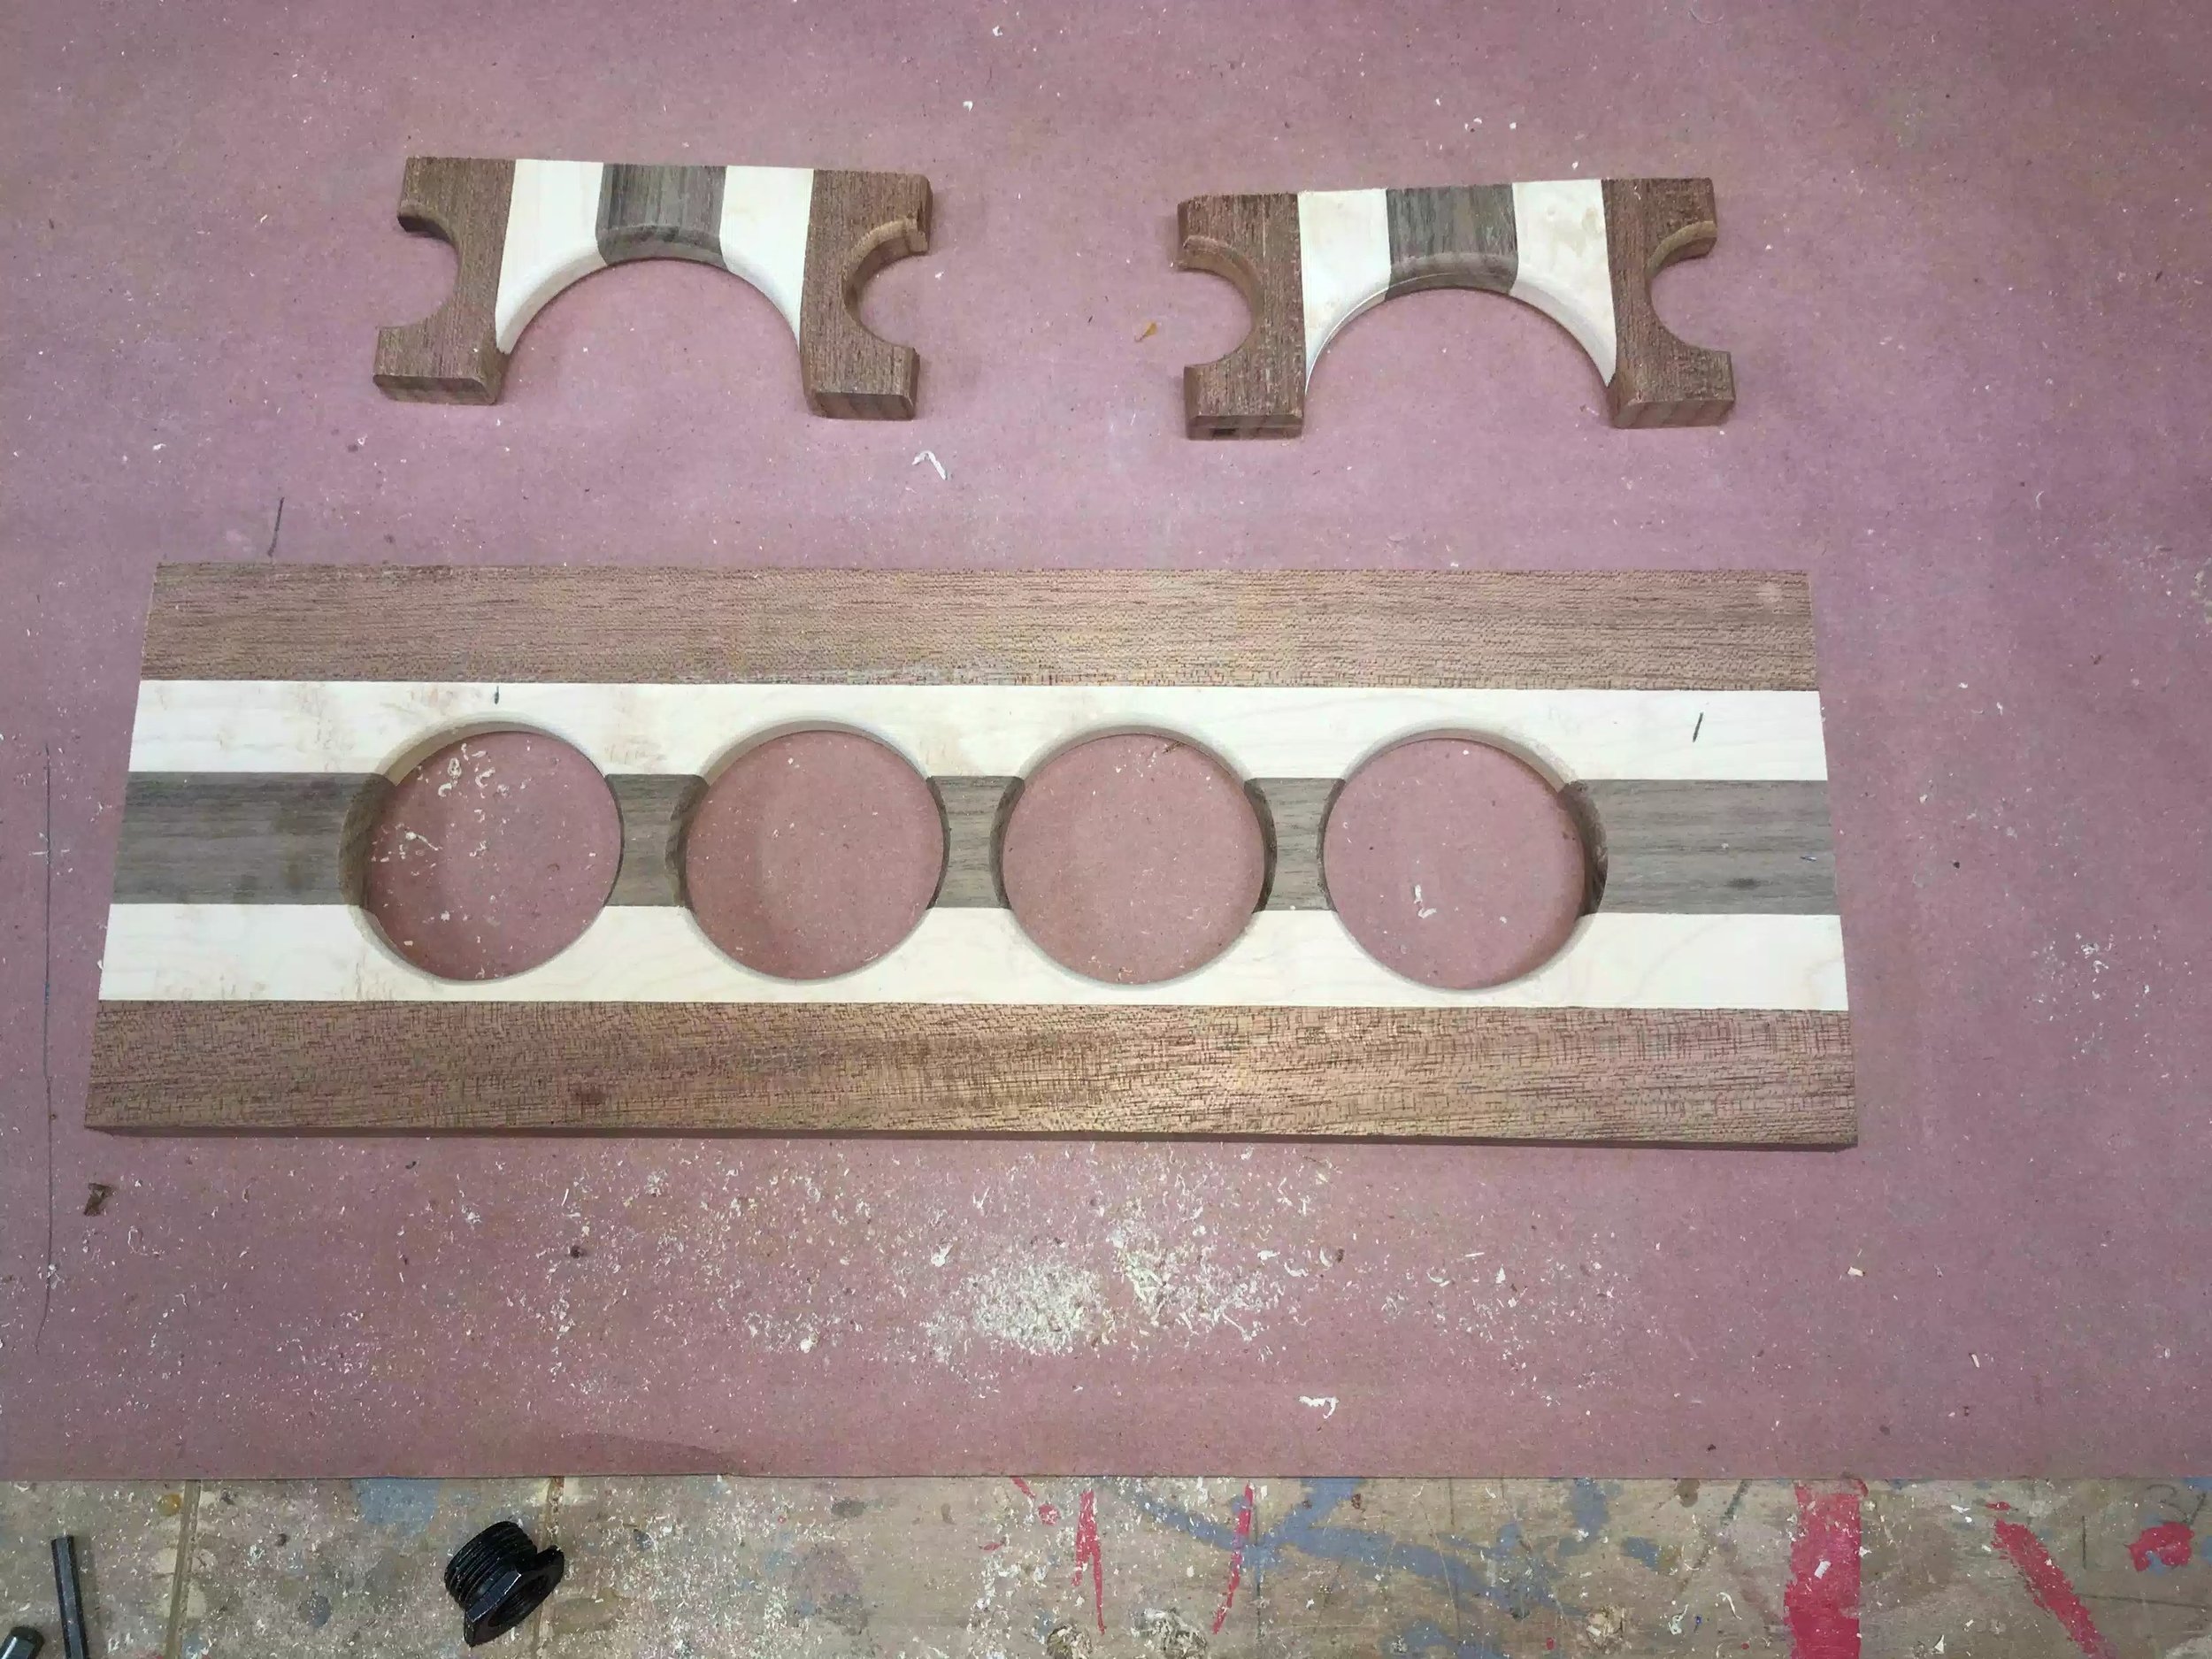
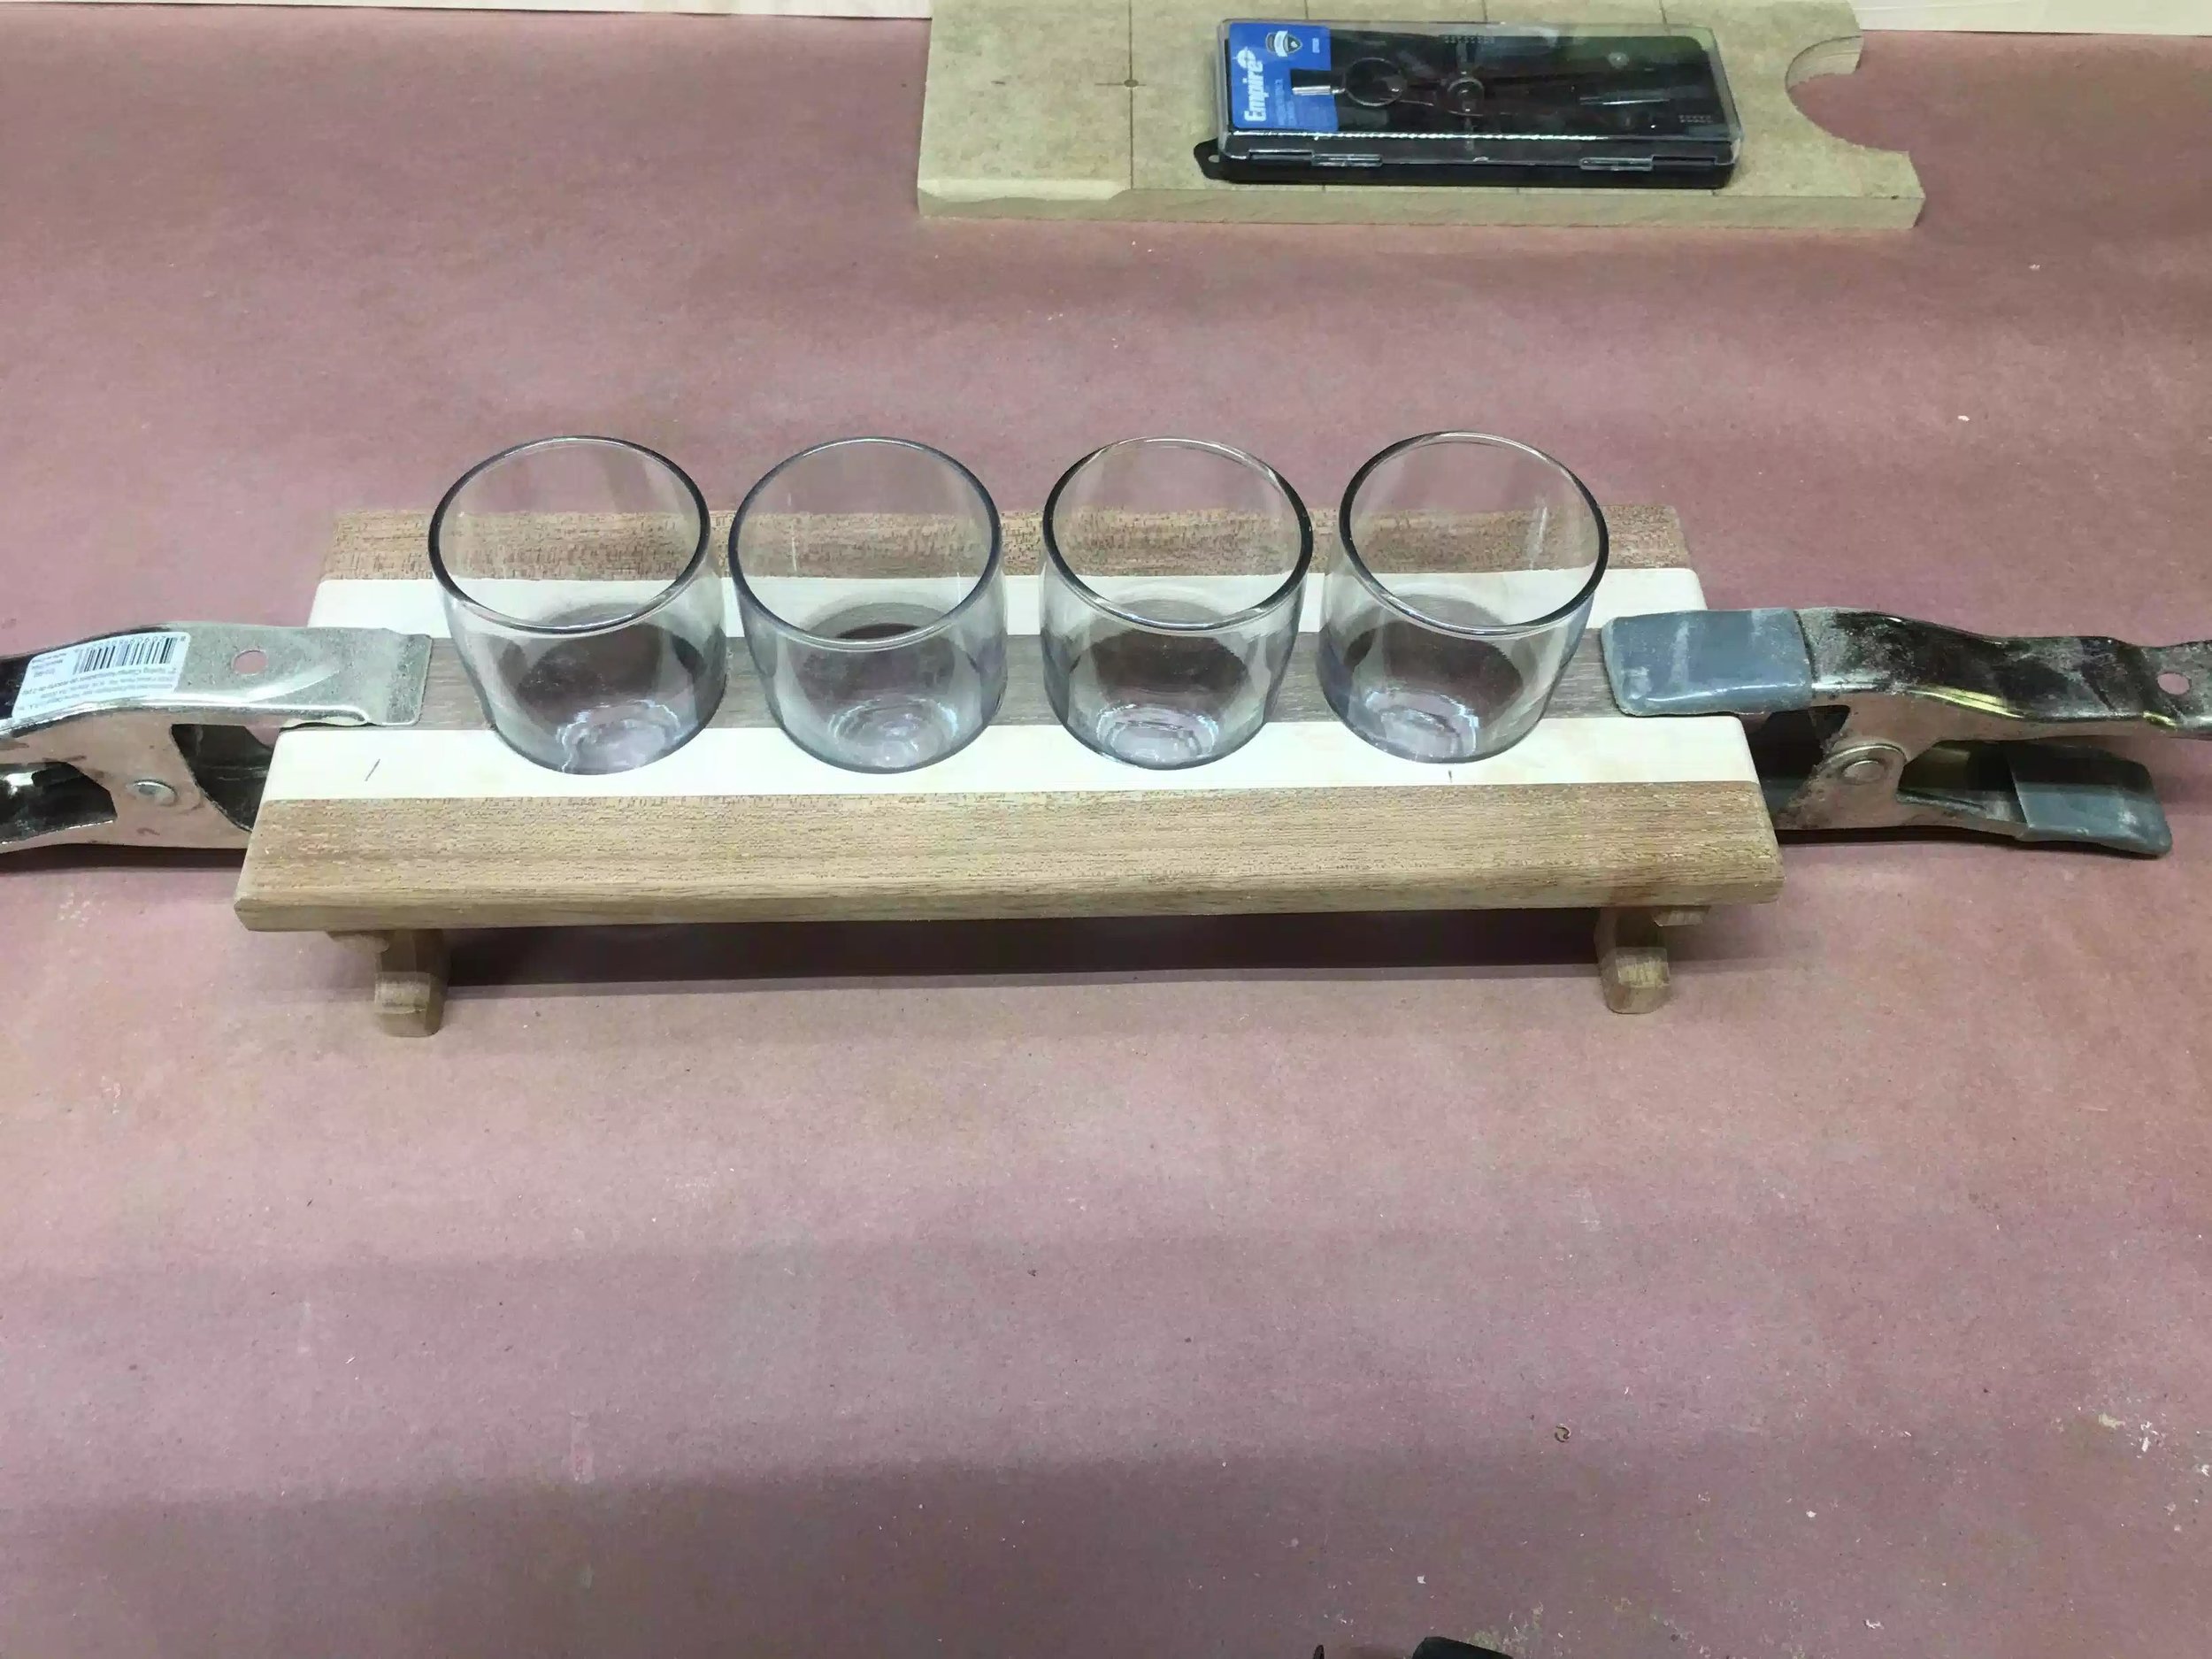
In my spare time as rare as that is, I love frequenting local craft beer breweries and when I first went to one about 2 years ago I was amazed at the quality of beer that was being made in the same town that I live, love IPA’s. Anyway craft beer breweries rotate their selection very often and since they do that you are never sure which one to try next and that was when I introduced to my very first beer flight, which is usually a selection of beer samples that are usually 5 ounces and they also arrive on a wooden paddle that holds the beers in place, well that is what I am going to make.


SOURCING THE PROJECT MATERIALS

Usually when I want to make a project I have a process that very rarely changes and are usually performed in this order

  • Inspiration (Research)

  • Design (Sketchup)

  • Source Materials

  • The build

But this time was different I went to the lumber yard at Barney & Carey before I even designed a model. Some of the wood that I wanted to use was species that I never used before and therefore didn’t know how much this project was going to cost me, I am glad that I waited and I was also very surprised at how many great pieces of wood at an affordable rate I could get.

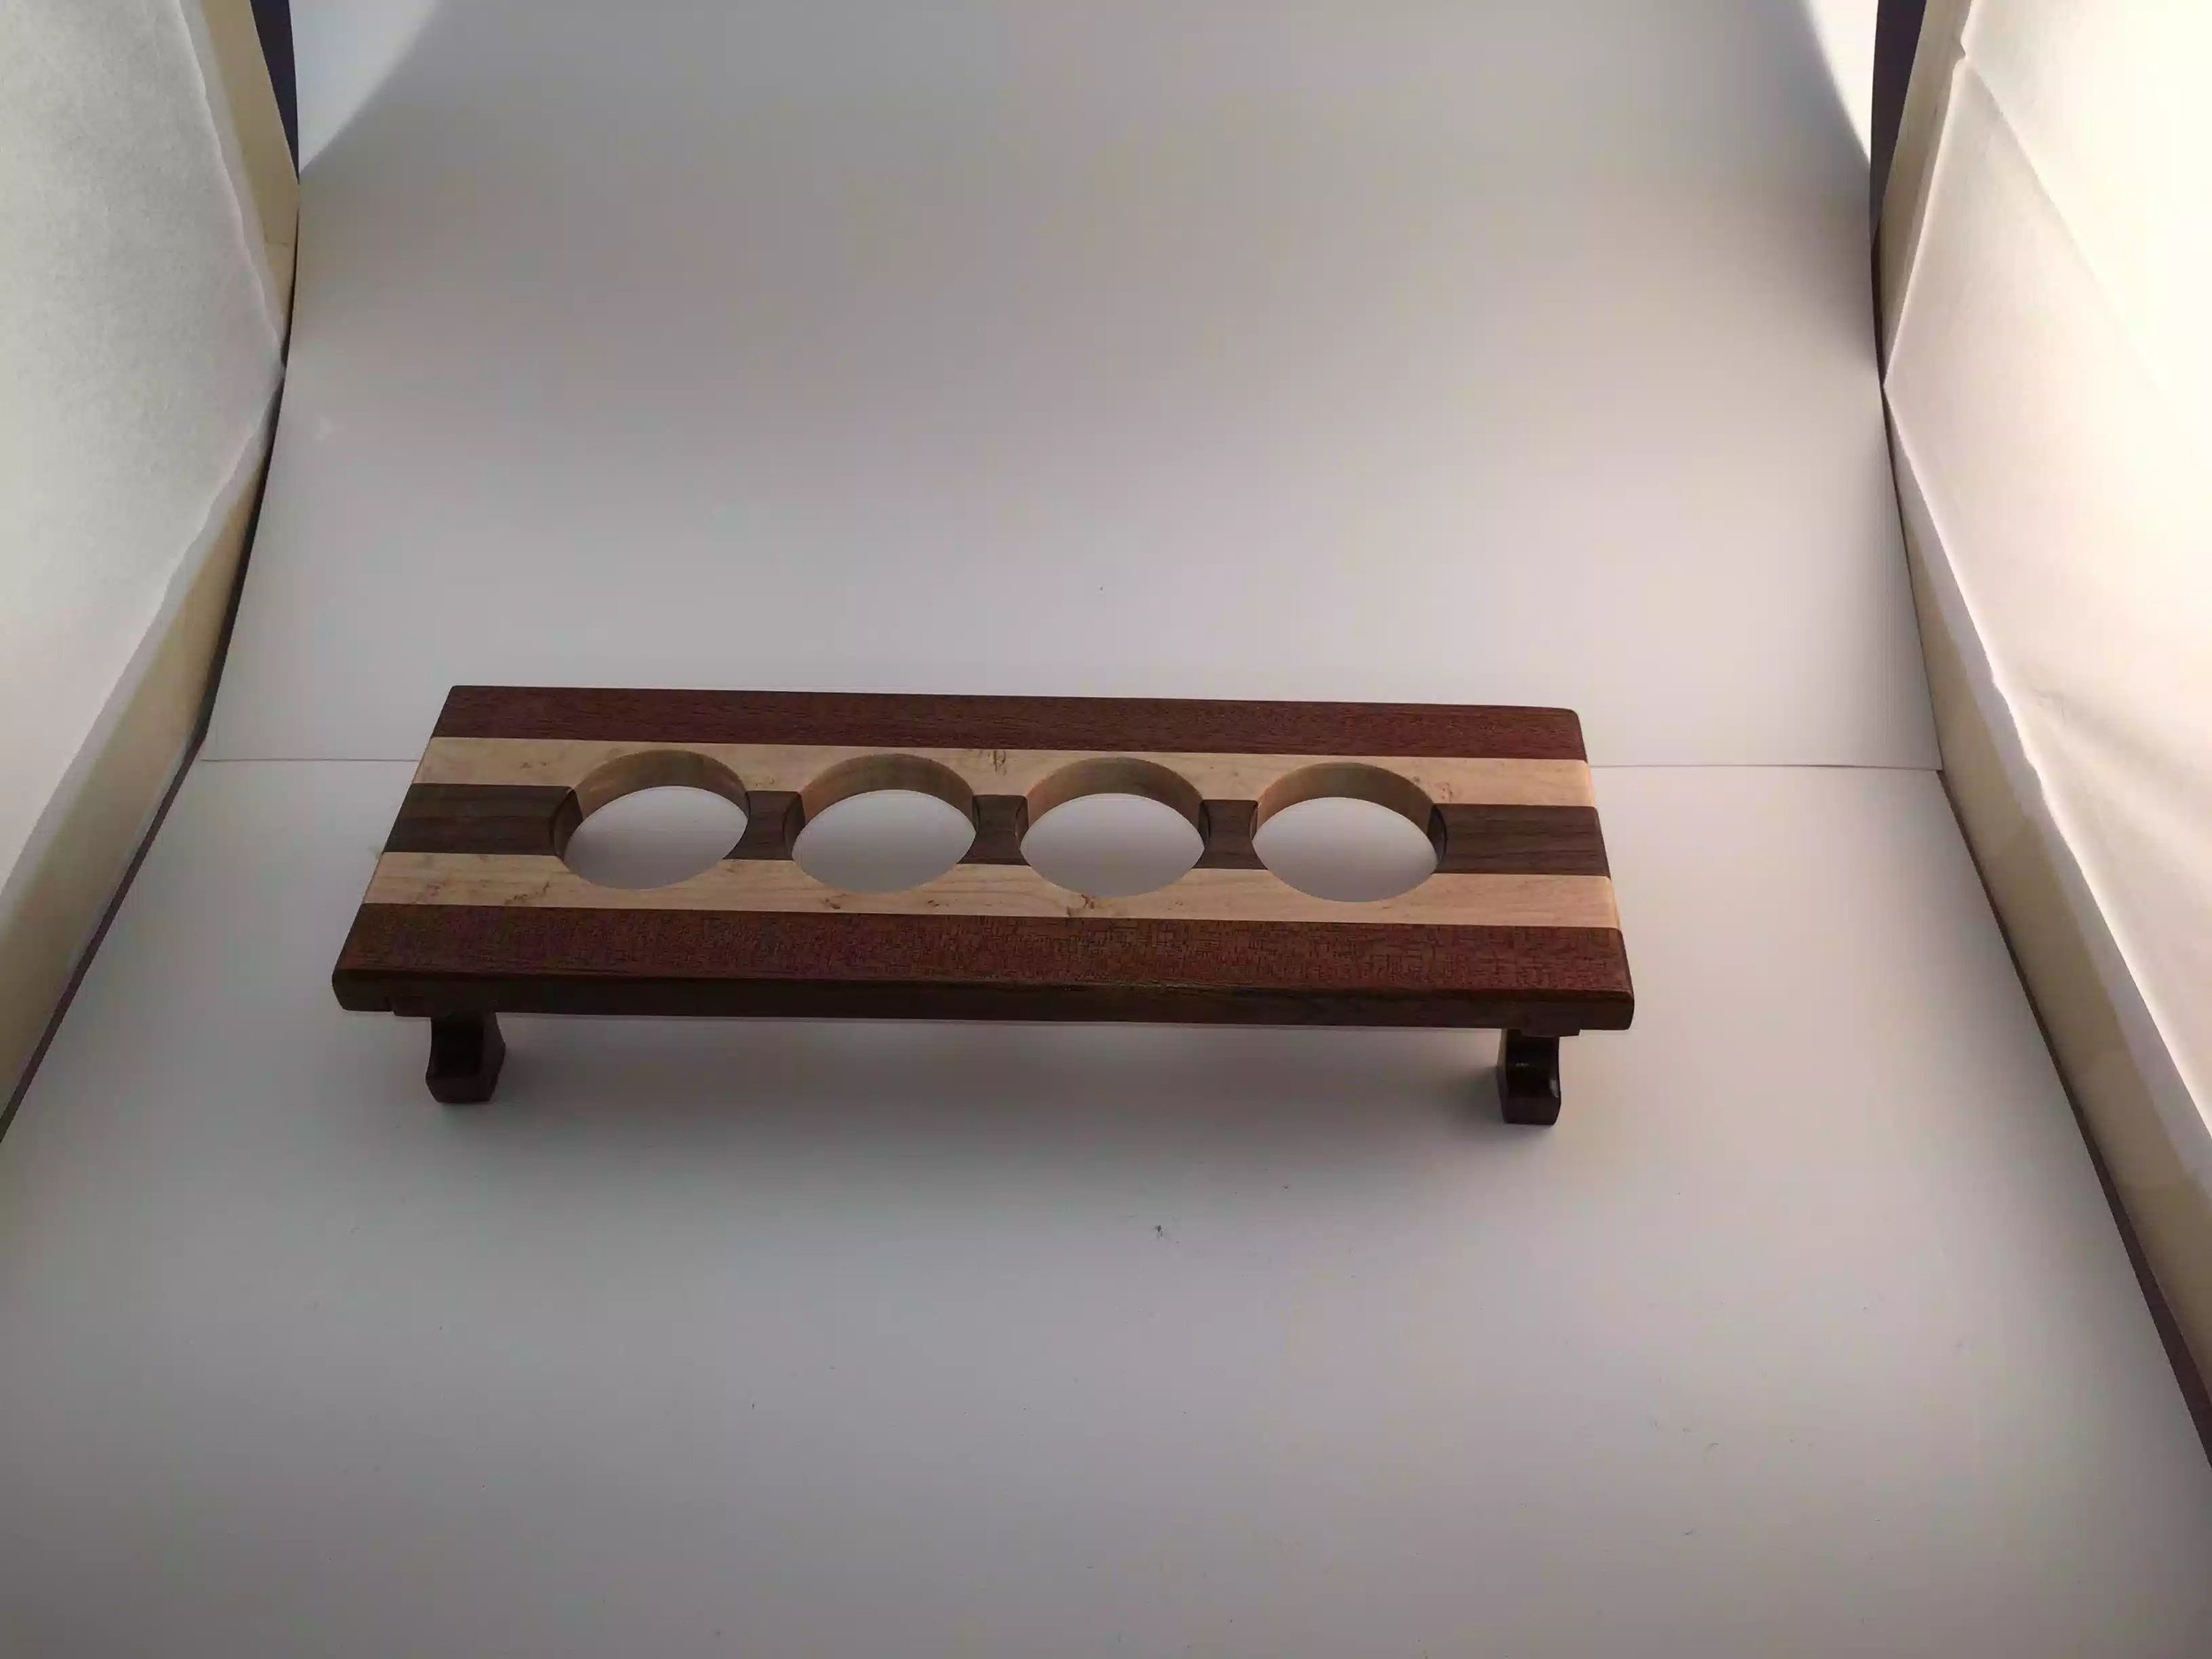
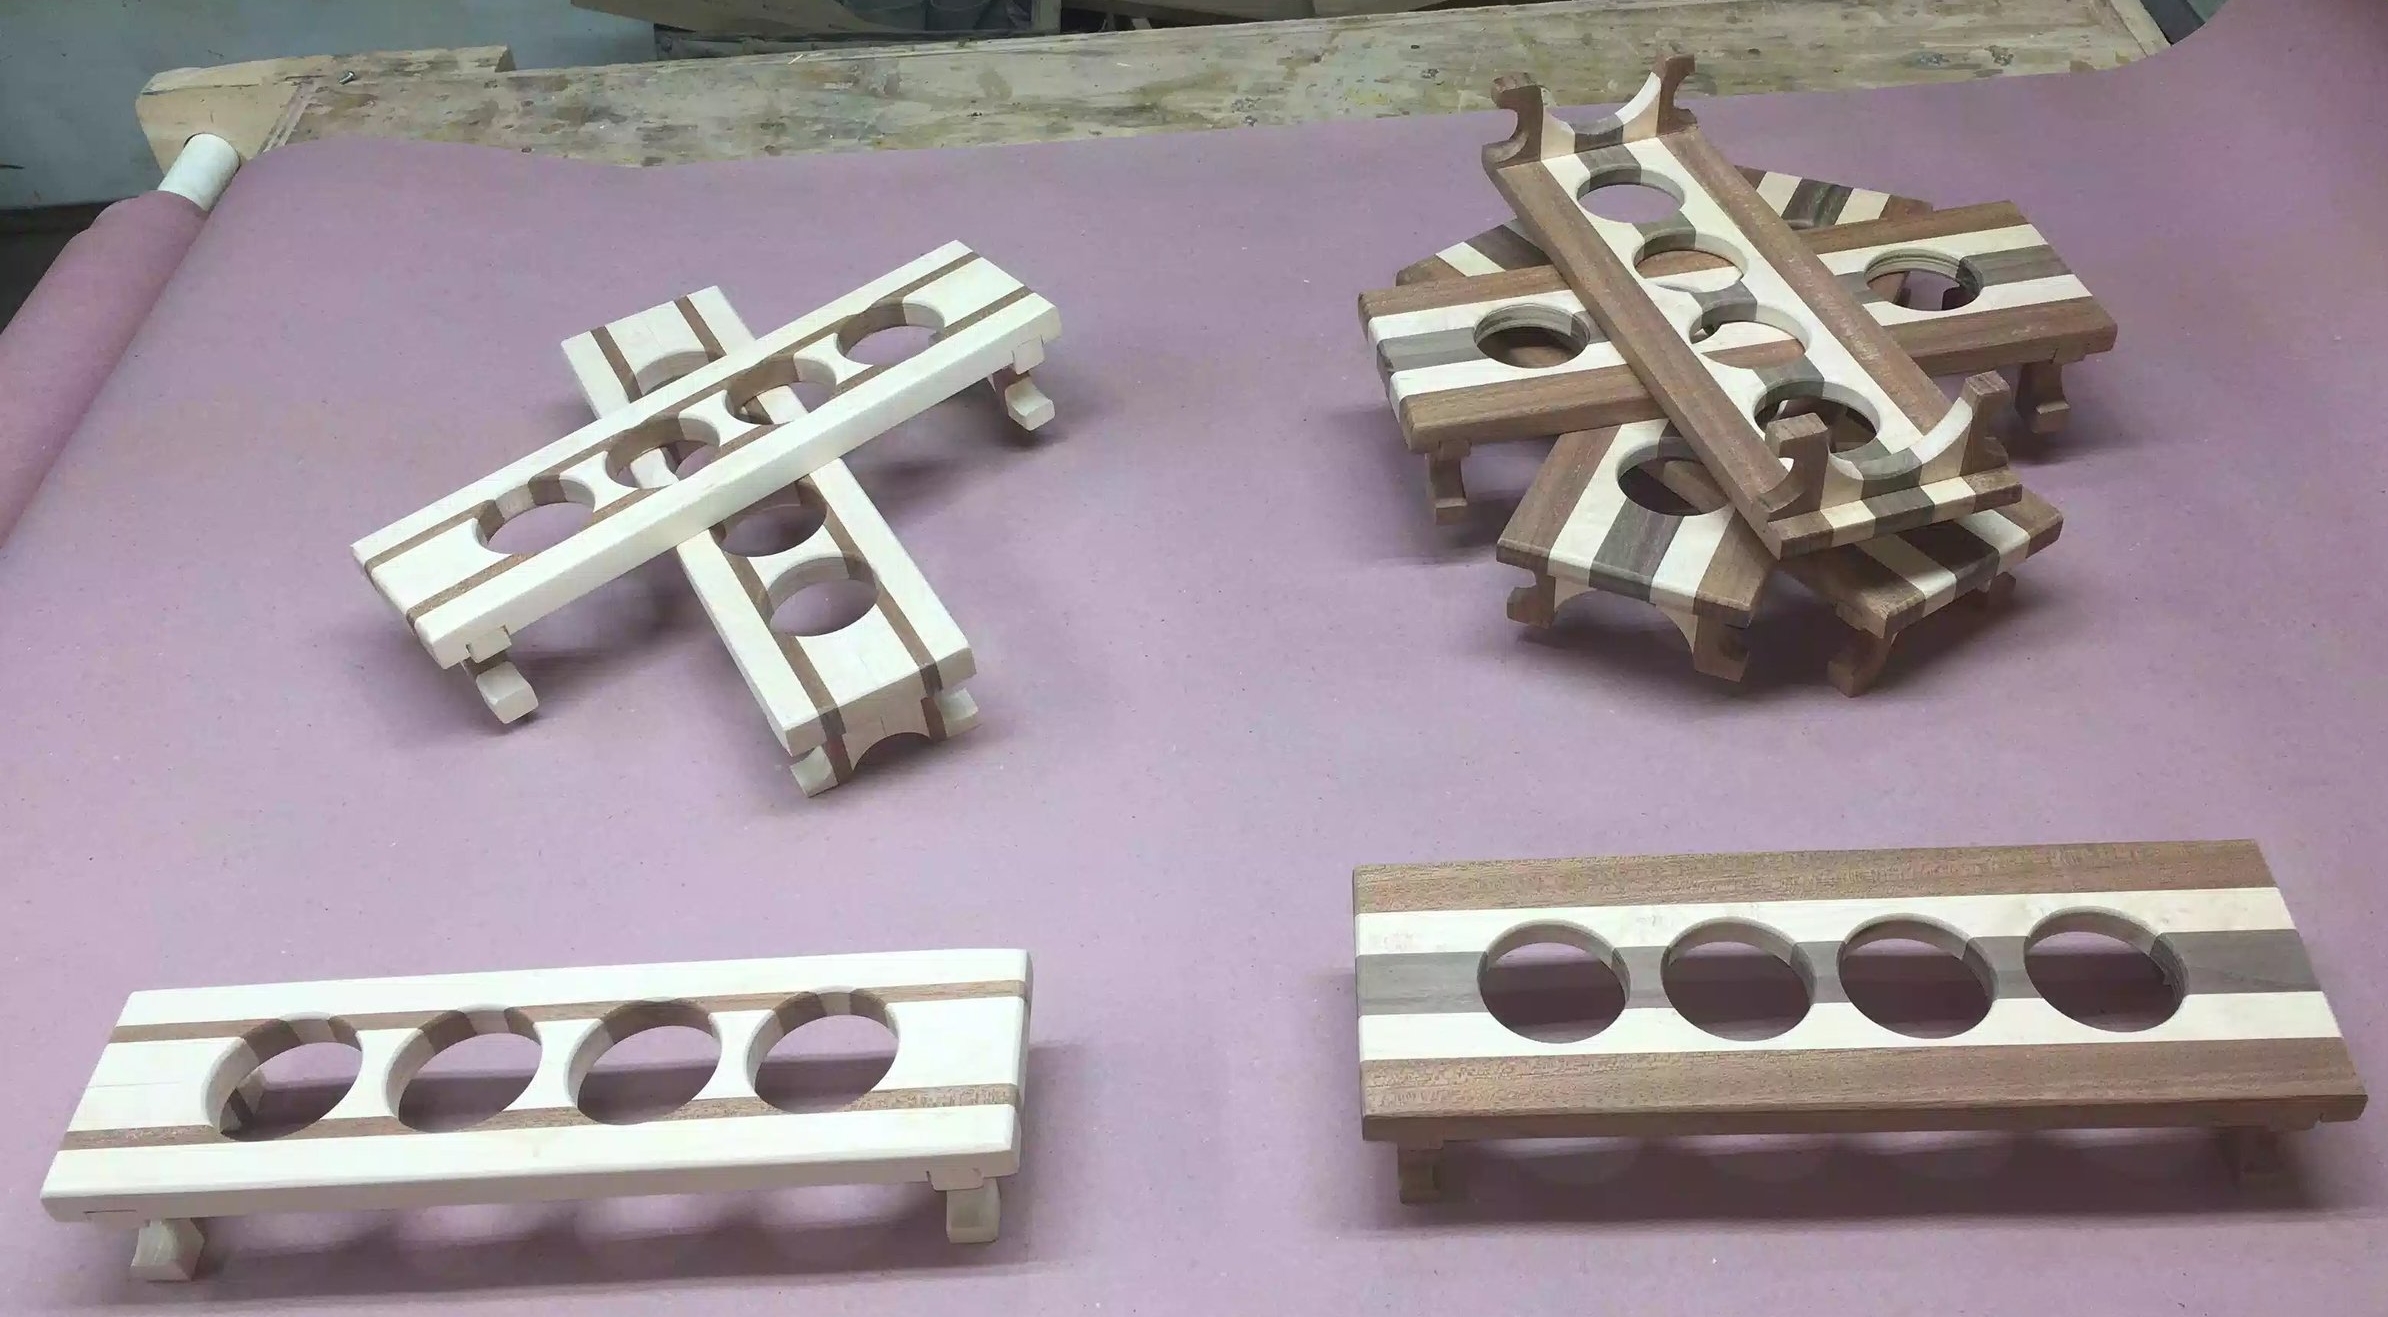
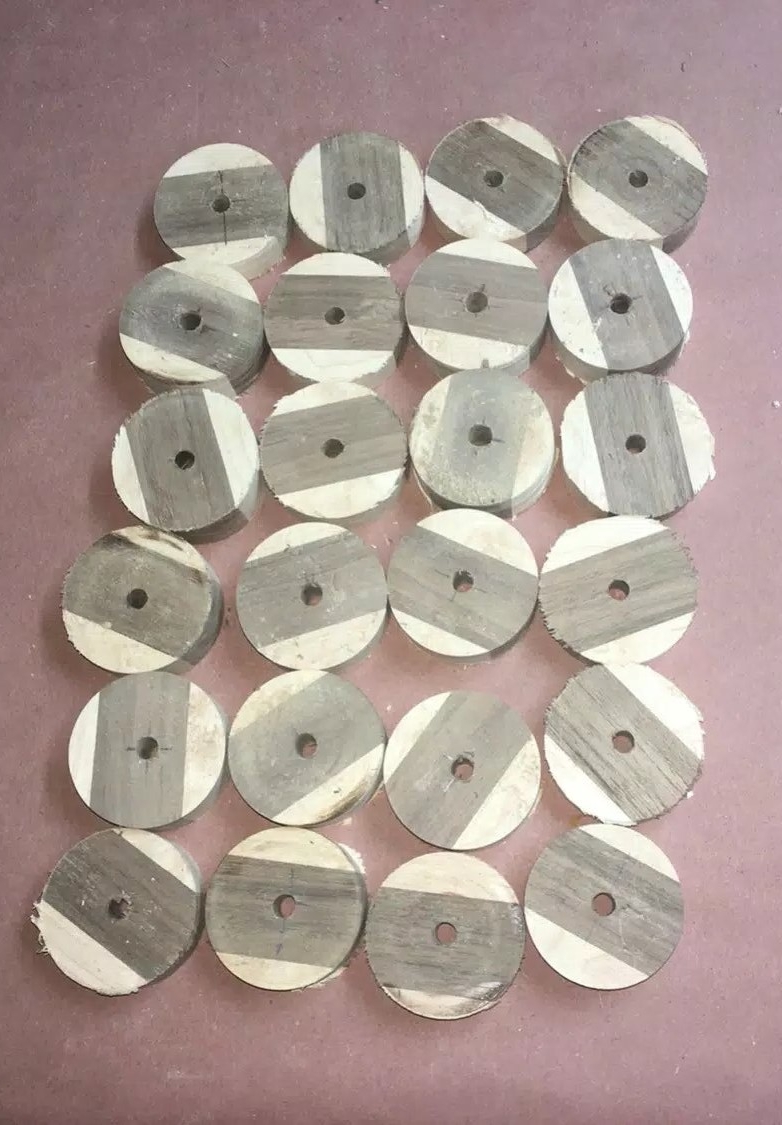
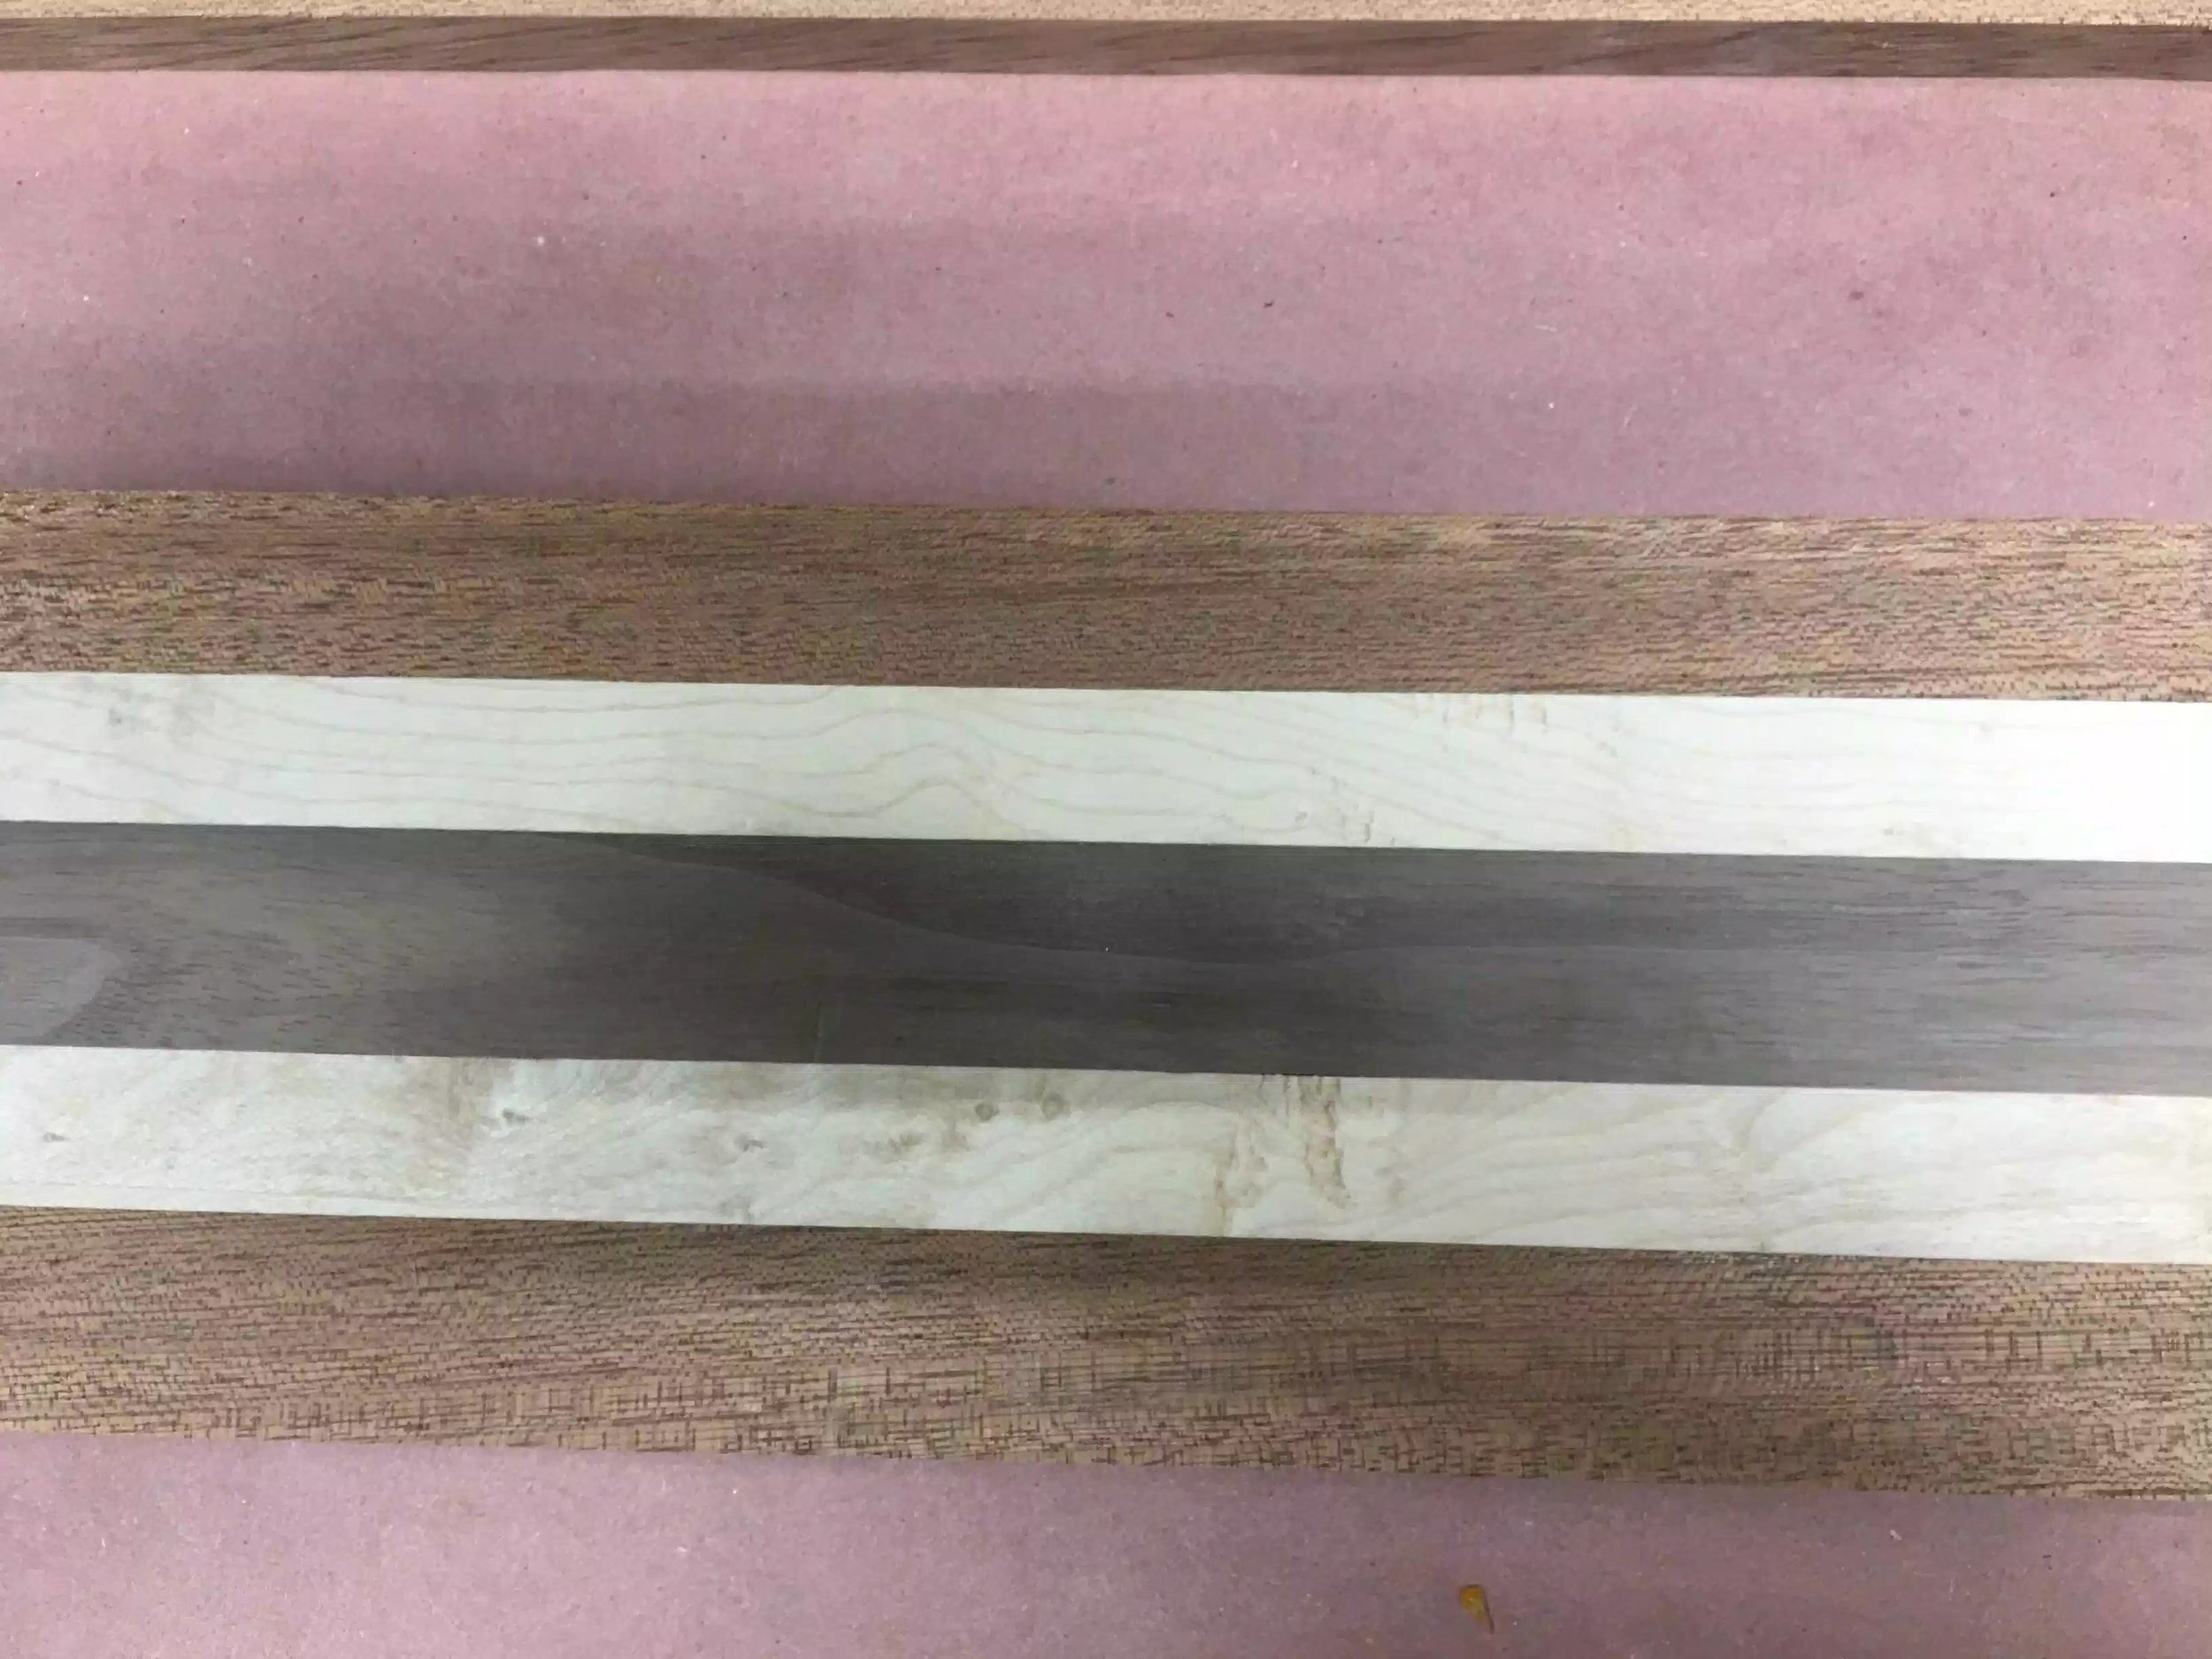
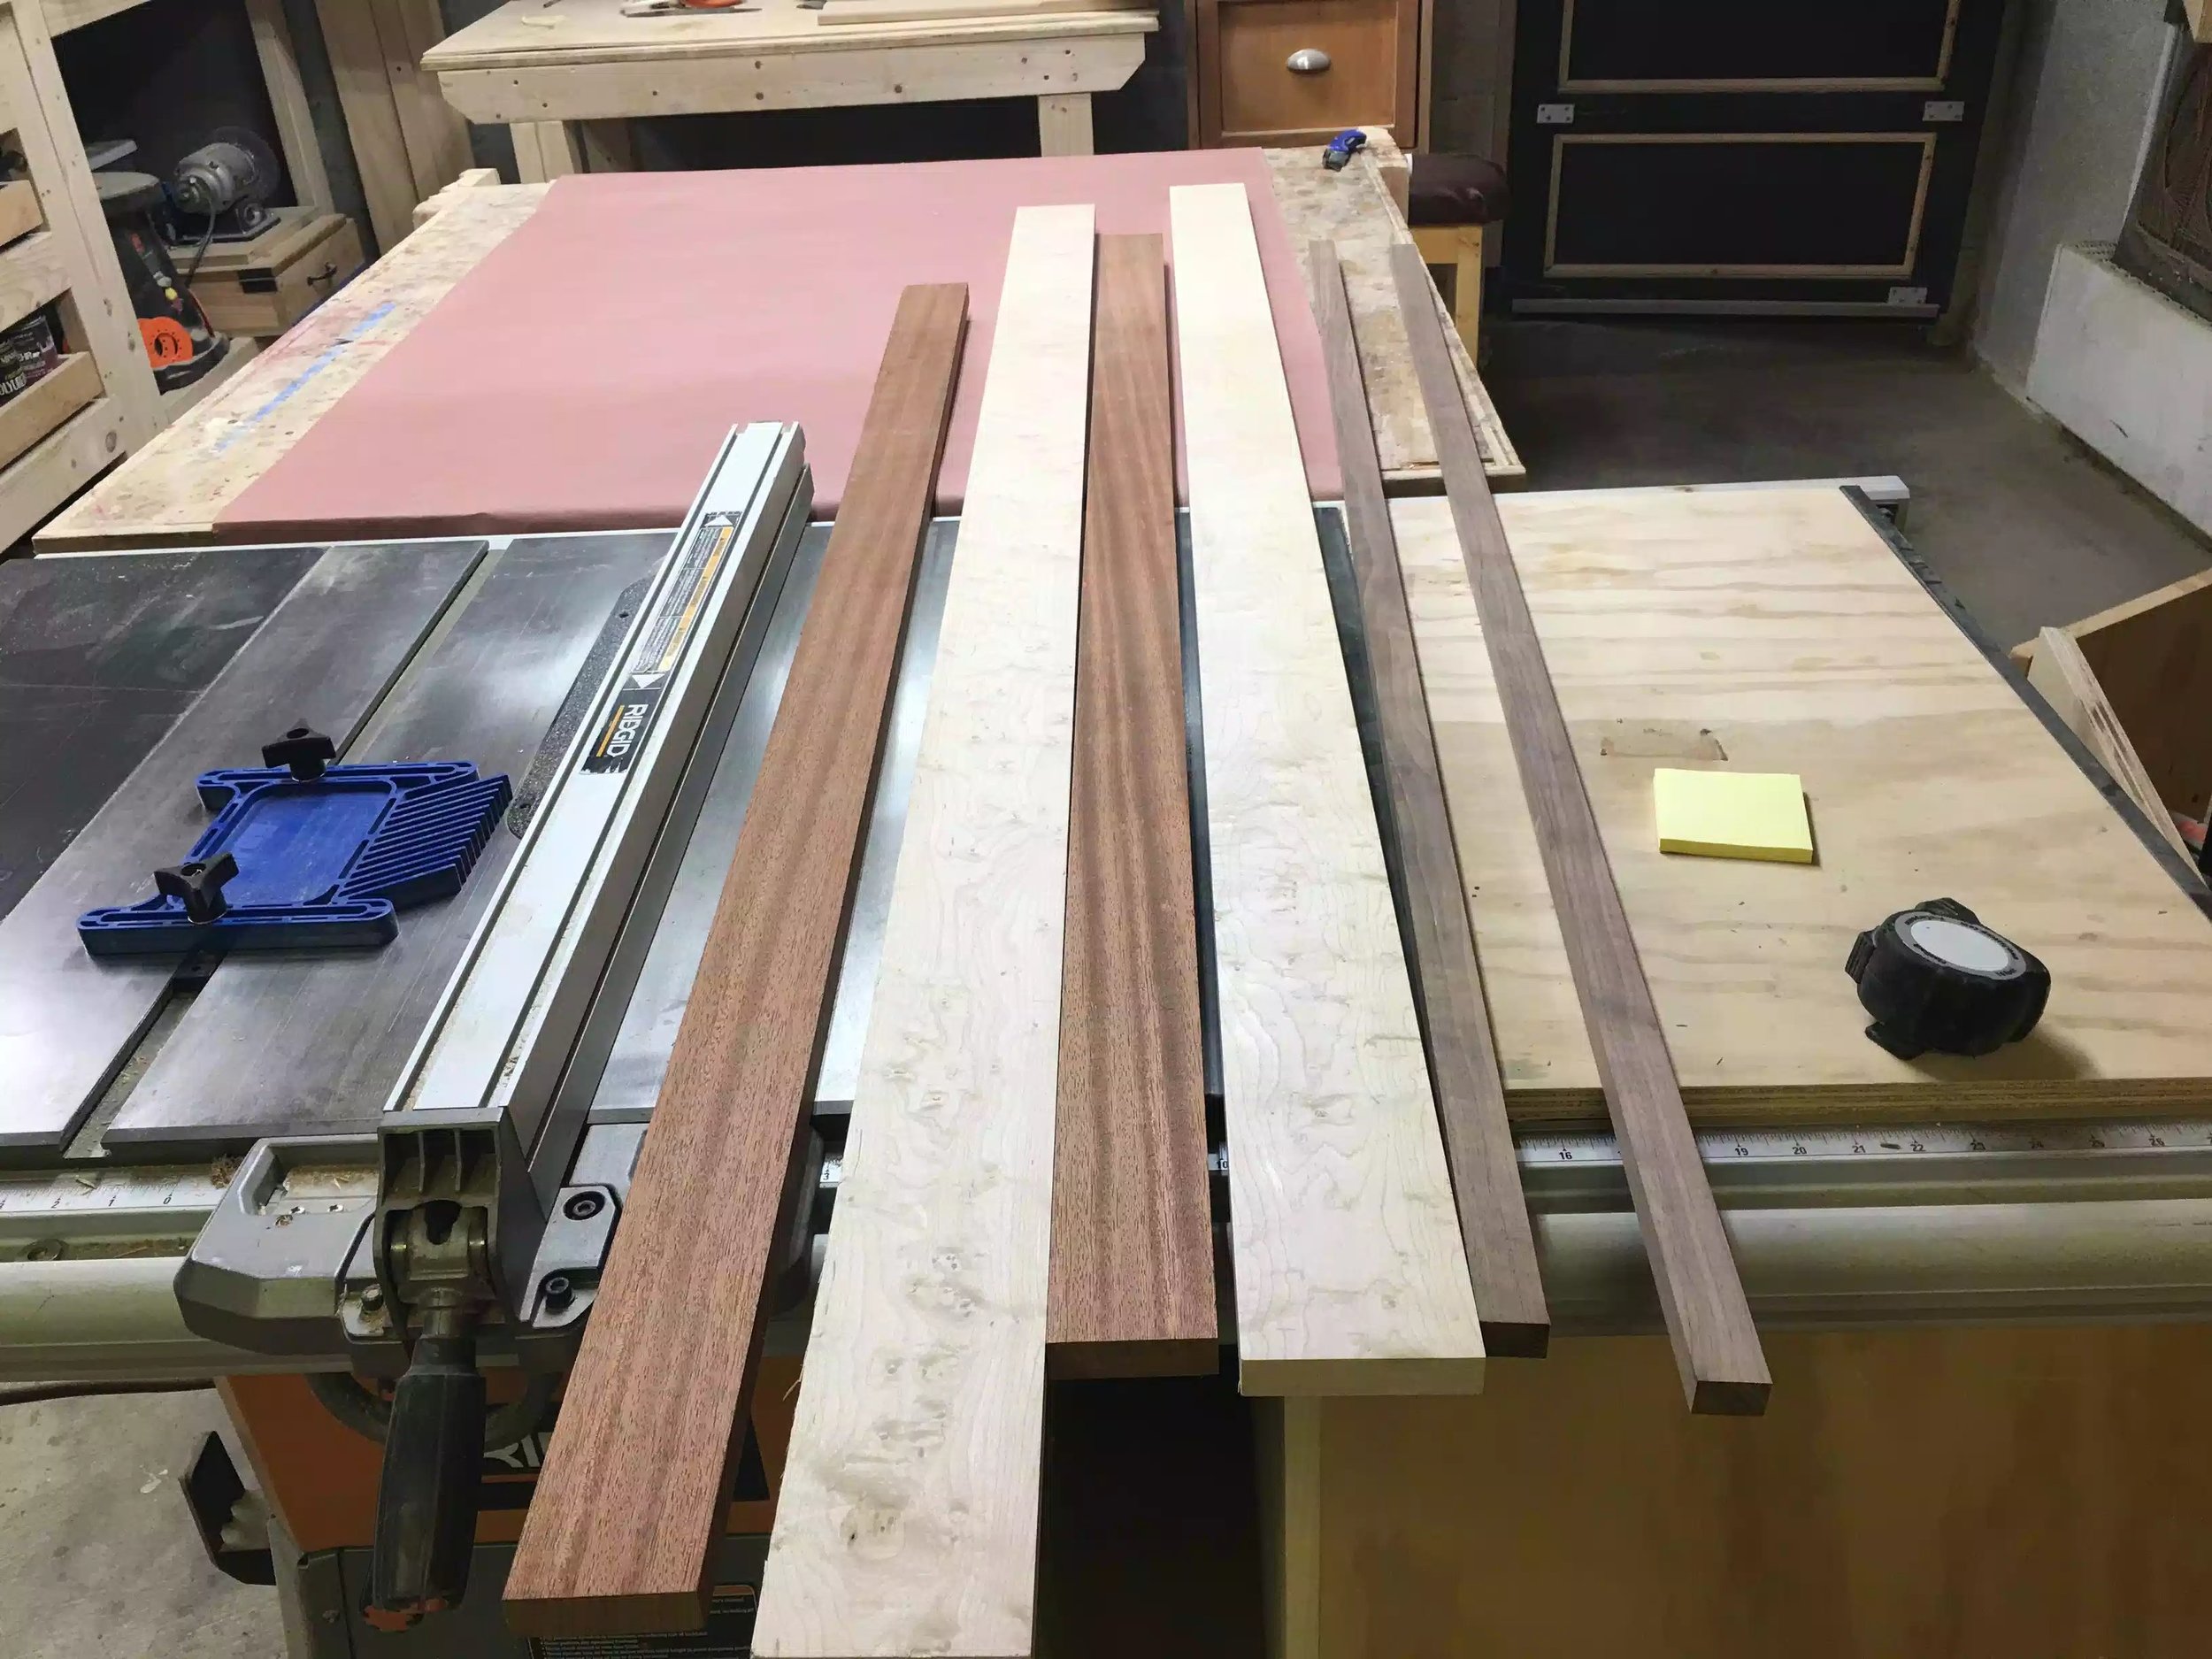
I wanted to get 3 types of wood and they had to be contrasting species so that they would look great next to one another. So I eventually purchased Brazilian sapele, soft maple and walnut.

I also wanted to sell a few of these after they were made and wanted to supply the glasses that would fit into the flight and not leave that up-to the customer, so I went looking for a case of glasses and man are some glasses very expensive, but I had a specific type of glass in mind and eventually found them at a restaurant wholesale business and they were selling them for $2.00 a piece I thought that was expensive until I started looking some more, I could get another similar glass a little cheaper but the shipping costs were not what I wanted to pay and as well were estimated 10 days out. I needed the glass for its dimensions as that is what I will be building the flight around so I eventually purchased the glasses at $2 each and I had to buy a case, so that is what I did. A picture of the glass is below

Below you can see the woods that I purchased and I always sticker them for at least 24 hours so as that they acclimatize to my workshop.

Here are the boards that I purchased at Barney & Carey lumber, the bottom 2 are maple, the next 2 up are Sapele and the top pieces are walnut.

Here are the boards that I purchased at Barney & Carey lumber, the bottom 2 are maple, the next 2 up are Sapele and the top pieces are walnut.

Here is the close-up of the lumber.

Here is the close-up of the lumber.

DESIGN

While doing some research I came across so many styles of beer flights, some were nothing more than pieces of pallet wood with a few holes drilled to have glasses just sit on them and some other styles were more elaborate that had a lot more work put into them, I decided to make one that had a lot of character to them, that is why I chose to use multiple contrasting species of wood.

Below are some of the features that the flight will have

  • Wooden Flight will be made of sapele, walnut and maple woods.

  • The woods will be cut into strips and arranged in a contrasting way so as to highlight the features of each wooden piece.

  • It will hold 4 sample glasses.

  • It will be raised up so as that the glasses will be suspended within the flight.

  • The top will have a round-over profile that will make it nice to the touch.

  • The legs will also be made of the same contrasting style of woods so as that it blends with the top.

  • I think the overall dimensions of the flight will be 13” x 4-1/2” x 2-3/4” high.

I did some preliminary drawings on my 3D software and you can see them below, there might be some subtle changes to the overall design but it should look something like the below pictures.

As you can see from the picture the feet will be housed in a groove beneath the flight itself which will provide a lot of stability for all the beer it will hold. This picture also demonstrates how the glasses will be held.

As you can see from the picture the feet will be housed in a groove beneath the flight itself which will provide a lot of stability for all the beer it will hold. This picture also demonstrates how the glasses will be held.

Here is another 3D image of the flight with the glasses removed, the wood colors are indicative of the actual wood I will be using, these images don’t have a grain pattern to them but trust me after its made it will look awesome.

Here is another 3D image of the flight with the glasses removed, the wood colors are indicative of the actual wood I will be using, these images don’t have a grain pattern to them but trust me after its made it will look awesome.

I will start making this project next week at some point and I will keep you posted as to all progress that I make.

Until then take care.