


SHOP ALTERATIONS
With my new assembly table built and the fact that I have so much more storage within the unit I decided to move all my wood finishes and glue products out of the unit that I made out of 2x4’s last year and completely dismantle that unit.
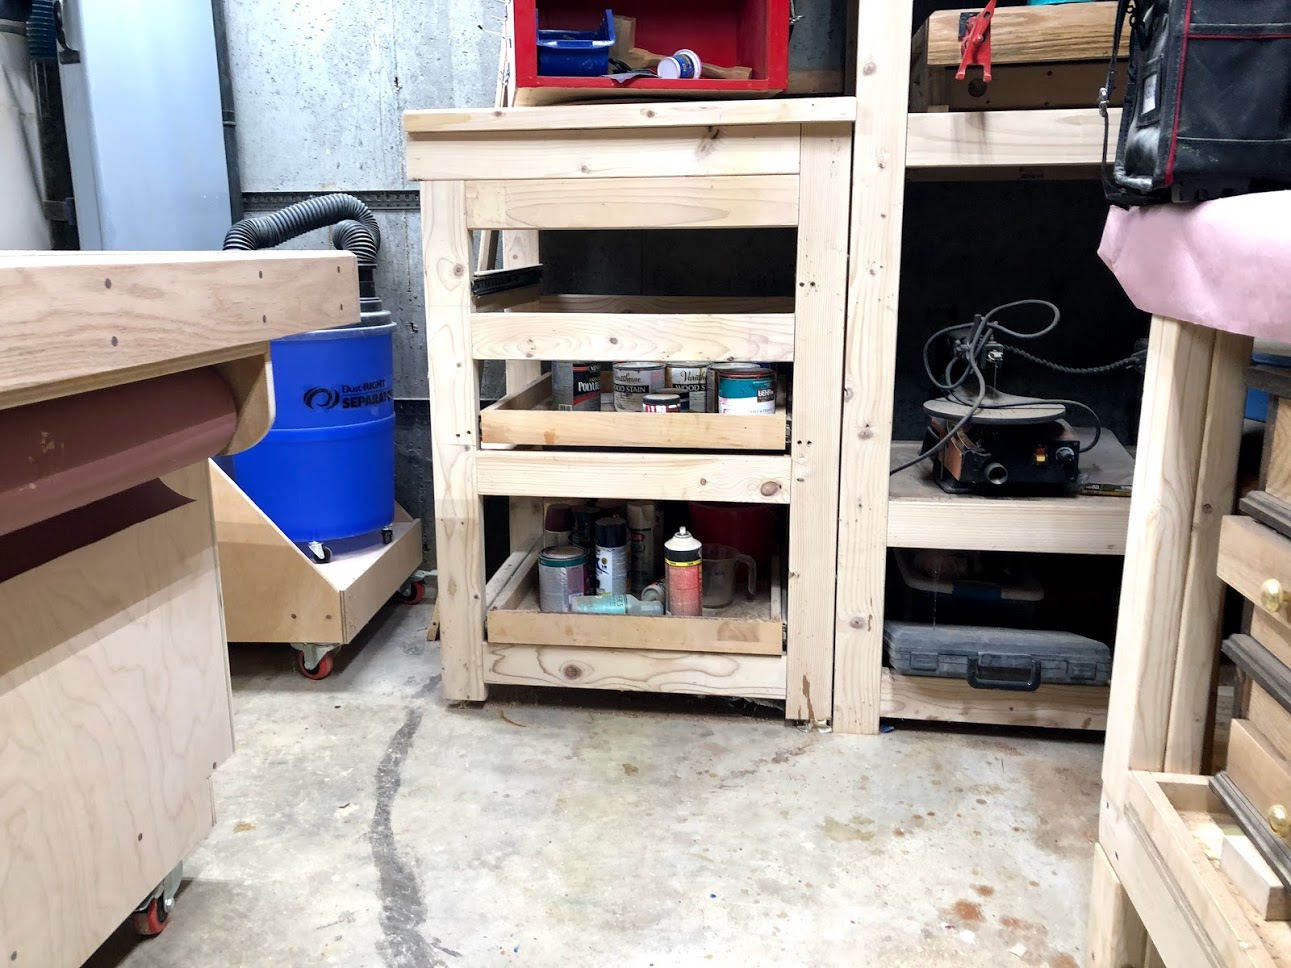
Here is the unit that I made with pull out drawers that used to store all my wood finishes.

This has all been dismantled except for the shelving unit.
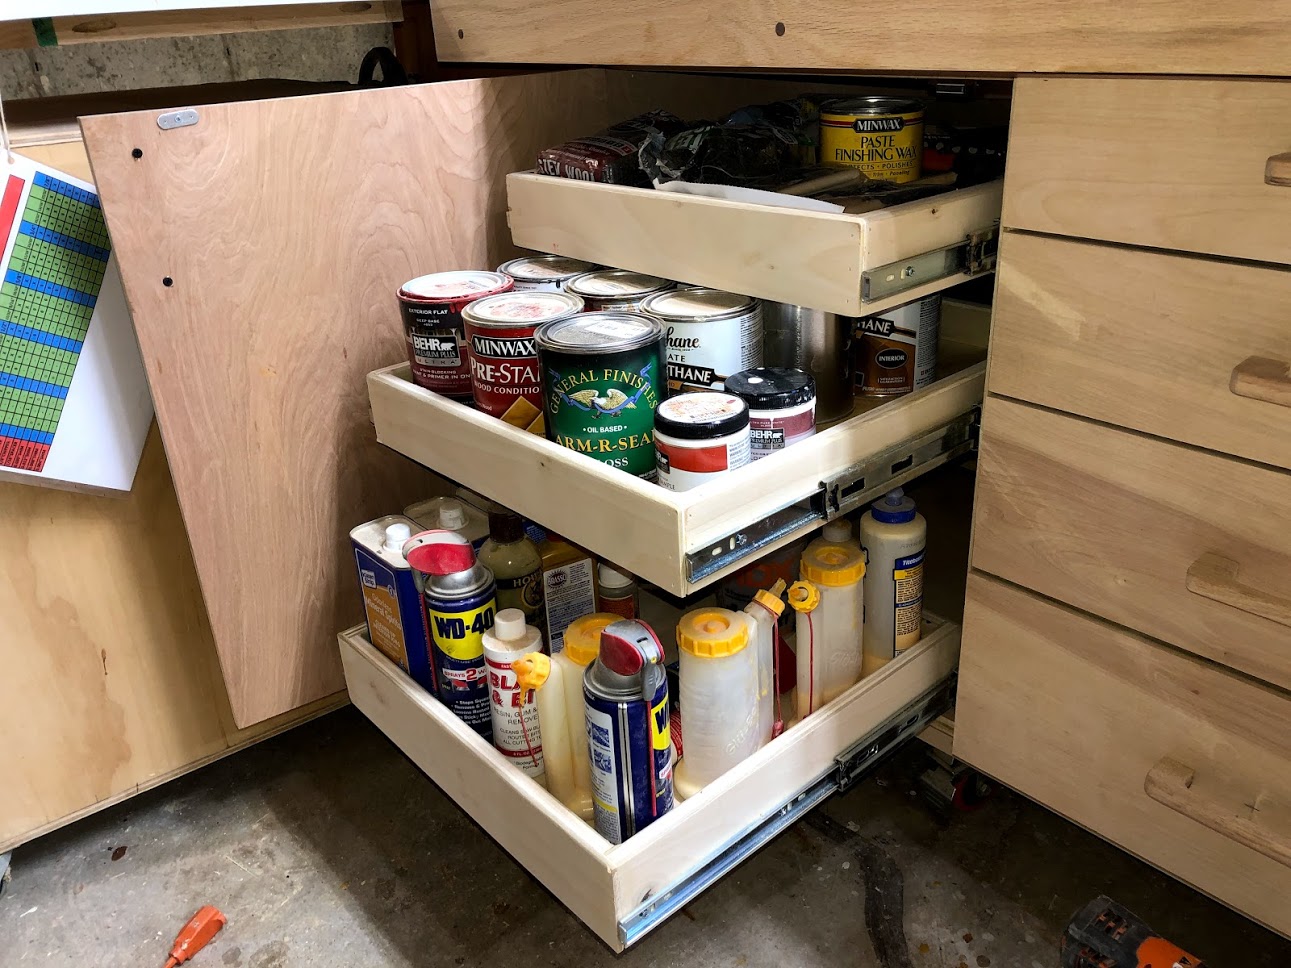
Here is the new home for all my wood finishes, more convenient and enables me to modify some of the shop furniture that I currently have, which frees up more space on the floor.
SOME DIS-ASSEMBLY
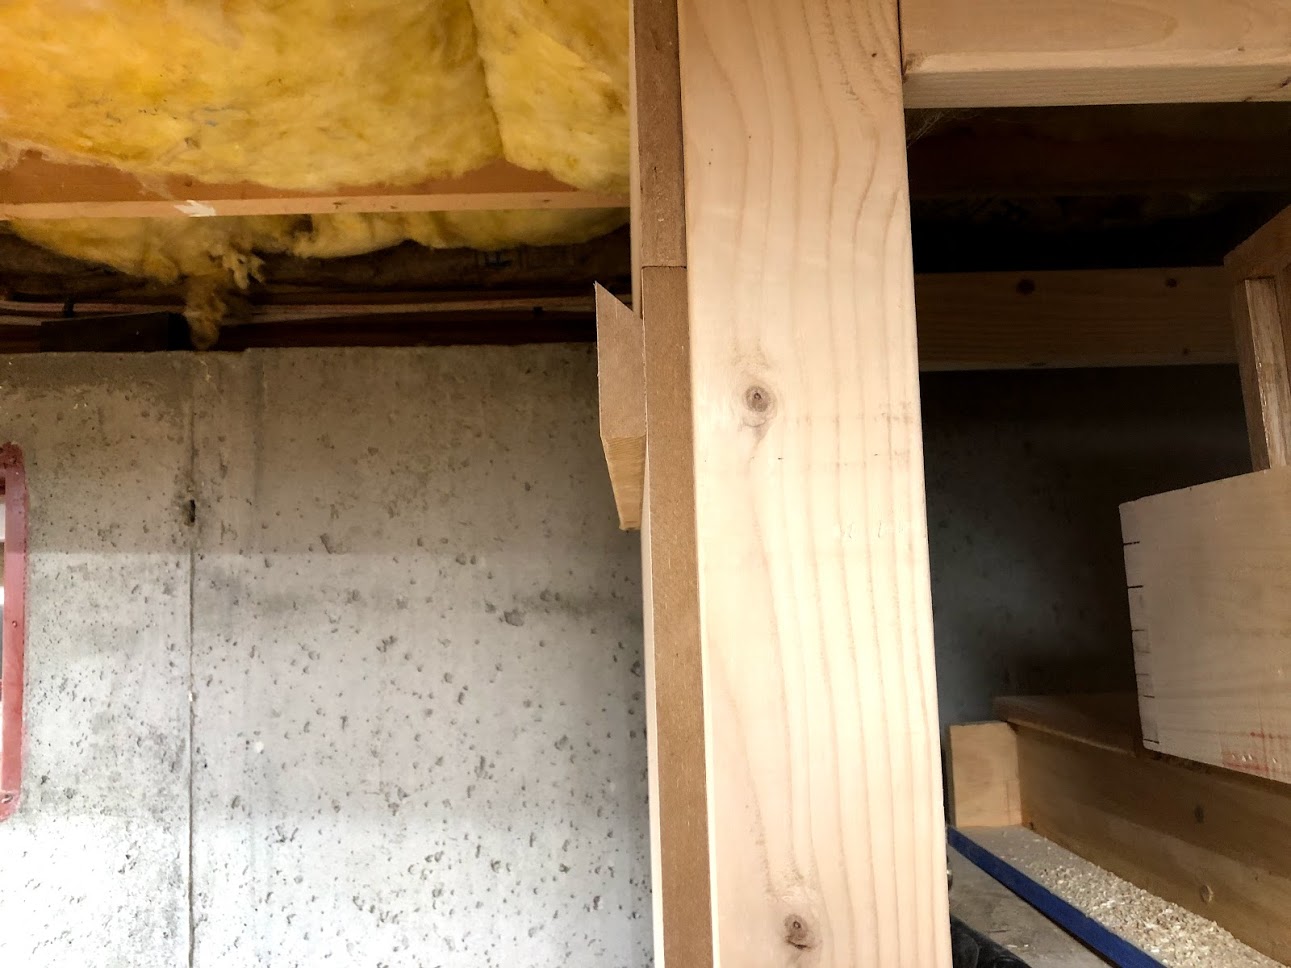
I decided to put a French cleat panel on the side of the shelving unit that still remains, so I used a couple of offcut OAK MDF panels that I was given from my old boss. The space that I created isn’t all that big but its better than nothing, its about 24” wide x 86” tall. I installed the panels with screws to one of the sides of the shelving unit . If you would like more information on that project click here
PAPER HOLDER UNIT STEPS
This project didn’t take long or take much in the line of materials to complete, I basically made the entire project out of scraps that I had lying around.
MODEL CONCEPT IN SKETCHUP
MATERIALS NEEDED
CUT-LIST
CUT PARTS TO SIZE
EDGE-BANDING
THE SIDES
JOINERY
WOODEN PLUGS
SHELF FRONT’S
FINISHED UNIT
SKECHUP MODEL
I usually design the project in my 3D software program called Sketchup, mainly to determine parts sizes and joinery methods and this project wasn’t any different. Below you can see my model.
The Unit has the following parts:
(2) Sides
(1) Back
(2) Shelves with solid wood shelf front
(1) 3/4” length of wooden dowel for hanging the paper roll.
Sketchup Model

Exploded View of the parts I used in the build
MATERIALS
Since I had a few panels of oak MDF (Medium Density Fiberboard) I decided to use that, I usually don’t like using MDF because its not a very strong material and its as bad or worse than plywood with the exposed edges. That is why I also decided to use solid oak edge banding on all exposed edges of the pieces of MDF.
Here are the parts and corresponding material type
Sides (MDF) + Solid Oak Edge-banding
Back (MDF)
Shelves (MDF) + Solid Oak Edge-banding
Shelf fronts (Solid Cherry)
CUT-LIST
Below is the project cut-list and if you want to be able to print this I will include them in the project plans at the end of this project blog.

Here is the cut-list for the project I will included these in the project plans.
CUT PARTS TO SIZE ON TABLESAW
My first step in this project was to cut all the parts to final size on the table-saw and this was pretty uneventful other than making sure I followed my cut-list dimensions precisely.

Here is a picture of all the labeled parts
EDGE-BANDING
As I stated previously I used solid oak edge banding to cover the horrible MDF edges, and since I was using Oak veneered MDF I used solid oak edge banding.
There are many ways to edge-band I chose to use my biscuit jointer and glue to adhere the oak wood to the edges of both the sides and the shelves as these would be visible unless I didn't. I didn’t need to edge the back as both sides of the back would be sitting in rabbets in the sides.
Edge banding provides a few benefits especially when dealing with MDF, it provides more rigidity to the edges and it also makes a panel look like solid wood even though it is not.
After the I left the edge banding glue up over night I returned with my router and flush trim bit to make everything flush.

Here is one of the shelves receiving the edge banding, you can see the biscuits have been inserted before I glued the edge banding in place.

Here is another view of the biscuits inserted into the shelf component.
THE SIDES
The part of this project with the most to do was definitely the sides of the unit because:
I needed to add the solid oak edge banding
I also needed to cut all the joinery for the unit into the sides, which included rabbets on both back edges of the sides. I also needed to position 2 dadoes per side to attach the shelves to.
I also needed to pre drill the sides with countersunk holes that I would later add walnut dowels to cover up the screws.
Finally I needed to cut 1 hole per side that fit the 3/4” diameter dowel that would later hold the paper towel.
Edge Banding the Sides

Here is the side receiving its solid oak edge banding and getting clamped up.
Cutting the holes into the sides

Using my drill press with a 1” forstner bit I stuck both side panels together and cut both holes at the same time.

Here is the side after the hole is cut, this will receive the 3/4” diameter dowel later and hold the paper towel in place.

Finally using my palm router and round over router bit I eased the edges of the hole.
JOINERY TIME

Here are the 2 sides with the rabbets cut into them, this is where I will attach the back later with glue and screws.

Next up on the joinery list was to cut the dadoes on the inside faces of the sides, these will secure the shelves in place.

As you can see the dadoes match perfectly, this is critical to have flat shelving and assures that they will fit into the sides.

Here is what he side panels should look like after adding the rabbet and dadoes and cutting the 1” diameter hole.
COUNTER-SINKING TIME
I figured it would be better to pre-drill the sides now before I assemble and make it easier to install the screws at the end of the project, so I used my drill and counter-sinking bit to make the hoes needed to attach the 1-1/4” screws that will secure the shelves and the back in place while the glue cures.
I also added some walnut dowels to cover up the screw holes, I had some walnut dowel leftover from the assembly table project.

Here are the counter sunk holes before I cover them with the walnut dowels

Walnut dowels glued in place

Here is one of the sides after I flush trimmed the protruding walnut dowels with my flush cutting saw. I really like the look of the contrasting walnut on the oak.
SHELF FRONTS
I wanted to use solid wood fronts on the shelves for a couple of reasons, I wanted to introduce a different wood to provide the unit with some contrast, so I used some scrap cherry that had been lying around, I also wanted to add some design elements into the unit so I added some curves using my scroll saw and sanded it on my spindle and belt sander. I think they came out ok but they really came to life after adding the polyurethane wood finish.

Sketchup Plan Image

My band saw would of been a better choice to cut out the curve but needs a new blade, so I used my scroll saw to rough out the curve.

I also used my oscillating spindle & belt sander to sand all the curves and remove the mill marks
ASSEMBLY TIME
I almost always do a dry assembly on a project before I glue it up for a couple of reasons
Make sure all the joinery was cut correctly
Rehearse the order of clamps that need to be used.
See How it looks

Looking good
FRENCH CLEAT
I decided to use a French cleat to hang this unit, basically a French cleat is super easy to make . Its basically 2 opposing 45° with one attached to the unit and the other screwed to the wall.

Here is the cleat attached to the wall, its held in place with screws. I made the cleat wider than the unit so as that I could possible place something else besides it.
Here is a side profile of the cleat attached to the wall.

Here is he French cleat closed off, with the mating cleat on back of the unit and closes the cleat off so it doesn’t move. I also placed a 3/4” thick piece of plywood on the bottom of the unit to negate the need for the unit to lean forward and be plum on the wall.
ALL FINISHED
All that was needed was to apply a couple coats of polyurethane to the unit to protect it and stock it full of stuff.
I decided to place all my glue bottles and accessories on the top shelf and my disposable gloves on the bottom shelf, so everything I need for a glue up (except clamps) is in one place.
Below are a few pictures of the finished unit.
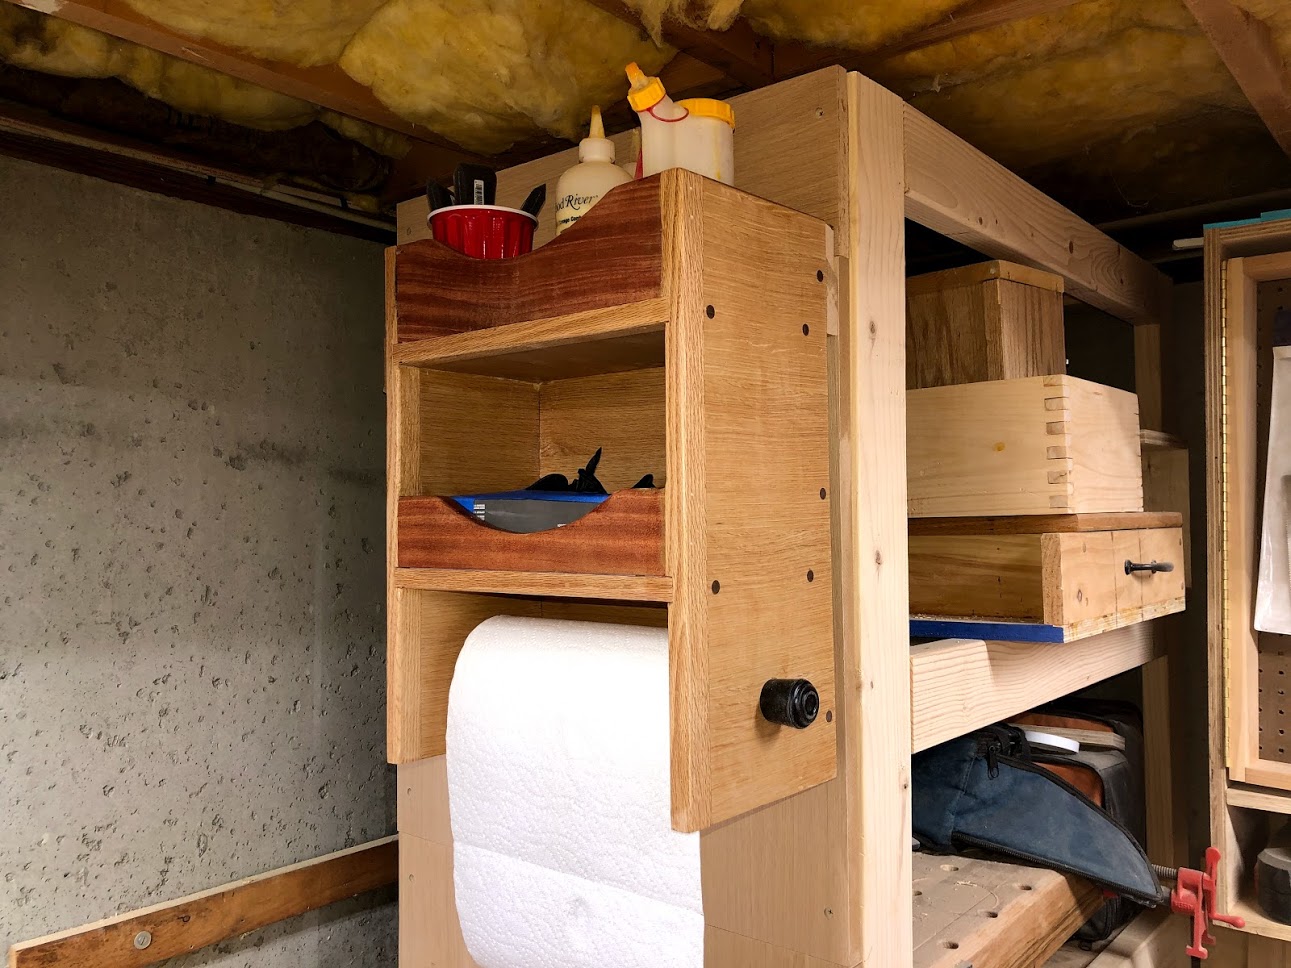
All finished with 3 coats of poly, super handy and doesn’t look half bad either.

A front view of the unit.
Thanks for reading my blog post and I hope that you complete this project, it is a great project that doesn’t need to be a shop project you could place it in your kitchen or wherever you need it, you could also make it out of solid wood and alter the size . The only limits to this project is your imagination.