


I recently just cleaned out part of my basement like all of us do when Spring hits removing patio furniture and cleaning up from the past winter. When I looked at our washer/dryer set up we really didn’t have a proper storage solution where we keep everything we need to do our laundry. I decided to tackle this problem and improve this area of the basement. Below you can see my current set-up.
I also wanted to finally use up all the scrap wood that I had been given over the winter period and this was the perfect project to do so. I will be using 2 different MDF boards for this project but I will get to this later on.
Here Is How I tackled the Project
Design & Inspiration
Materials
Cutting the Parts to size
Solid Wood Edge Banding
Joinery
Some wood shaping
The Shelf Fronts
Design Change : Paint
Assembly
Finished Storage Unit
DESIGN & INSPIRATION
Inspiration for this project was derived from the little stool that we are currently using, the inspiration I got from it was the foot print that is currently occupied so I made my shelving unit around the same foot print. The design was worked on in Sketchup and that is where I did most of the components sizes as well working on some visual aspects of the project.
For example I did the following:
Added solid wood edge banding to the case sides
I also added a rounded arc profile on the top of the sides using solid wood
The shelf fronts are recessed into the sides so as that the shelves are all flush to the front of the unit.
Below you can see the 3D Image of the Sketchup model I put together for the storage unit, to be honest I might have gone overboard on its design and quite frankly looks too nice for a dingy basement but it affords me a project to practice on and o things that I don’t normally do and if it looks horrible I will be the only one that sees it if it doesn’t look great.

MATERIALS
As I stated I am using veneer covered MDF (Medium Density Fiberboard) simply because I have it on hand and I wanted to use it for something instead of throwing it away. If I needed to buy materials to make this I would probably get plywood or solid wood, but since I have the MDF that is what I will be making most of the case parts out of. However I will also be using solid wood on the edge banding so as to cover the ugly MDF core that will be visible on all the case edges. Some edges will not be seen because they will be covered as part of the joinery of the case will conceal them. But I will be using maple and cherry anywhere I need to cover the edges.
If you want make this yourself and am wondering how much wood to buy I would recommend getting a full 4’x8’ sheet of plywood you will have leftovers. I will be selling the plans for this soon and you can get them n my shop. Don’t worry I will post when they are available but first I need to build it.
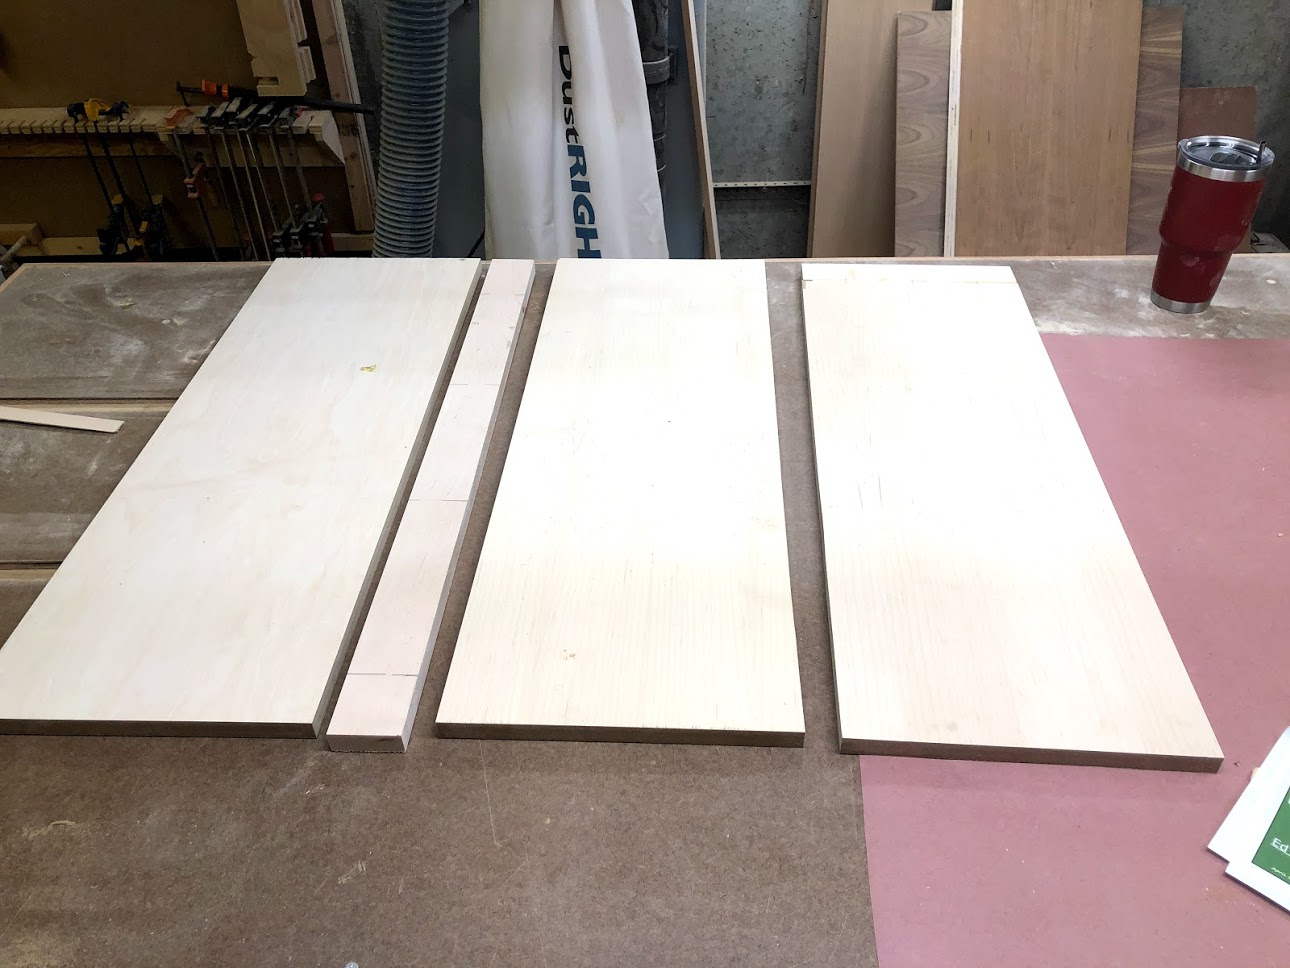
CUTTING PARTS TO SIZE
As most of my project start I needed to break down the sheet goods into the individual pieces that make up the unit, so as usual I went to my table saw and ripping and crosscutting these pieces to the final size. Below you can see images of the workpieces.


SOLID WOOD EDGE-BANDING
As I mentioned I used solid wood edge-banding to cover the ugly MDF edges on pieces that will be visible. Although this is not hard to do it is a little time consuming here are the steps that I took in applying the edge banding to the case sides.
I took an oversized blank and since I decided to use biscuits to attach these edges to the MDF panels I needed to mark a line where the slots needed to be applied using my biscuit jointer.
Once I used my biscuit jointer to cut the slots I took the blank over to my table-saw and ripped them along each edge of where the slots were located. I use this method because its safer to cut the biscuit slots into a wider workpiece than a narrow one.
Added glue to both the MDF side and the edge banding and clamped them all together.
Used my router with a flush trim bit to even up the edges of the solid wood it was a little oversized but once you use the router its like it was always a solid panel.

Here you can see the outside solid wood blank and the MDF panel behind it. You can vaguely make out the pencil lines marking where the biscuits are to be placed.

Next I took my oversized solid wood and ripped it into 2 pieces

Here is my craftsman biscuit jointer I use this machine almost exclusively when edge banding.
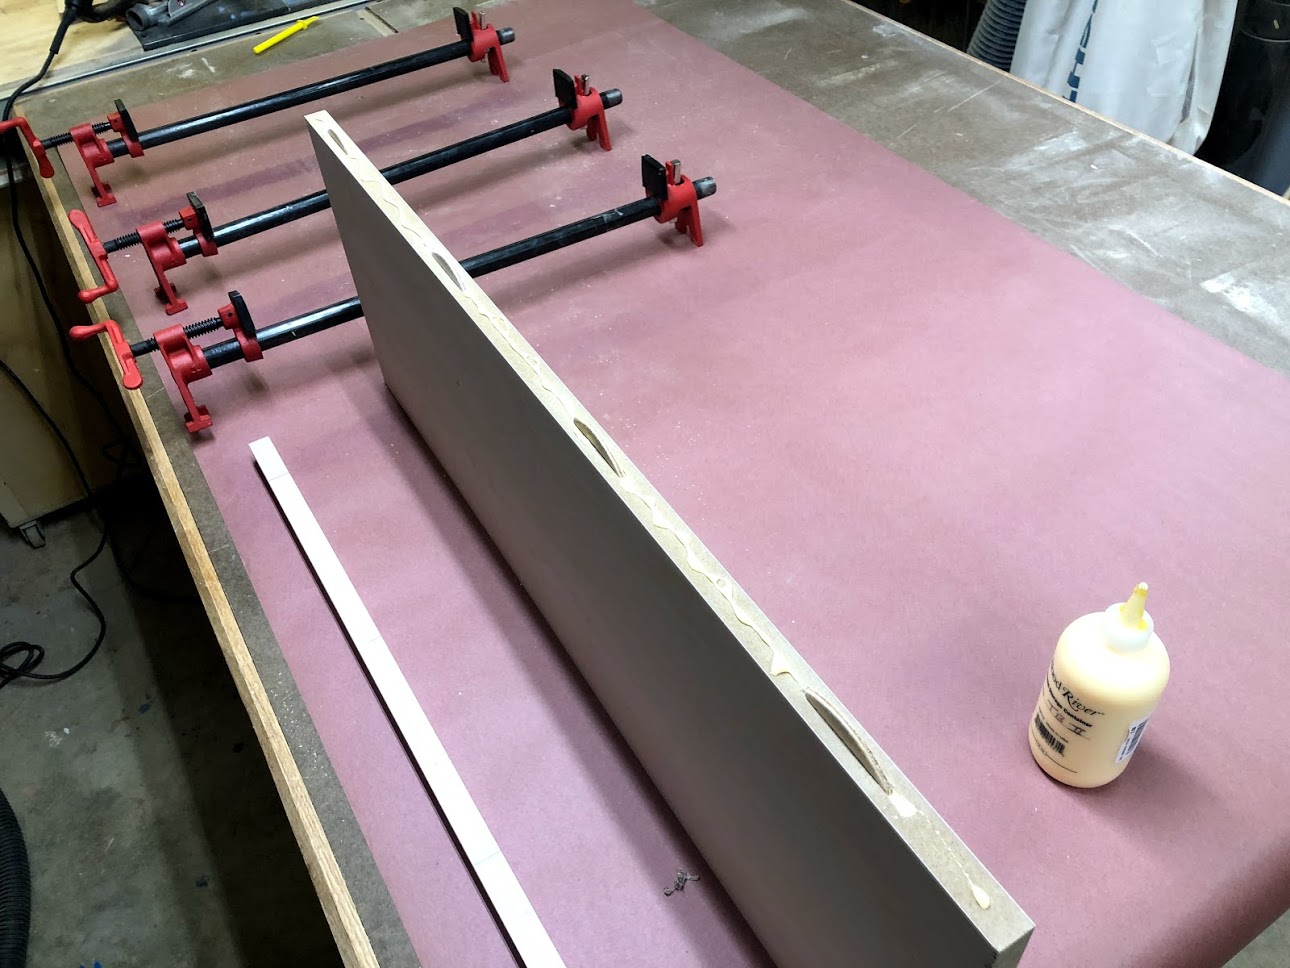
Here you can see the MDF panel all glued up with biscuits inserted, all I need to do now is attach the solid wood and clamp them together.

Here is the glued up side panel with the solid wood on its front it makes a huge difference.
Router Time
After the edge banding had dried it was time to make the edges flush to the panel so I used my router to do this.

Getting ready to flush trim the side panels, here you can see my router with the flush trim router bit installed.

A close look at the router bit.
JOINERY TIME
I decided to use Rabbet and Dado joints to assembly the case work so after consulting my plans on where to locate the dadoes I installed the dado stack that matched the shelves wood thickness and went about placing matching dadoes in each of the sides as that was the only workpieces in this project that were to receive the cut outs.
Also there was a very good reason for installing the solid wood edge banding before I tackled the joinery part of the project and that is simply because it is much easier to cut one solid panel with the dado stack instead of cutting individual pieces and hope the line up later.
The sides were to receive the following:
2 dadoes
2 rabbets

Here you can see my tablesaw accessories cart which contains all my saw blades and dado stack parts, if you would like to see more on that project click here.

Here are the two sides of the unit with rabbets placed on the back edges.

Here is a close up of what a rabbet looks like on the side panels

Here are the 2 sides with the joinery completed. The center piece is the back of the unit.
SHAPING THE SIDES & SHELF FRONTS
I wanted to add some visual interest aspects to the case and I decided to achieve this by doing these two things:
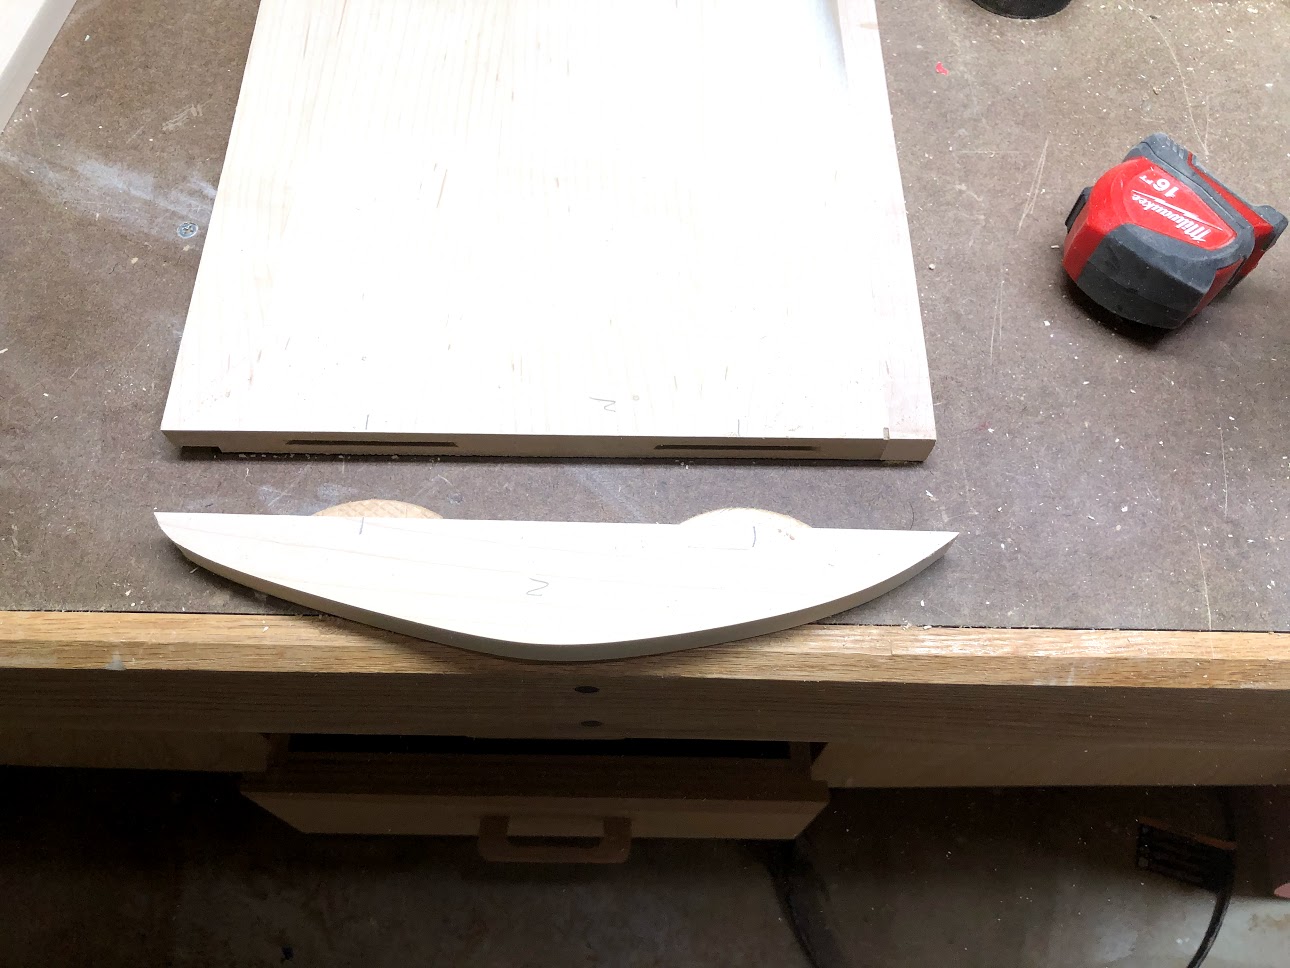
Adding a curved solid wood feature to each side. To achieve this I needed the a solid piece of maple and turning it into a curve design. To attach this piece to the side I again turned to my biscuit jointer and attached it using biscuits and glue. To cut the shape I roughly drew and outline pleasing to the eye, cut this design out on my band saw and then did little more shaping using my oscillating belt sander.
As far as the shelf front go I decided to add two different router profiles to the front an back edges of the top of the piece. I will also be removing a section f the shelf front so as that I can just glue it in front of the shelf and that way the shelf front will be flush with the rest of the case sides.

Here are the two curved side pieces that I will be gluing to the case sides.
Here you can see the biscuits have been inserted into the curved section and is now ready to be glued in place.

Here is the panel after gluing the profiled edge to the top, I still need to clean this up a little.
SHELF FRONT’S
The shelf fronts are made from solid cherry and I will be fixing them to the front of the shelves to cover the MDF edges that are visible. There is quite a bit of work to do on this part such as:
Apply a chamfer router profile to the top front edge of the shelf front
Apply a round-over router profile to the top back edge of the shelf font
Cut a notch on both the upper right / left so as to be able to flush mount he shelf fronts to the case sides.

Here is the shelf front blank before doing any shaping to it.

Here you can see the chamfer on the front edge and the round over on the back edge.

After installing a 1/4” wide dado stack in the table saw I removed the notch, you can also see the routered profiles easier in this image.

Here is front view of the shelf front and the notch cut out, the bottom half of the notch will fit into the dado in the case side thus hiding the MDF edge.
DESIGN CHANGE
I altered my original design where I would just show the veneered covered MDF but when I saw the colors go together I decided that it didn’t look great, it just looked way too busy with too many contrasting colors that clashed against each other.
So I decided to paint the case sides now before the assembly stage happened as I thought it would be easier and so I didn’t accidentally paint a section that didn’t need it after it was all assembled.
I also changed the wood I chose for the shelf fronts I used some red oak since that is what I used for the feet.

Here are the case sides painted white, I painted both sides of the case sides, I will post more pictures when its completed
ASSEMBLY TIME
So now that all parts of the shelving unit were complete it was time for the assembly of the case. Although my primary joinery method for the case was dadoes and rabbet’s I also used some screws that were inserted through the case sides and for that I pre-drilled some holes for the screws that I will fill with wooden plugs to cover the holes what I have not determined is whether to use wooden plugs and leave the plugs visable or paint over them to blend in with the white case sides.
Here is what I did today:
Attached the Shelf Fronts
Added Wooden Plugs
The Glue-Up
Clamping
ATTACHED THE SHELF FRONT’S
To attach the fronts to the shelves I simply used pocket hole joinery and glue to achieve this, I cut to pocket holes per shelf added glue and it was done.

Here you can see the pocket holes that I cut to attach the shelf fronts.

Here you can see the shelf with the front attached.

Here are all 3 shelves with the pocket holes and the oak shelf fronts attached.
ADDED WOODEN PLUGS
I decided to use screws to strengthen the case joinery but I didn’t really want visible screws so I pre-drilled the case sides and used wooden plugs to cover the screw holes. Below you can see a picture with the wooden plugs glued in. To finish this off I will add my final coat of paint to the case sides to hide the plugs.

Wooden plugs glued in, but unfortunately very visible, most of the time I like these plugs visible but they just clash too much with the white sides. Another coat of paint needed to cover these plugs.
THE GLUE UP
The glue up was very simple I decided to glue and screw 1 side at a time and then once one side was completed I turned the case to the other side and glue and screwed that together. Unfortunately I don’t have too many pictures of this except the one below.

With the right side glue and screwed together I am working on the other side in this picture, be careful not to add too much glue.
ADDING CLAMPS
After the entire case has been assembled I added a couple of clamps to keep it square and all that was left was to attach the feet that I made. You can see pictures below of this.

Clamps attached to keep everything square.

Here are the 4 feet that I made using solid red oak, the measure 2-1/2'‘ x 1- 7/8” they came out awesome.
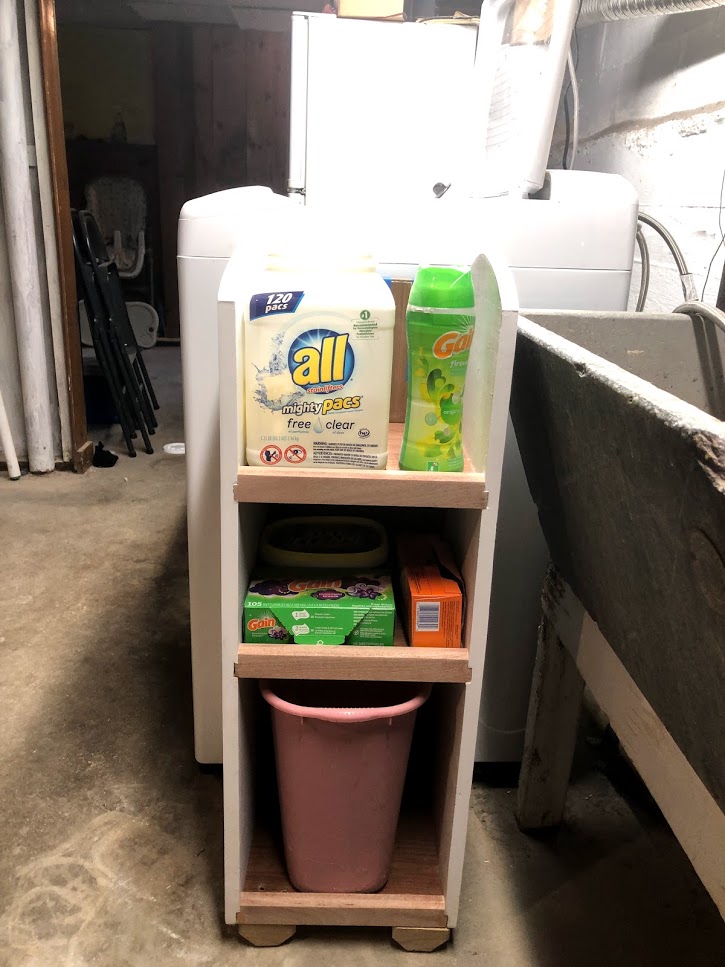
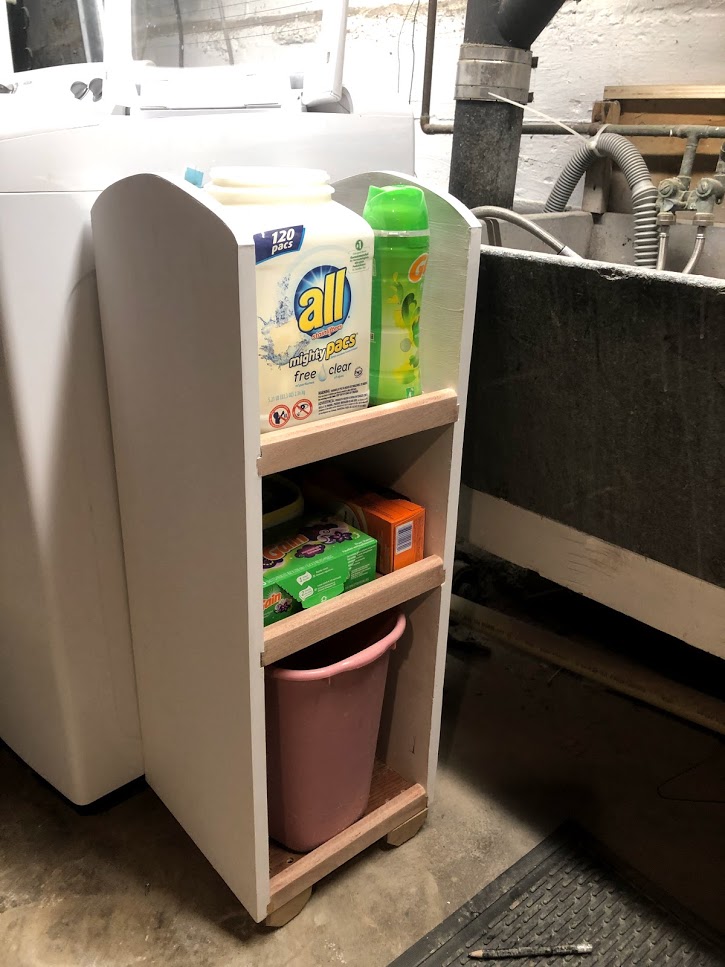
FINISHED SHELVING UNIT
The only thing that was left to do was to give he unit 1 more coat of paint and well I didn’t take any pictures of that as it didn’t offer much in the line of valuable content. I really like how the unit turned out, but to be honest MDF is not my favorite material and if I could do it again I would definitely use cabinet grade plywood and then stain it. There is just something about MDF that I just don’t like, it cannot take a screw very well and well to be honest it hates glue, it just absorbs it all day long ad nothing sticks that is why I needed to incorporate metal fixings to the case sides. One more thing I know that plywood has a very thin wood veneer on the face well this MDF had even less and I could not sand the unit because it would remove the paper thin veneer that was on the panel.
But all in all it was only for a basement utility unit and looks really didn’t matter that much and it fulfilled a need near my washer/dryer.
Below you can see the final unit.


If you would like to make this unit, I have prepared a complete set of plans for sale in my shop. Check the link below