

PHASE 2

The second phase of the scrap wood storage cart dals with the central storage option. This is basically a bunch of cubbies that I plan on standing lumber in vertically.
The storage unit basically has 2 sides and 4 cubbies . The sides of the cubbies is angled from the back to the front.
Here is the order in which I made the cubby
Breakdown plywood panel
Cutting the Dado’s in the side panels
Pocket Holes
The Dividers
Assembly
Finish Phase 2
BREAKING DOWN THE PLYWOOD PANELS
SETTING UP
I needed to set-up a working area as the plywood panels were kind of big. I purchased some foam insulation board as a sacrificial surface to lay my workpiece on, that way I cut through the plywood and not damage anything when using my circular saw. Here you can see the sawhorse with a plywood on top then I laid my pink insulation board on top of that.

BREAKING DOWN THE PANEL
In this image you can see the plywood panels with some layout lines and my straight edge on top of the plywood to guide the circular saw. As you can see the plywood panel will be angled (27” at its highest side & 12” at its lowest) all that was left to was to cut the plywood and it came out great.

PLYWOOD SIDES CUT TO SIZE
Here are the 2 sides of cubby unit and as you can see they are angled. I also took the opportunity in laying out the dado cuts which the dividers will sit in.

JOINERY
CUTTING THE DADO’S
In this image you can see the plywood side with my dado router jig on top and I used my plunge router installed a 3/4” router bit to remove the material. The depth of the dado is 1/4”. The idea of the dado jig is to align the router using guide rails screwed together and then clamped to my table to guide the router through the workpiece. There was a total of 3 dado’s and 1 rabbet at the front of the side (12” high end).


A close-up of the dado jig
COUNTER-SINK & POCKET HOLES
I decided to pre-drill all the holes for the unit now rather than after the unit was assembled. I positioned counter-sunk holes in the outside face of the side, this was done to help me position the screws which will secure the plywood dividers that make up the cubbies. To kelp me pre-drill I used a very small diameter drill bit and drilled through the inside groove then came back and flipped the side over to its outside face and used my counter-sinking bit to finish the hole off. The counter-sink bit helps bury the screw inside the plywood that way the screw isn’t that visible.
POCKET-HOLES
I also placed pocket holes on the inside face of the sides this was the method I chose to secure the unit onto the base of he cart. I drilled pocket holes on the bottom and back of the panel. This enabled me to also secure the unit the right side of the vertical storage unit I just made.


Pocket Holes Applied
THE DIVIDER PANELS
THE DIVIDER PANELS
The divider panels are what I used to separate once cubby from another. Since the sides of the unit are tapering from back to front, I needed to cut these panels on the table-saw in decreasing heights in order to match the profile of the sides of the unit. (All these dimensions are in the plans)

ASSEMBLY TIME
ASSEMBLY TIME
The process I used in the last glue up was the same in this glue-up. Here are the steps I took in completing the central storage unit.
I placed the right hand side panel on its back making sure the grooves were facing up. I applied the glue into the grooves.
Next I added the divider panels making sure hat they were placed in sequence according to their height so as to match the profiled slanting on the side panel.
Next I added glue to the tops of these dividers, then placed the left hand side panel with the dado grooves facing down, and screwed the panel in place. I needed to use clamps to keep the panel tight to the divider panels.
Finally I flipped the whole unit over onto the right hand side of the unit and then added the final screws completing the assembly. The screws were a great solution as I didn’t want clamps all over the unit and they worked great.


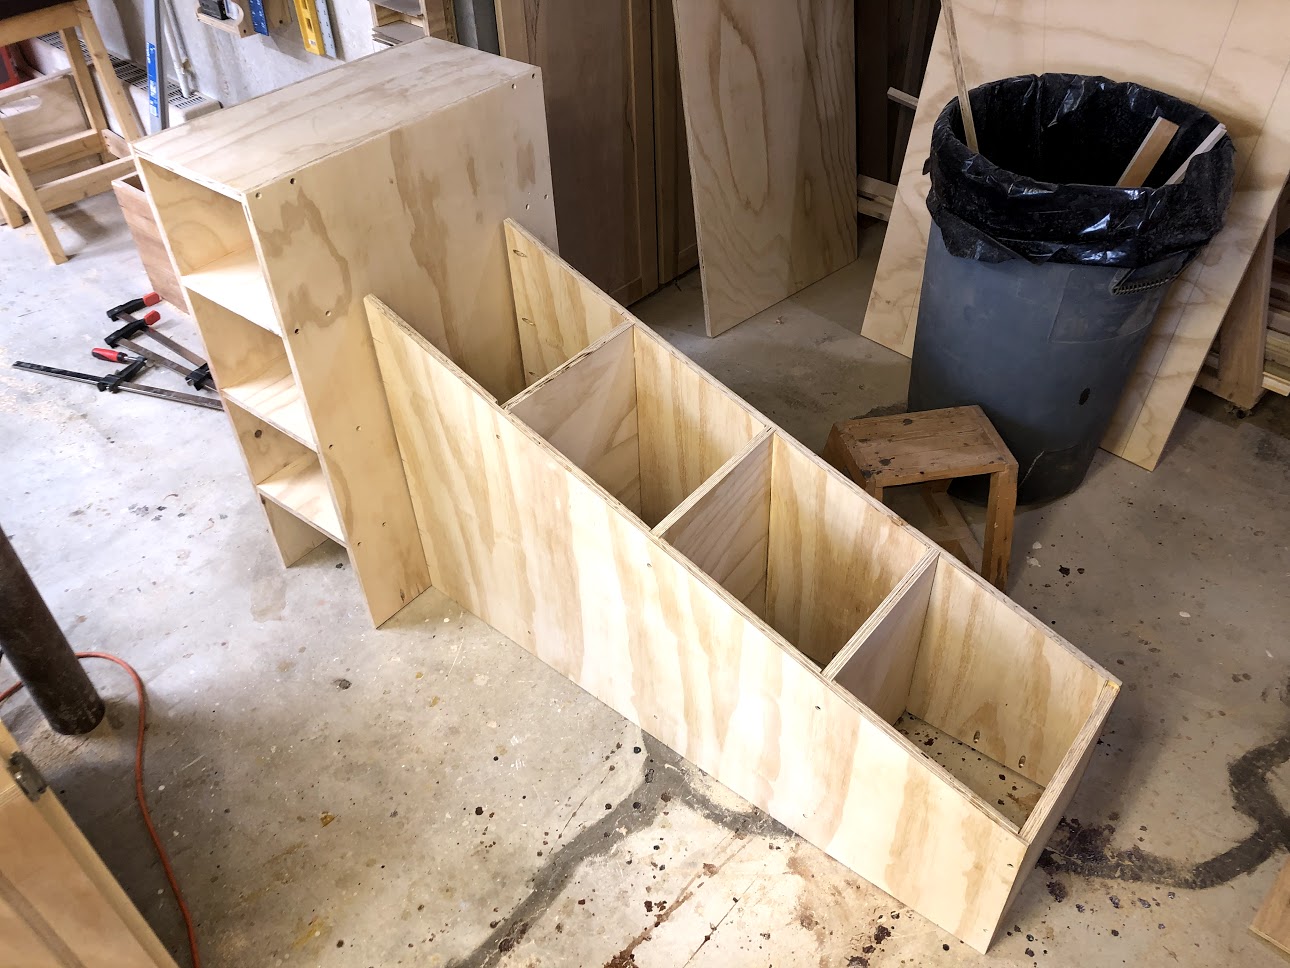
PHASE 2 COMPLETED

Here is the finished central storage unit. I love that it is tiered which allows functional storage for different lengths of lumber
Here I both unit as hey will appear in the final cart